Day 19: Ovals & Hot Flashes
Just like the title, while I was practicing the second hardest basic stroke, I had several hot flashes. I'm going through menopause right now.
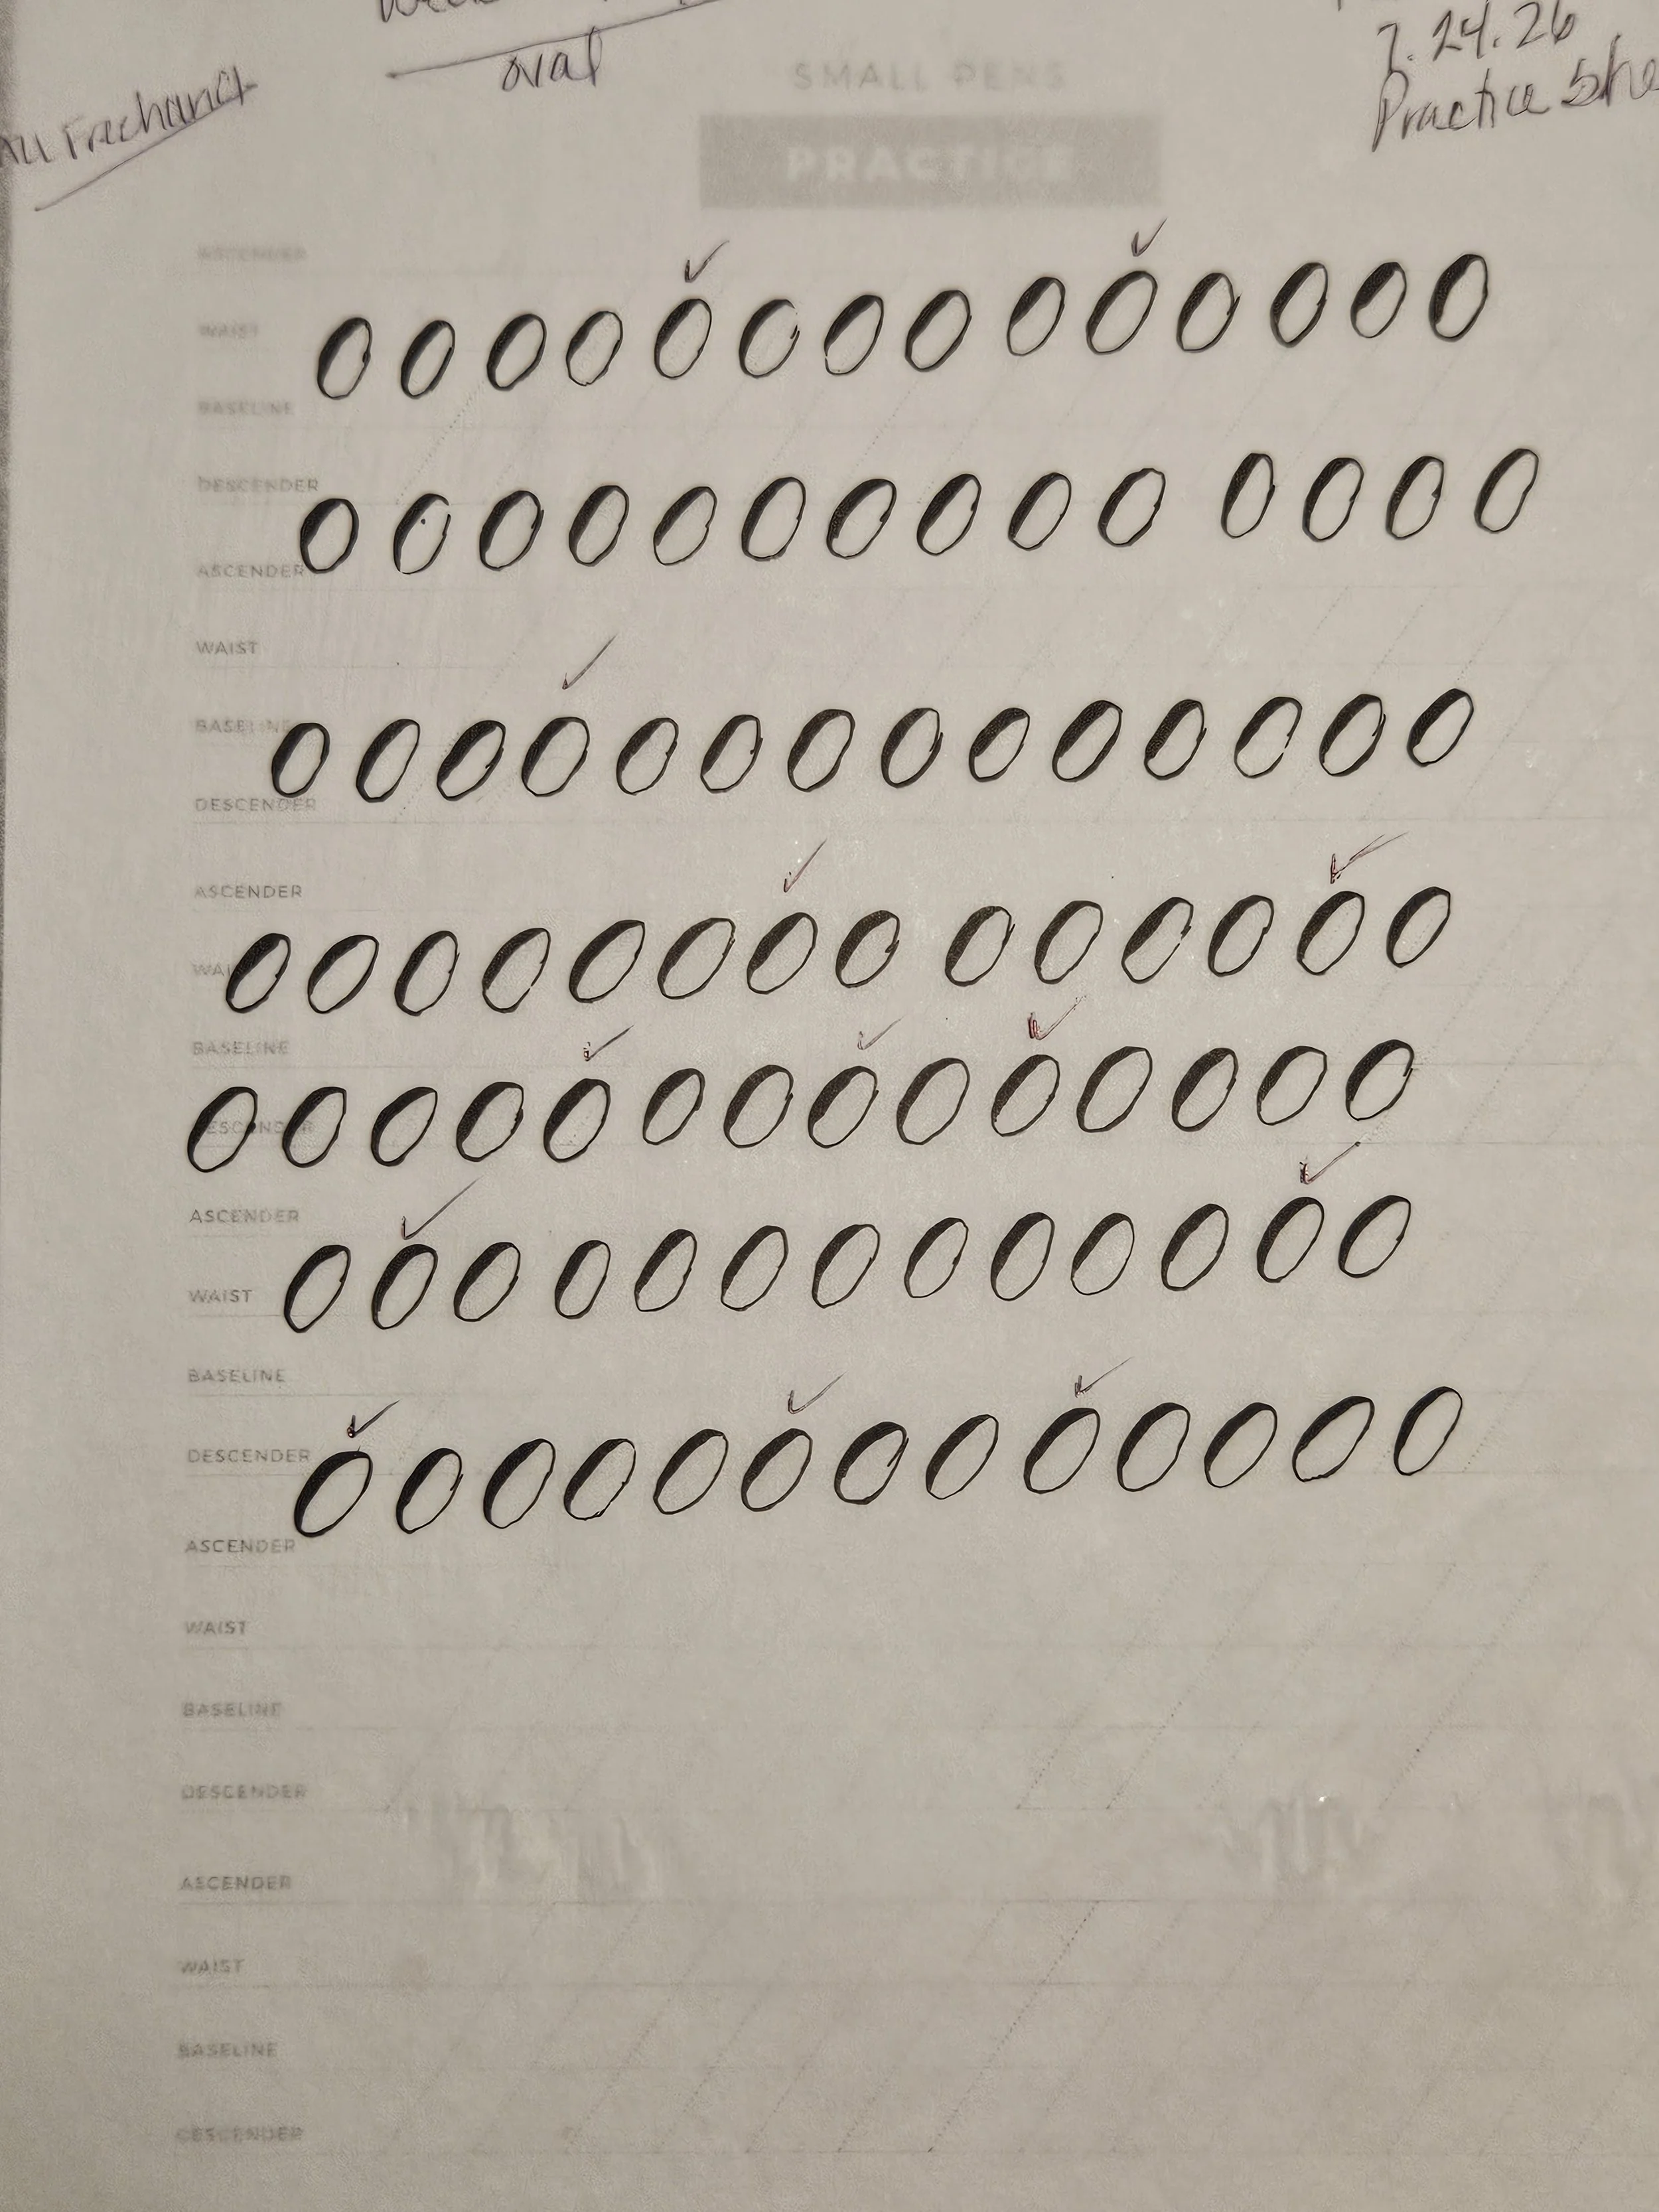
Just like the title, while I was practicing the second hardest basic stroke, I had several hot flashes. I'm going through menopause right now. My face was dripping from sweat. It just happens out of nowhere. You can't control when it happens, which is all the time. It feels like there's 10,000 sun cores inside me. I persevered and continued. A small portion of my paper I was unable to use due to sweat dripping off my forehead. I didn't want to stop mid stroke, so I kept going.
Whether you're learning calligraphy or any new hobby, challenges will always come up while learning/practicing. There is nothing more distracting than being hot with sweat dripping all over your body, but I kept going and made it through, and you can too. Some days, simply showing up is the victory. Pick up your pen, make a few strokes, and give yourself credit for keeping the promise you made to your future self. Consistency will always take you farther than waiting for motivation.
Day 18: When the Curves Start to Flow | Compound Curves
'm very happy with the progress I have made with if not or one of the most challenging basic strokes in calligraphy, the Compound Curve. This practice was 30% tracing and 70% freehand. I will admit by the end practice sheet my hand started getting tired and you can really see it.
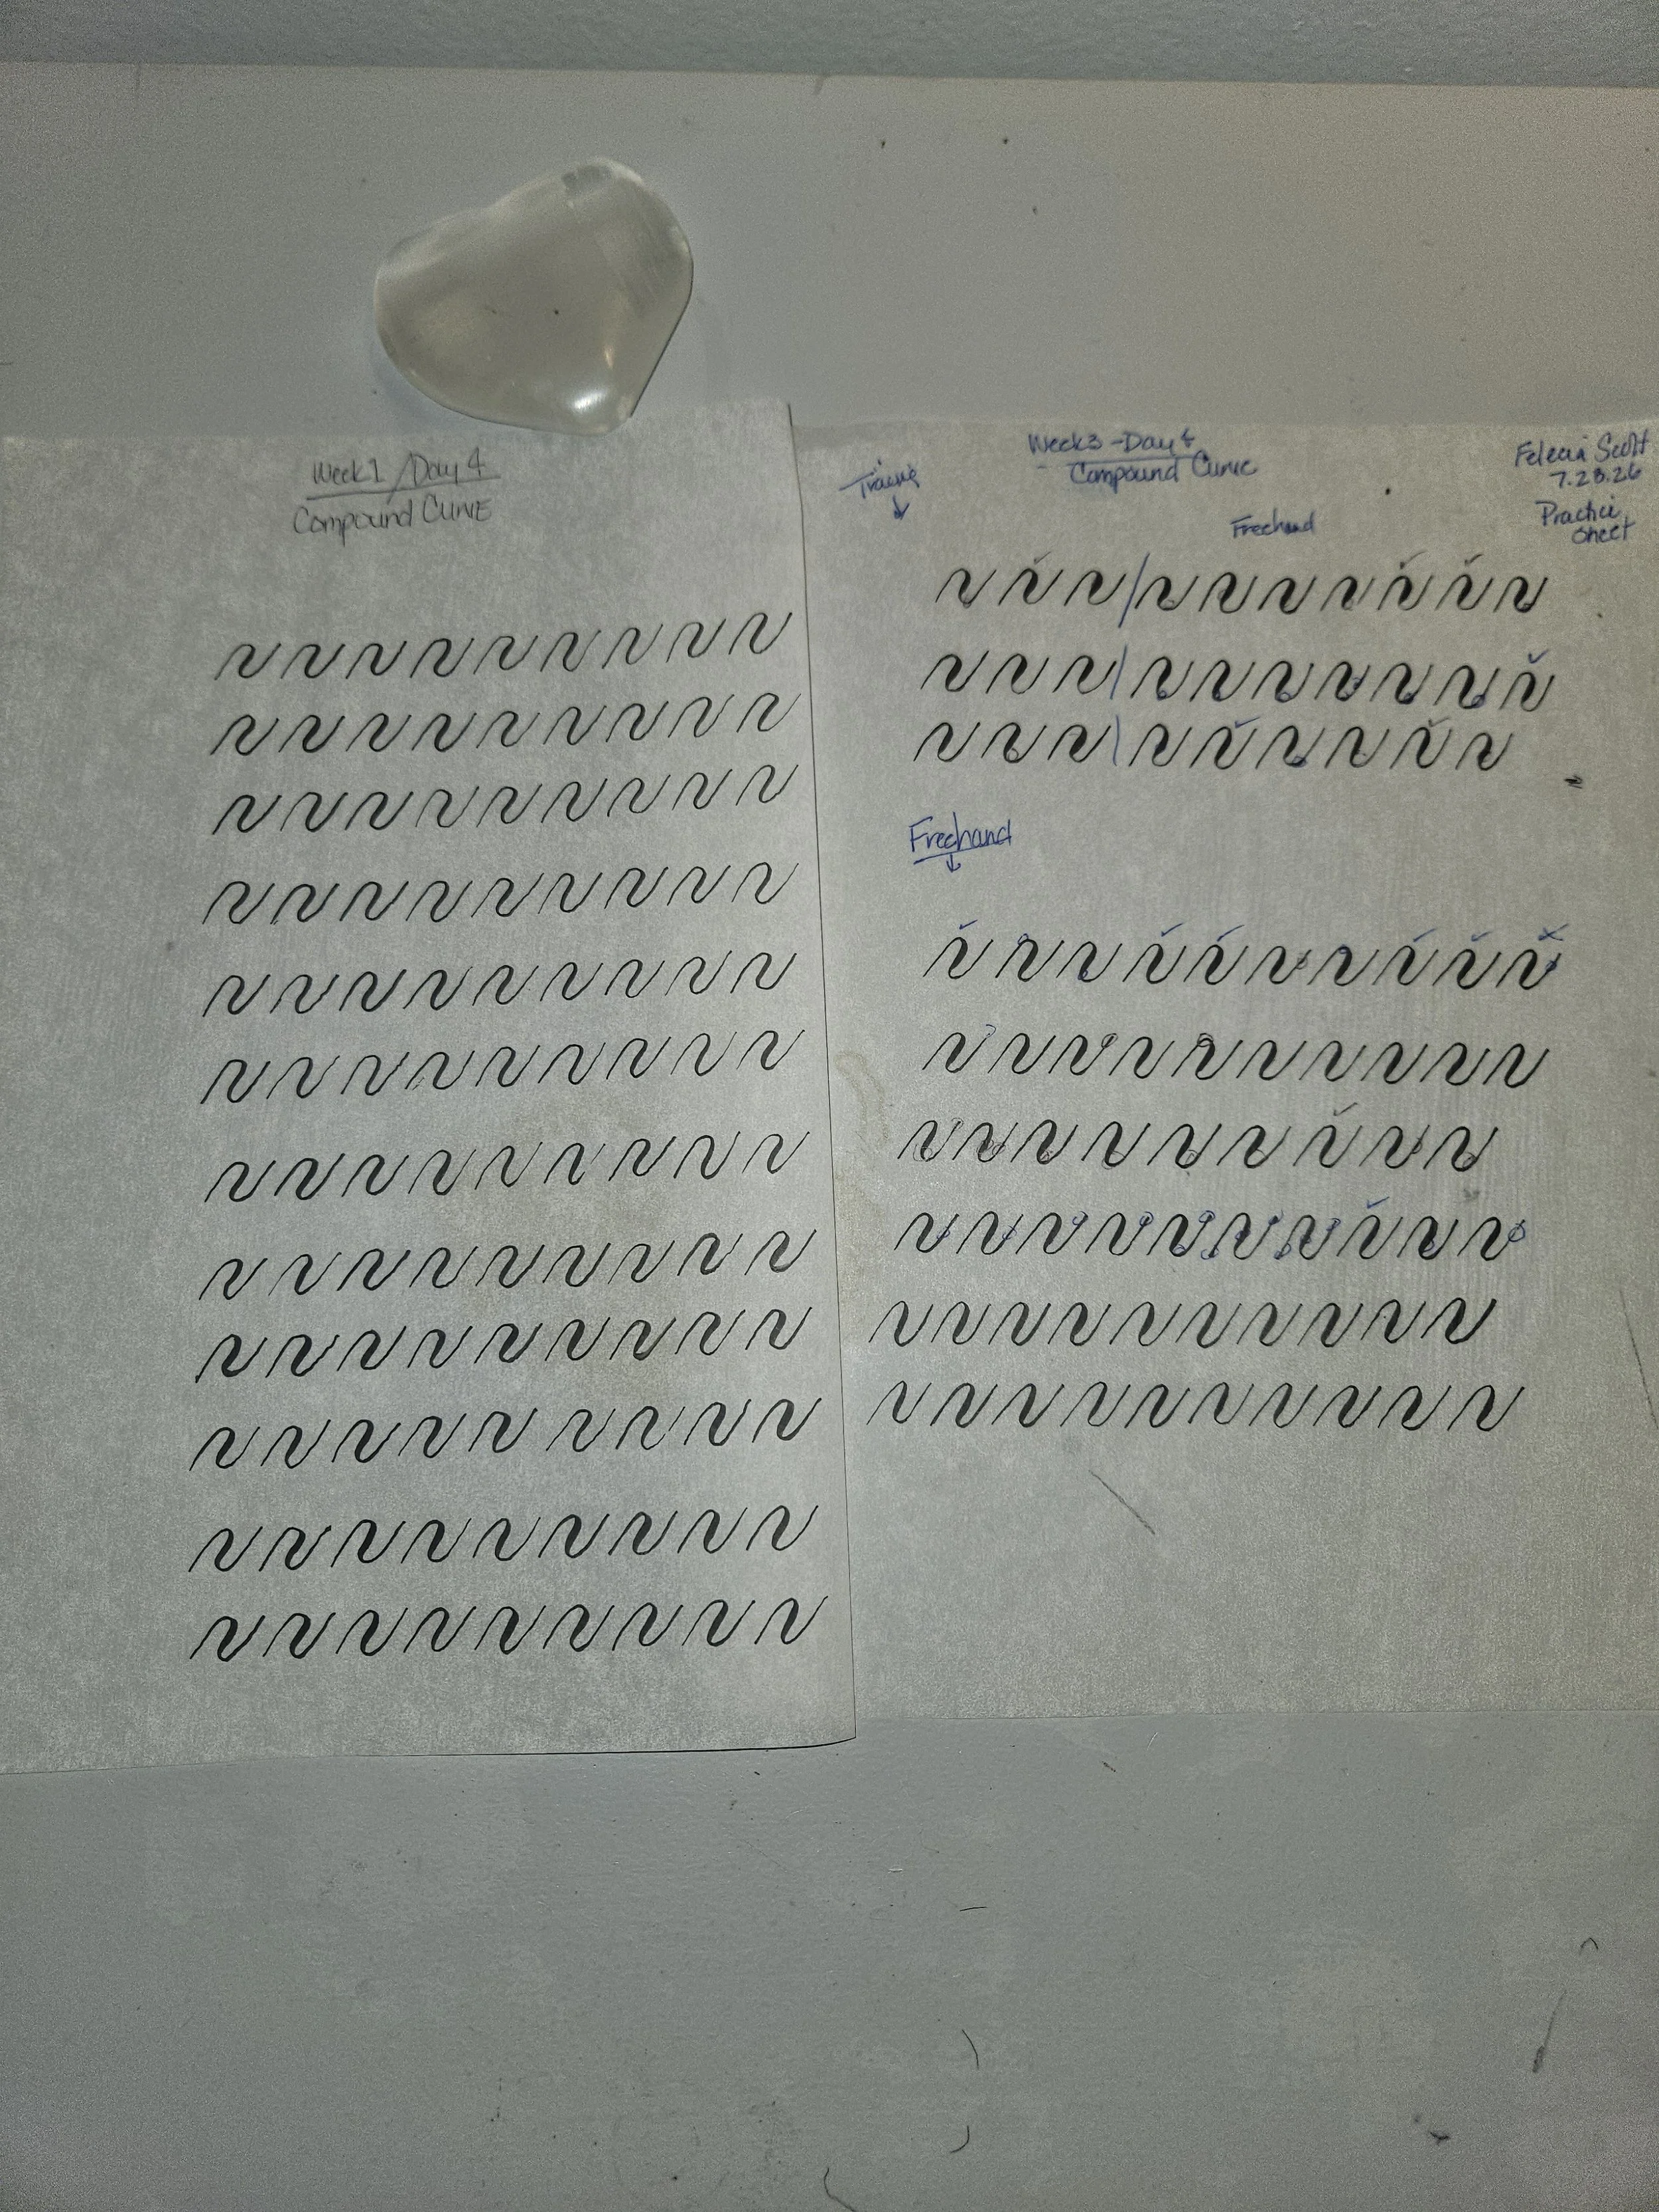
I’ve uploaded Week 1 Vs Week 3 practicing the Compound Curve
I'm very happy with the progress I have made with if not or one of the most challenging basic strokes in calligraphy, the Compound Curve. This practice was 30% tracing and 70% freehand. I will admit by the end practice sheet my hand started getting tired and you can really see it.
As I was writing this, I wanted to share what I've learned so far:
I think calligraphy is interesting because it's one of the few skills where progress is visible. If you keep your practice sheets, you can literally see your hand becoming steadier, your pressure control improving, and your letters becoming more consistent over time.
A few thoughts that stand out to me:
Calligraphy teaches patience. Unlike typing, you can't rush a graceful stroke. The pen tells you when you're moving too fast.
The basic strokes matter more than the alphabet. Many beginners want to jump straight to writing beautiful words, but mastering the fundamental strokes makes every letter easier later.
It's less about talent than repetition. Most people who create beautiful writing weren't born with it—they practiced thousands of deliberate strokes.
Mistakes are part of the process. Wobbly upstrokes, uneven ovals, and shaky transitions aren't signs of failure. They're evidence that you're learning a new motor skill.
It's surprisingly mindful. Focusing on pen angle, pressure, and movement can make a practice session feel calming because your attention stays on one simple task.
Everyone's writing develops its own personality. Even when two people learn the same script from the same instructor, subtle differences in rhythm and movement make their work unique.
Improvement often comes in jumps. Sometimes you feel stuck for several days, then one practice session suddenly clicks. Those plateaus are a normal part of learning.
Good calligraphy isn't perfect calligraphy. A few tiny imperfections often make hand-lettered work feel more human and expressive.
One thing I especially like about learning calligraphy is that it rewards consistency more than intensity. Fifteen to thirty minutes of focused practice every day. If your practice sheet looks like nothing you hoped for today, don't let that stop you from coming back tomorrow. Every confident calligrapher started with shaky strokes and uncertain hands. Keep showing up. One practice session at a time, you're building a skill that can't be rushed.
Day 17: Learning to Trust My Hand | Underturn Strokes
I do see progress being made. Last week doing the Underturn, I could barely hold the shape. This week, I can but there's still some challenges with this stroke.
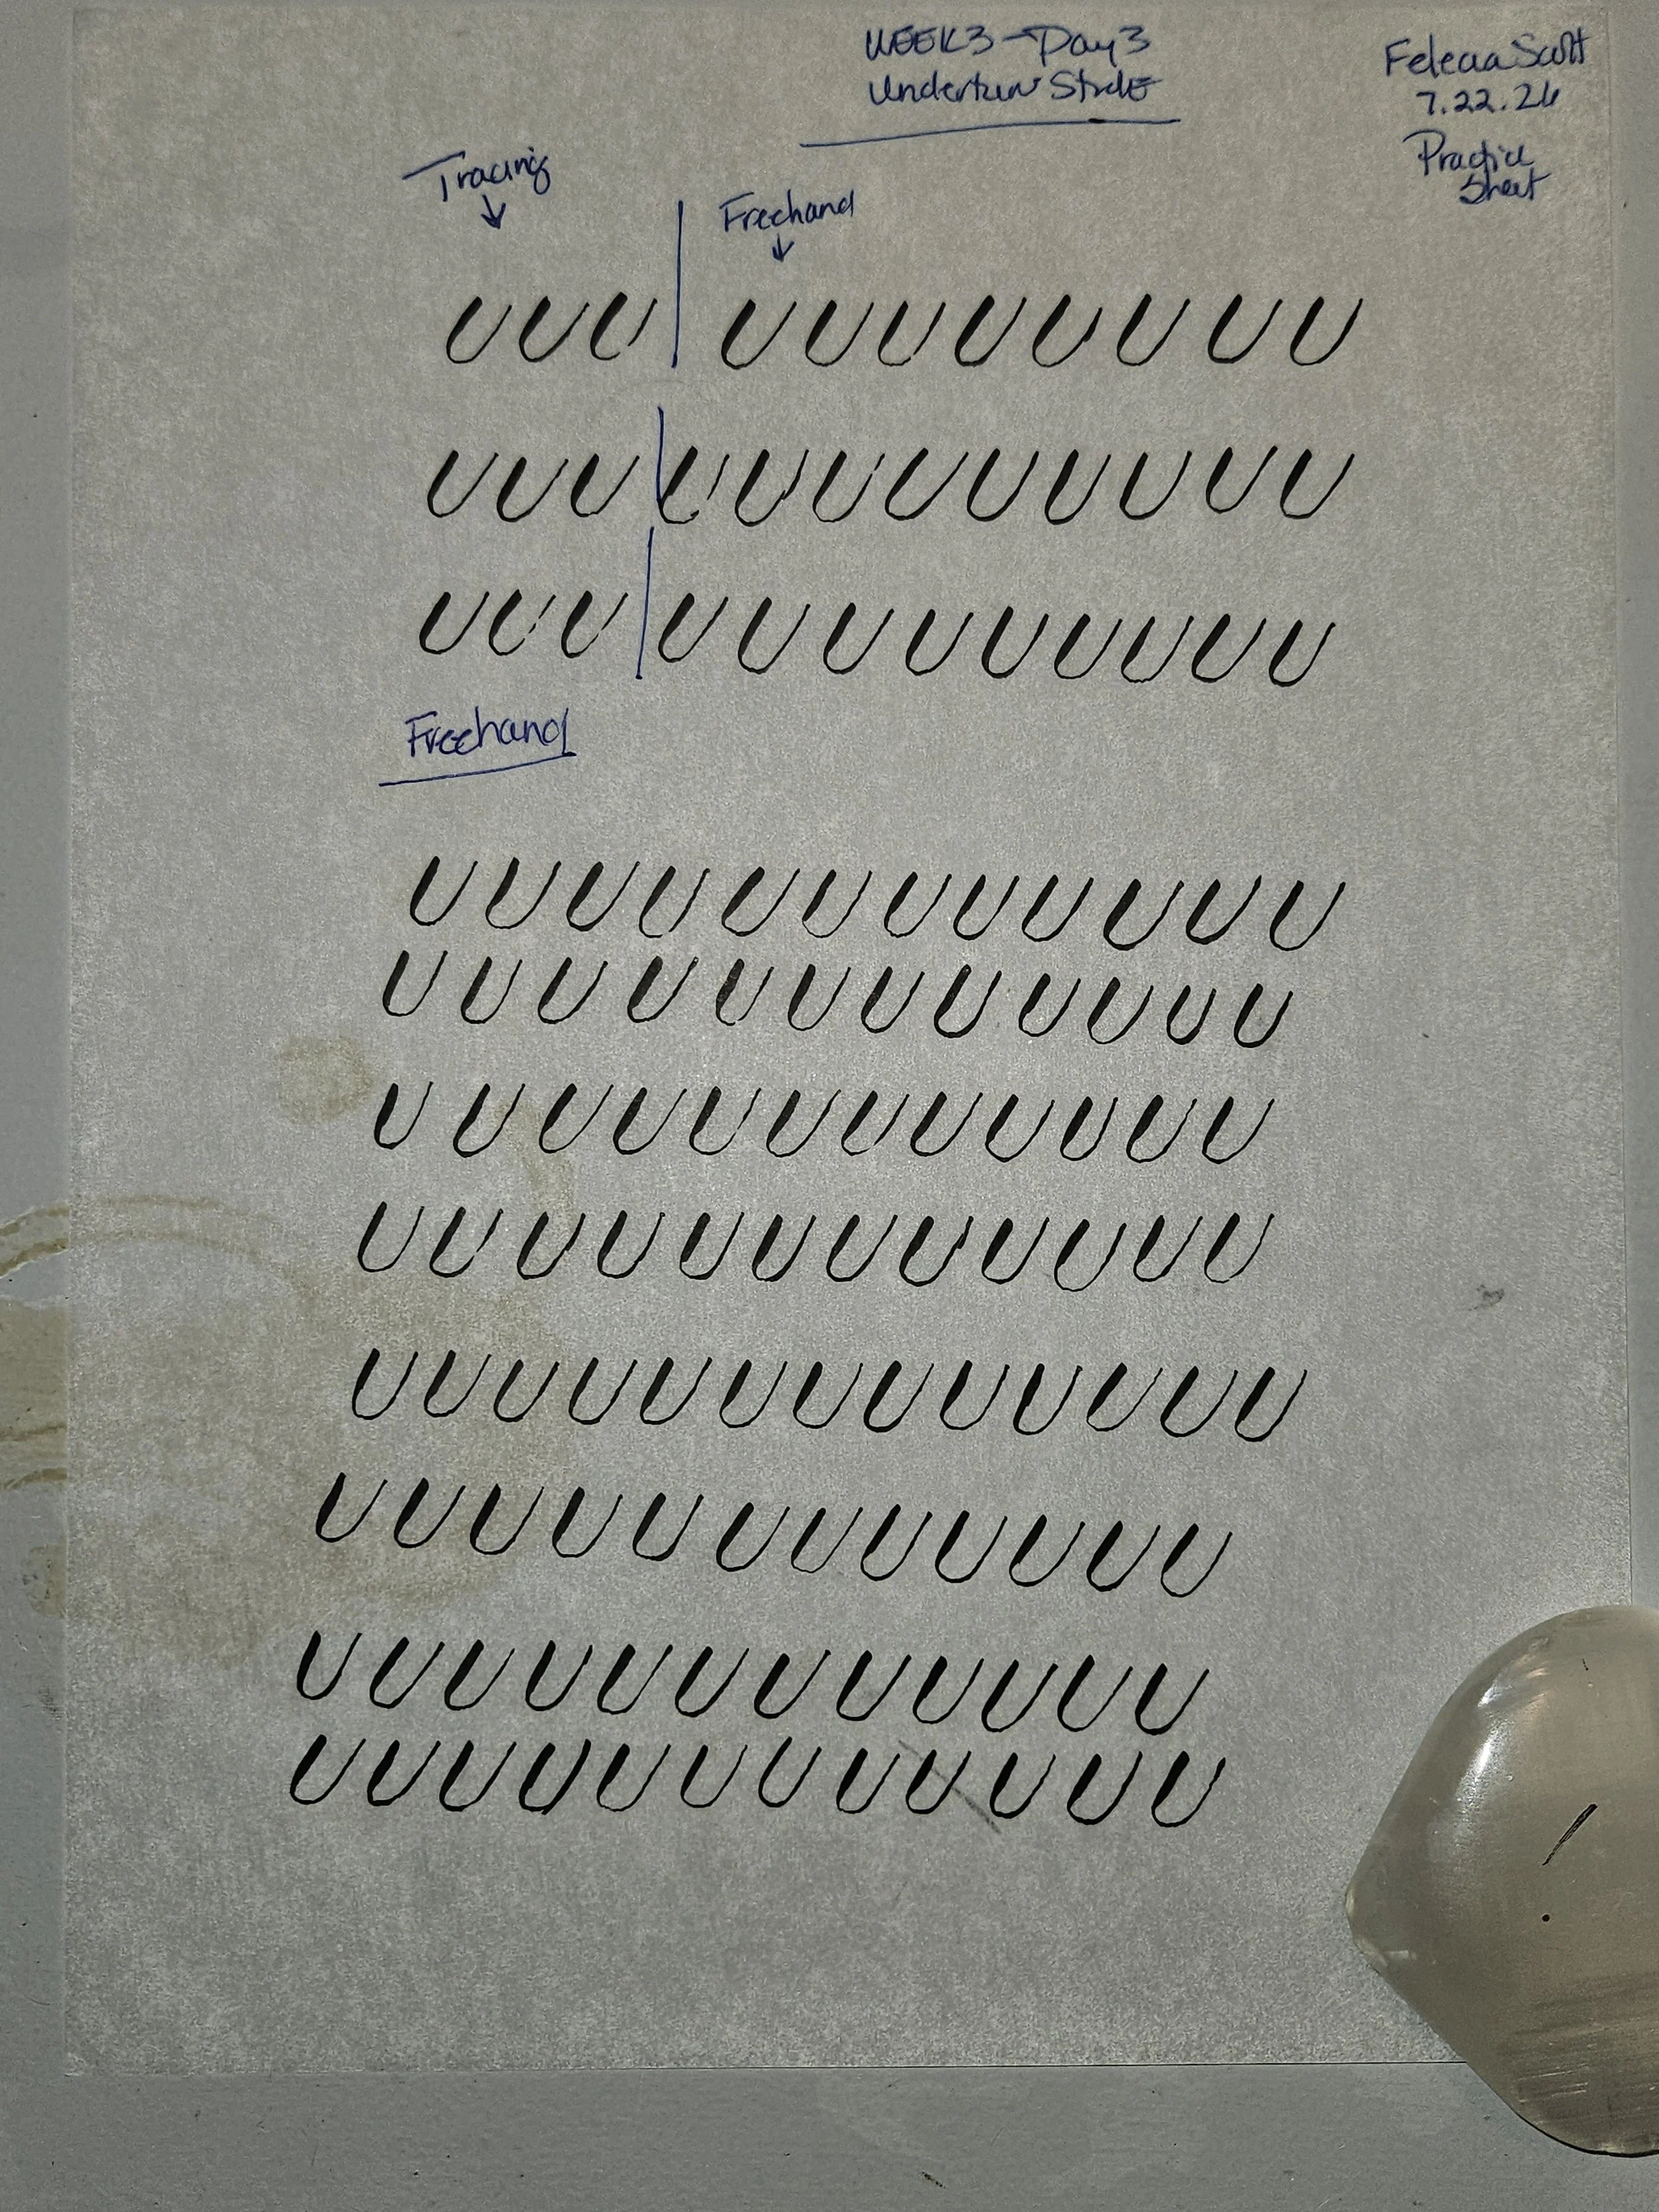
I do see progress being made. Last week doing the Underturn, I could barely hold the shape. This week, I can but there's still some challenges with this stroke. When I do Downstroke into the curve, I'm okay but when I get to the upstroke, I can still see my hand shaking. As I was doing the practice drill today, I actually recorded my hand shaking, which was wild to see. The shakiness has gotten better, and Becca, the instructor said, "Beginners struggle with this for a time, but as we practice more and get better, it will go away."
This reminded me that learning a new skill is physical as well as mental. My hand is still building the muscle memory it needs, and that's something that only comes with time and practice. I do. I practice twice a day for 30 minutes. Once in the morning and once in the evening, usually on my lunch break at work, which is also 30 minutes.
I do see progress being made. Last week doing the Underturn, I could barely hold the shape. This week, I can but there's still some challenges with this stroke. When I do Downstroke into the curve, I'm okay but when I get to the upstroke, I can still see my hand shaking. As I was doing the practice drill today, I actually recorded my hand shaking, which was wild to see. The shakiness has gotten better, and Becca, the instructor said, "Beginners struggle with this for a time, but as we practice more and get better, it will go away."
This reminded me that learning a new skill is physical as well as mental. My hand is still building the muscle memory it needs, and that's something that only comes with time and practice. I do. I practice twice a day for 30 minutes. Once in the morning and once in the evening, usually on my lunch break at work, which is also 30 minutes.
I uploaded the video. You can see it below. I'm going to keep practicing. Keep showing up every day and documenting this journey. Because rarely get to see how the majority of calligraphers began, just the ending. There are videos galore from experienced calligraphers saying, "If I started learning calligraphy right now, this is what I would do." That's great, I love watching those videos, but I wouldn't mind seeing some of their old practice sheets. Show more of the journey before they got to where they are.
This is what I learned today. Some strokes take patience; some take repetition but do not let a challenging practice session convince you that you cannot learn calligraphy. Keep going. You will get there.
Day 16: Finding My Rhythm | Overturn Strokes
Last week when I practiced this exercise, my page was basically filled with circles. Checks mean I performed the stroke correctly.
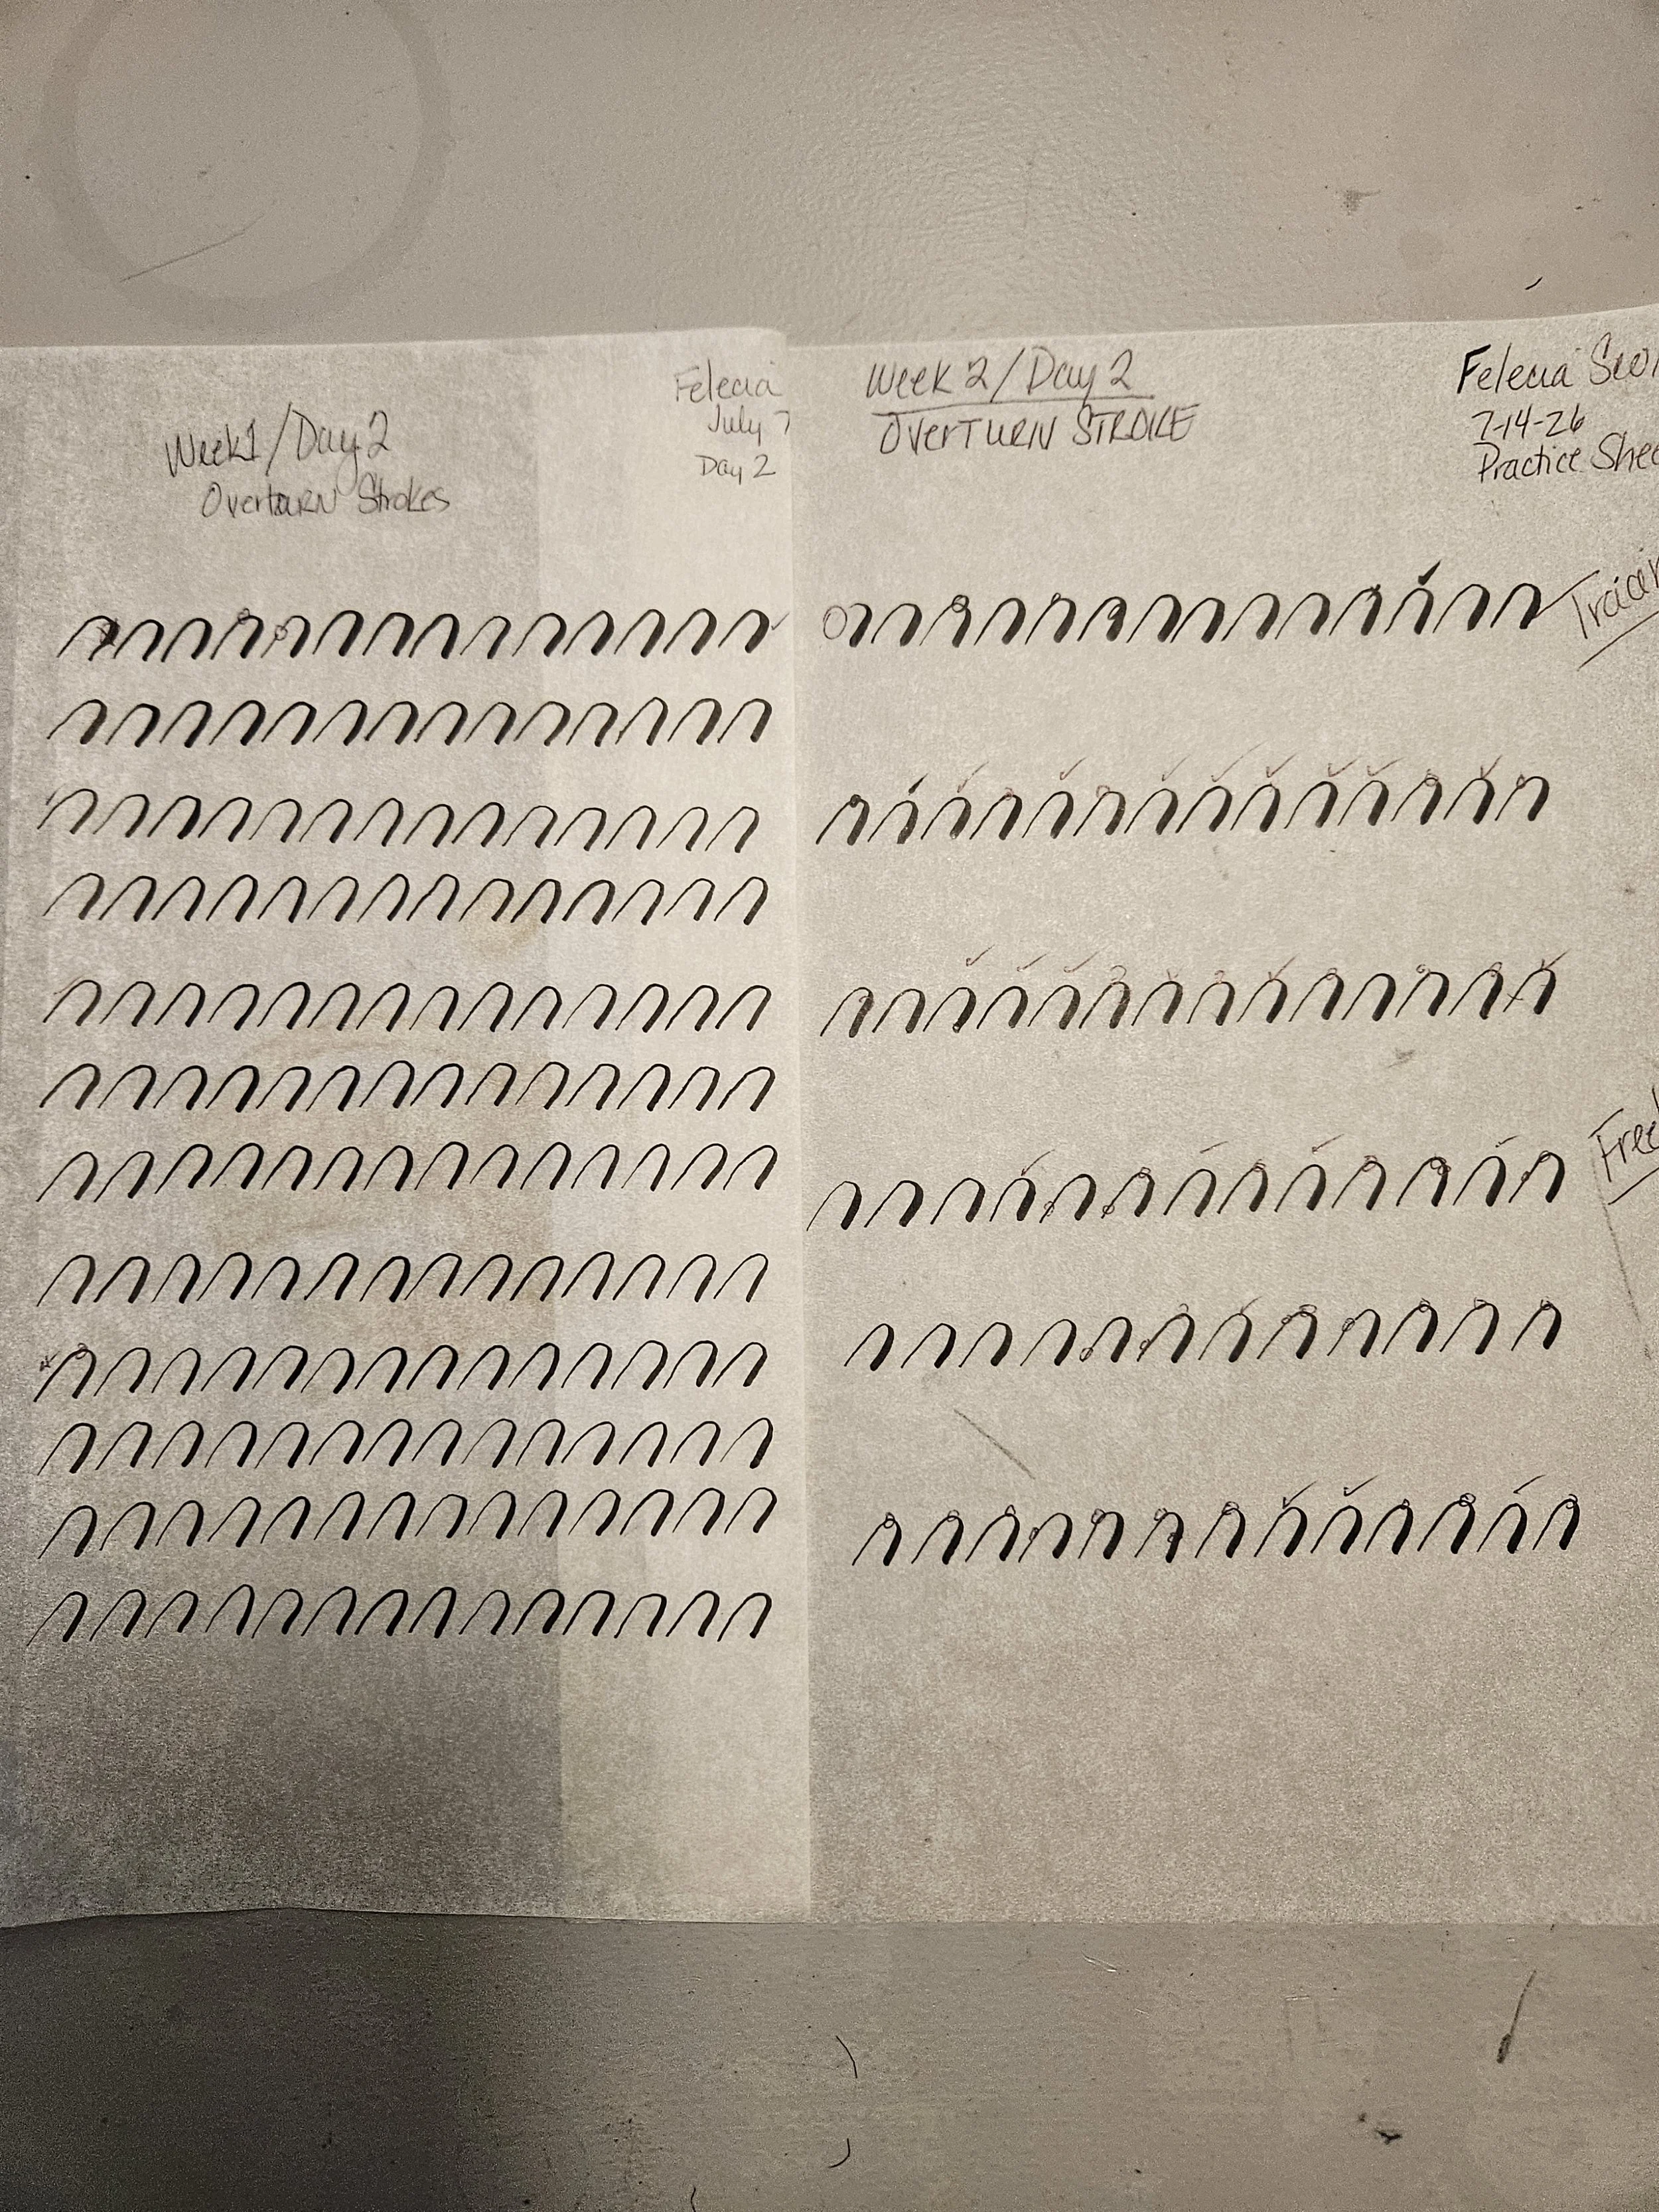
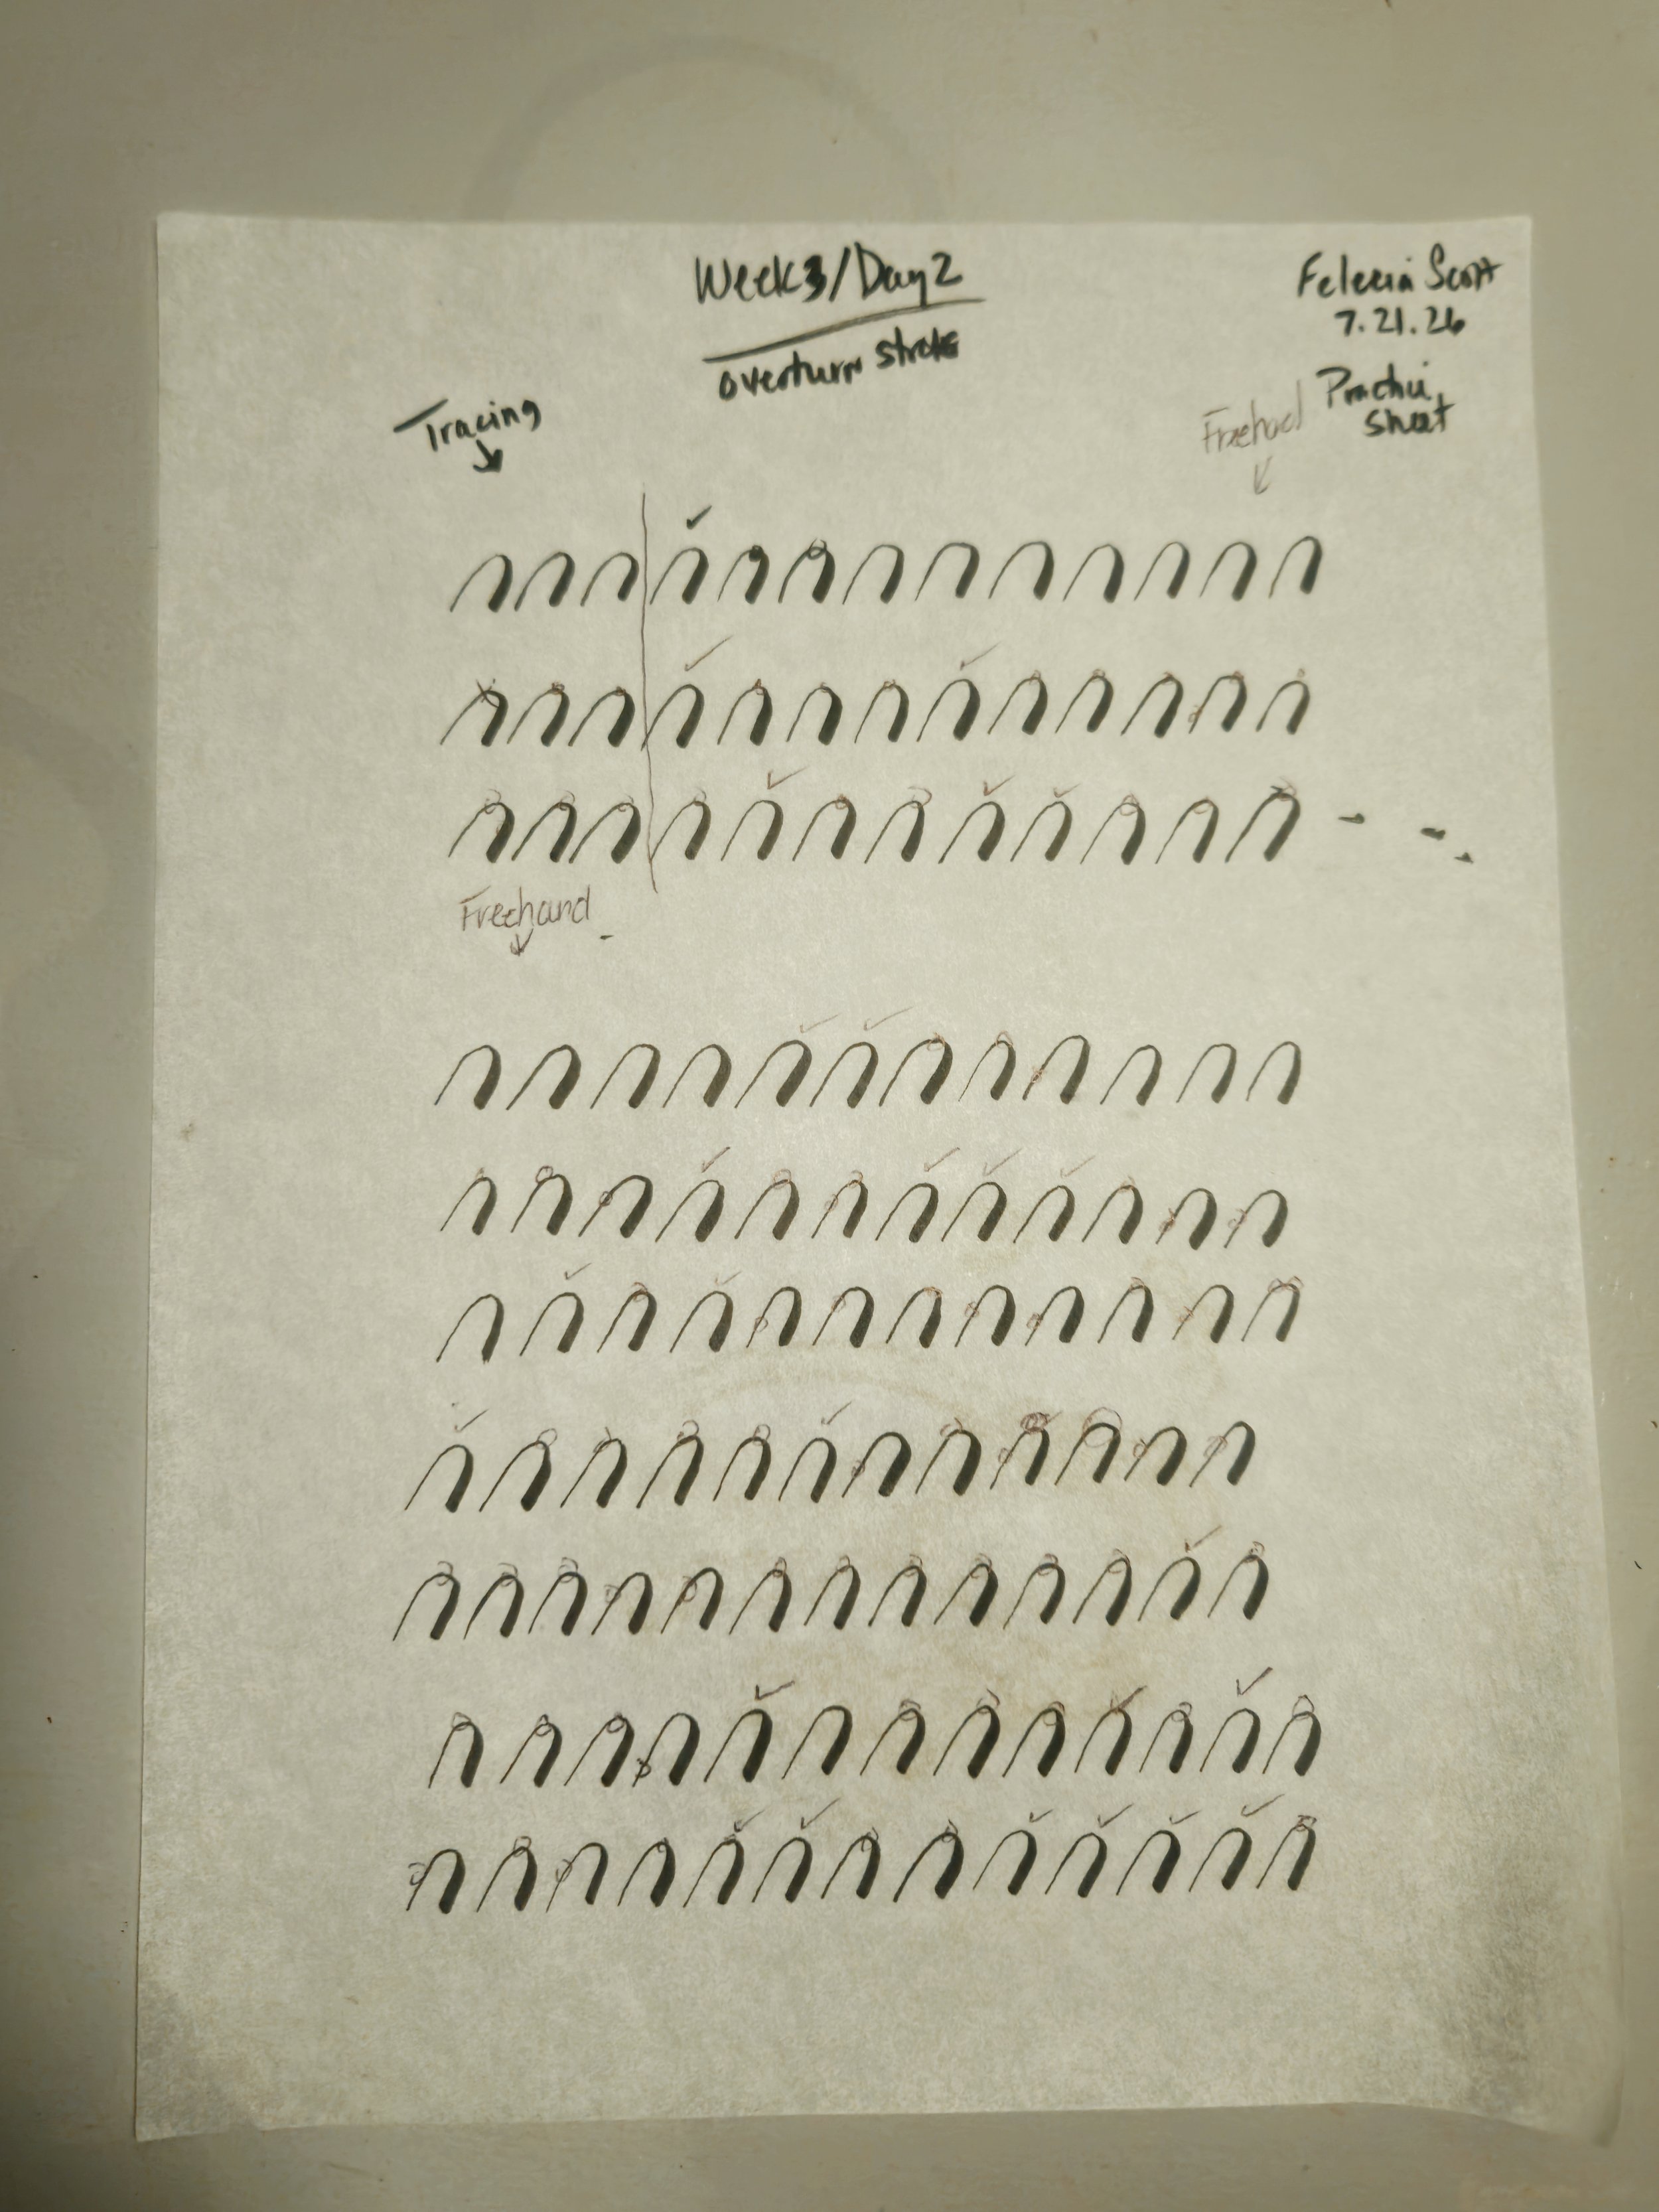
Last week when I practiced this exercise, my page was basically filled with circles. Checks mean I performed the stroke correctly. Circles mean, I need more practice. This lesson is a reminder to me that my hand is still learning the movement and my brain was still trying to understand the technique.
This week, I can honestly see improvements. Instead of every attempt turning into a circle, I had about 30% that were actually correct and 70% that still need improvement. At first glance, that 70% might sound like a lot, but when you compare it to last week’s results, I didn't get any right. This is a huge step forward.
This is something I’m learning about calligraphy: progress doesn’t always look like perfection. Sometimes progress looks like fewer mistakes, a little more control, and those small moments where your hand finally does what you’ve been practicing.
That 30% is my proof that I’m getting closer. Those successful attempts show me that I understand the movement—I just need more repetition, patience, and practice. A few weeks ago, I couldn’t even imagine getting this stroke right. Now I’m catching myself making the correct motion more often. Today’s win: I went from 100% circles to 30% correct strokes. I’ll happily take that win.
Day 15: Getting Comfortable With the Basics | Upstrokes & Downstrokes
Going on my third week of learning calligraphy. I'm going to make a video about the class I'm taking shortly and review the 30-day free class, which I'm loving more and more each day.
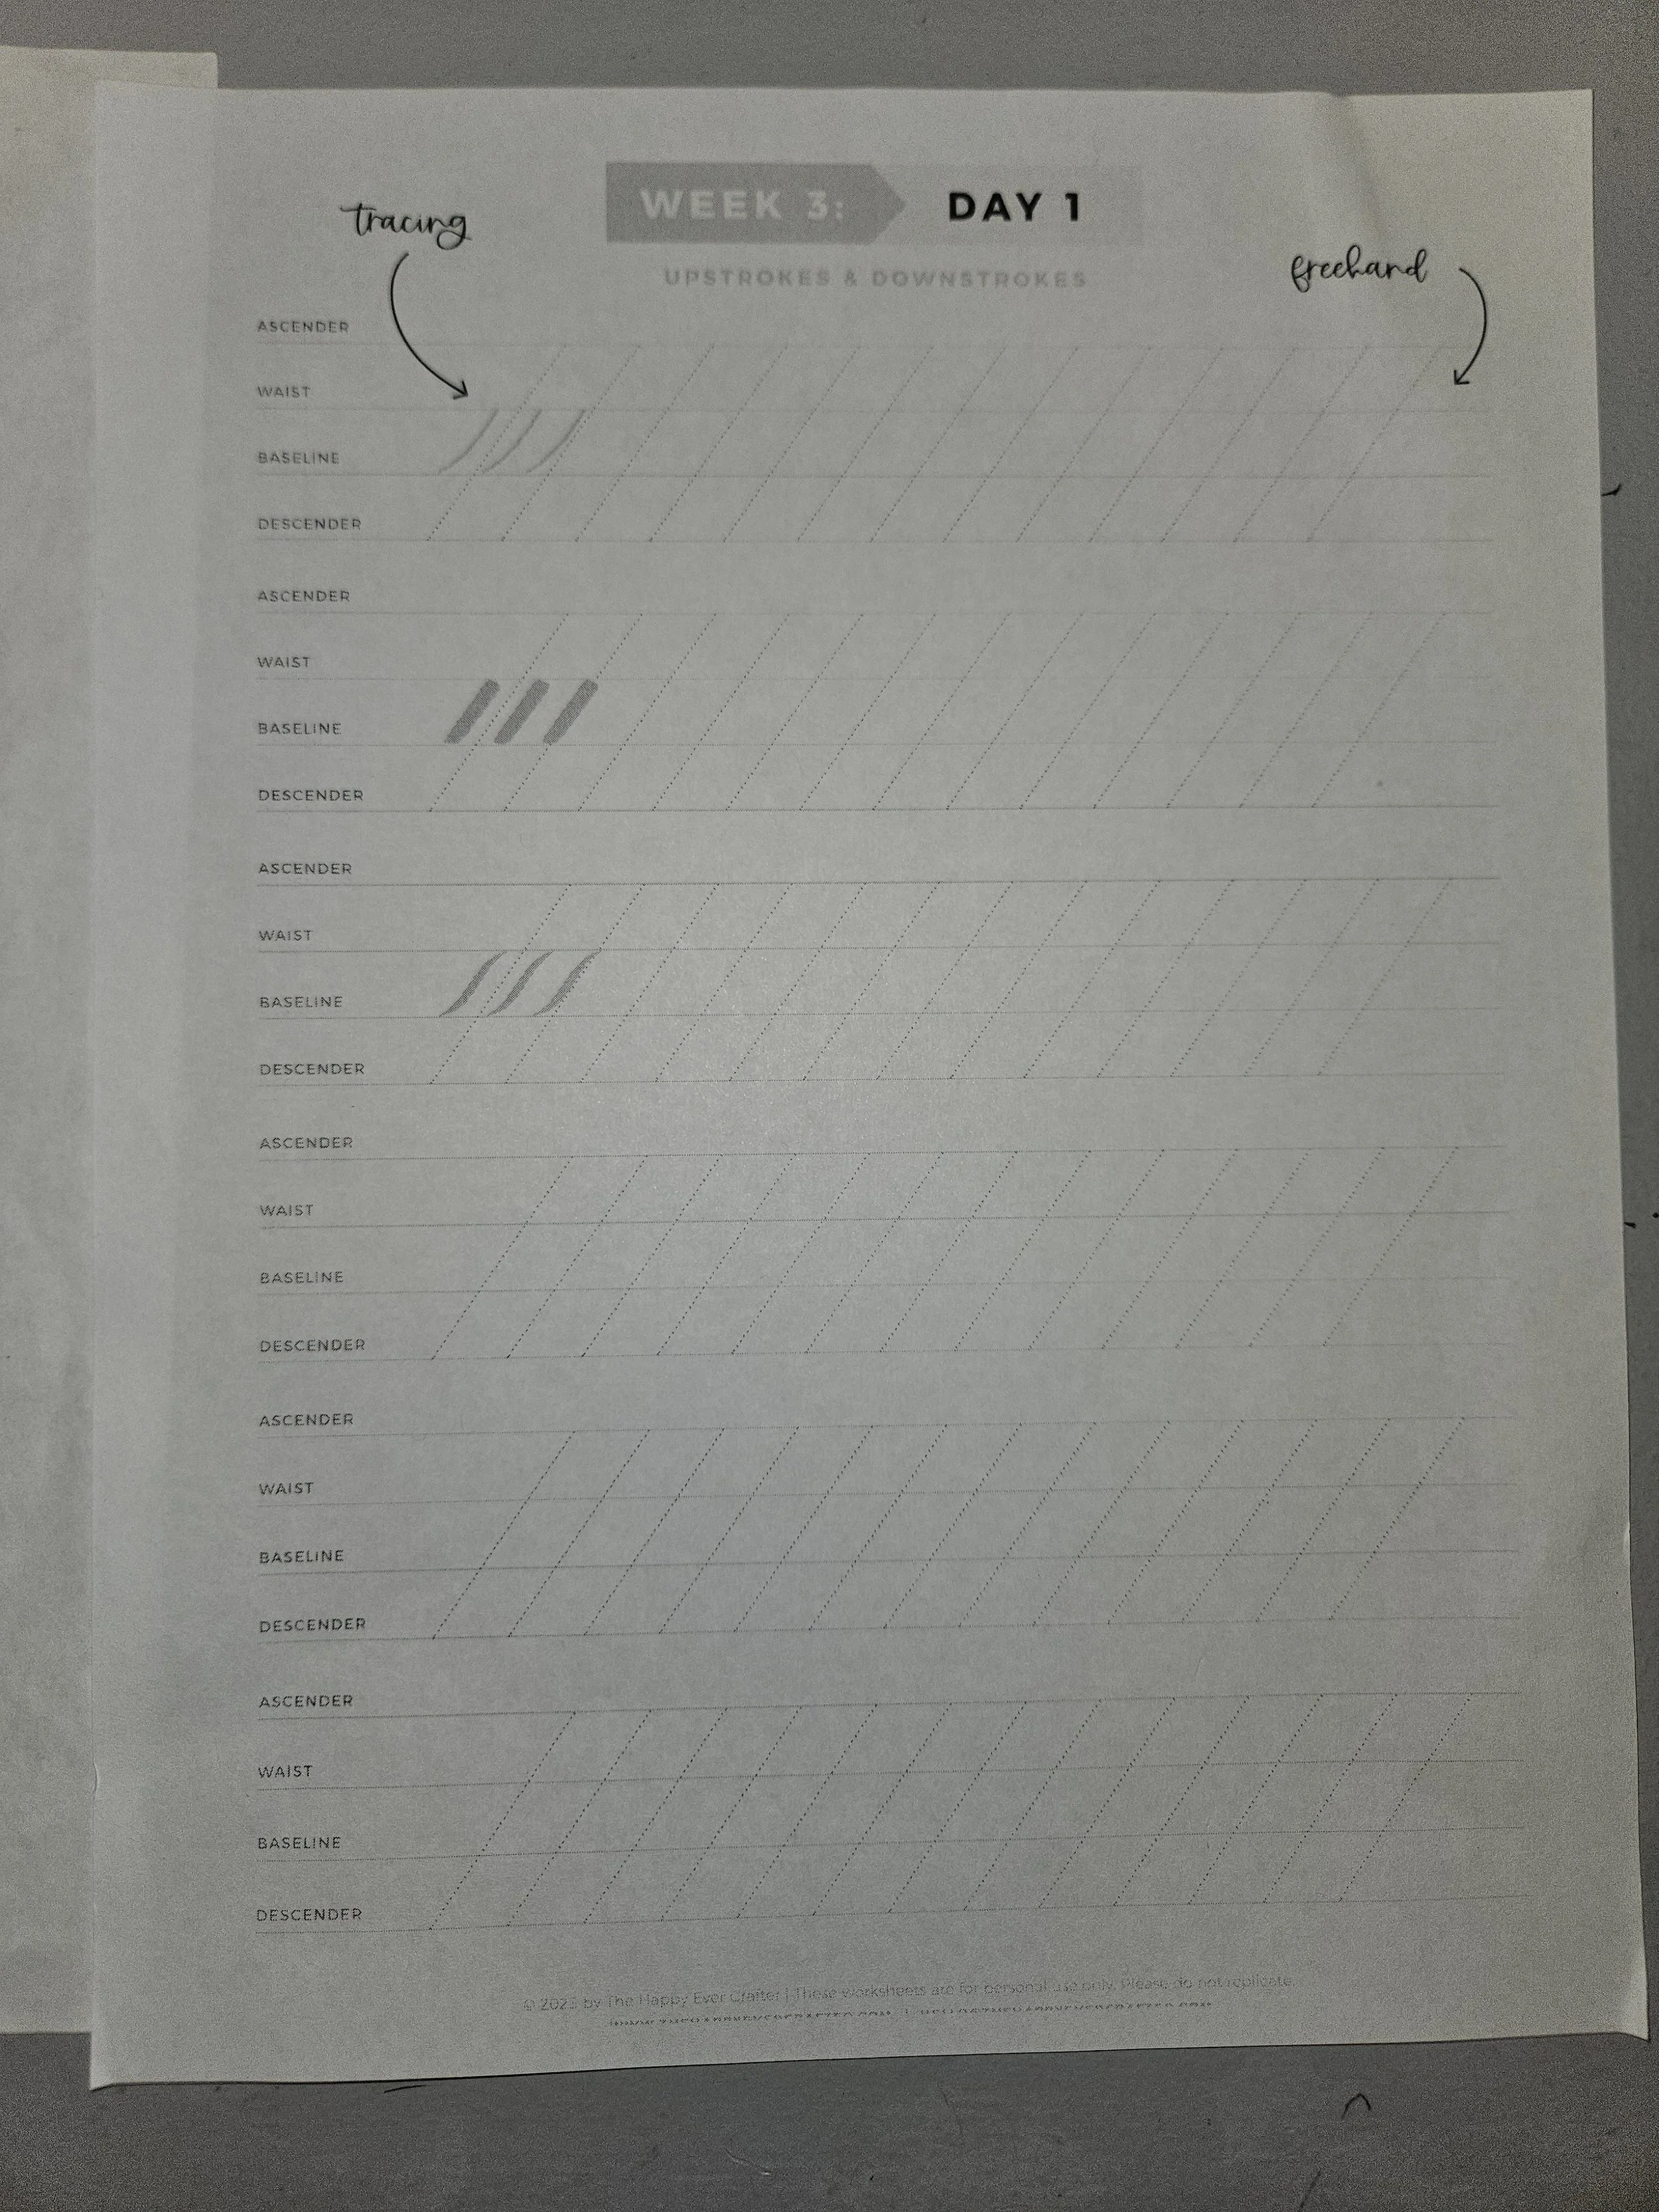
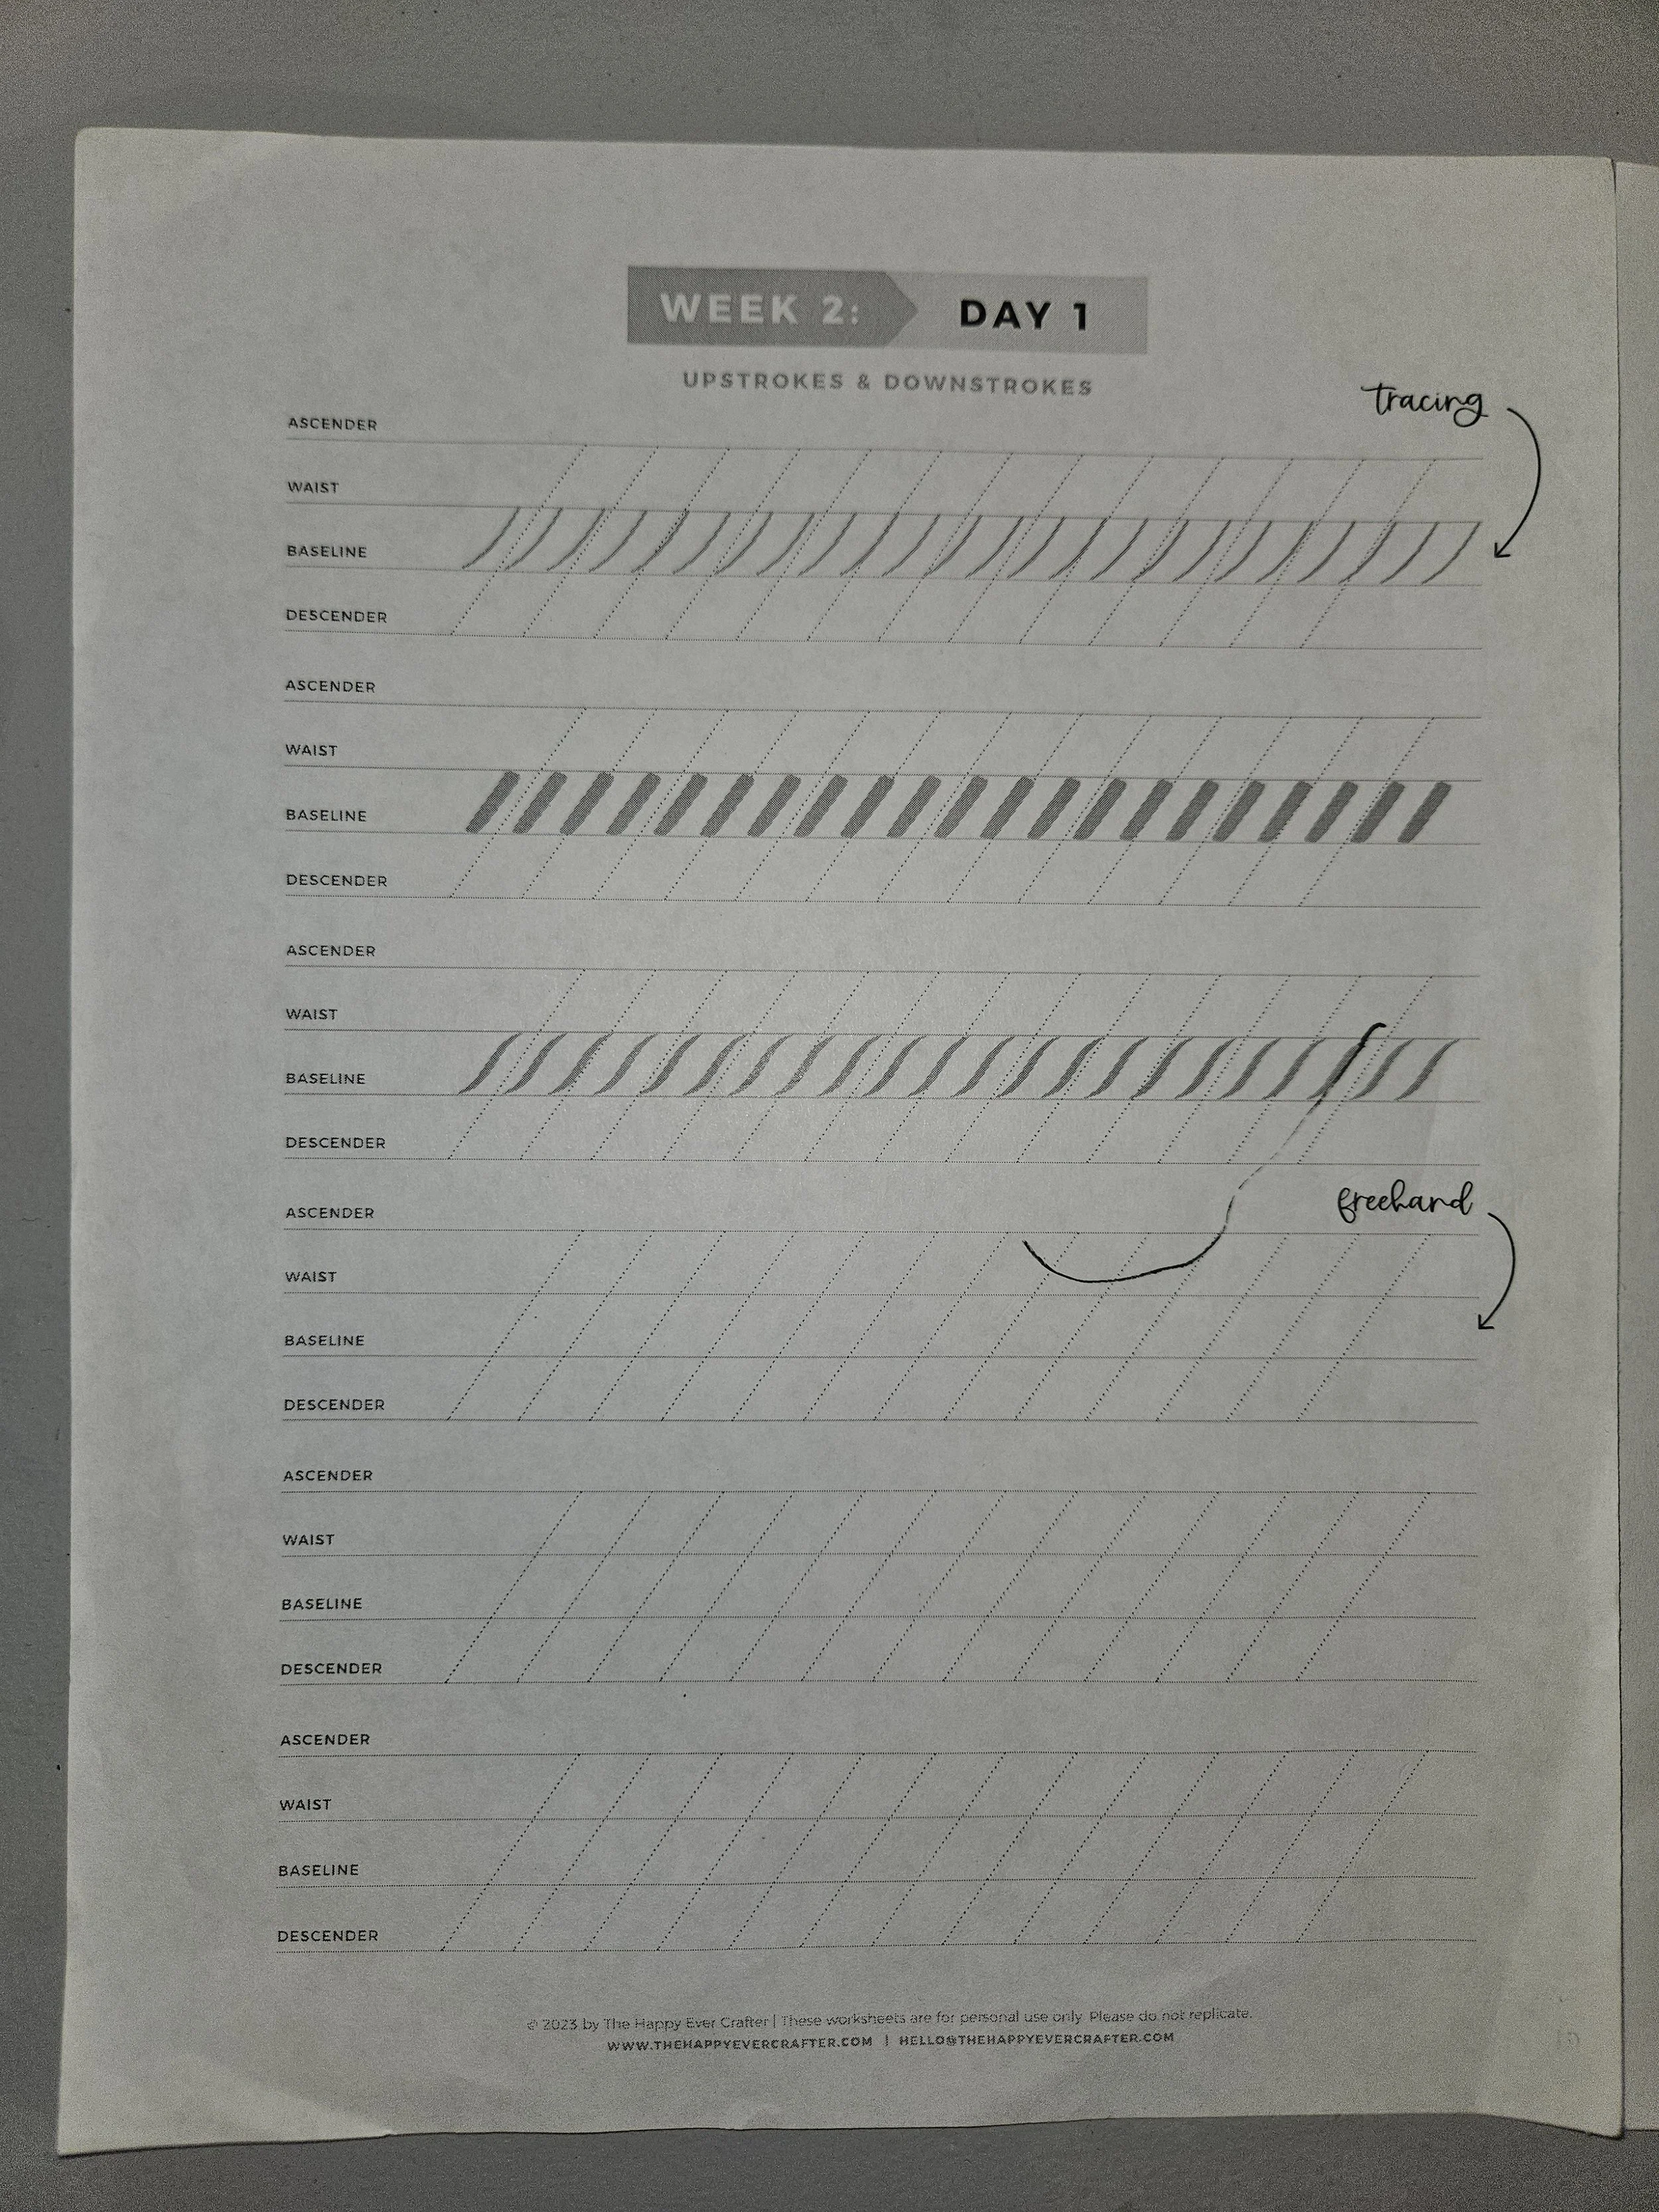
(Left) Upstroke & Downstroke Practice Sheet (Right) Second week practice sheet. (Credit Becca C. Rafter) @ The Happily Every Crafter for both practice sheets.
Going on my third week of learning calligraphy. I'm going to make a video about the class I'm taking shortly and review the 30-day free class, which I'm loving more and more each day. You can see above the practice sheets has intensified from WEEK 2 to WEEK 3. The tracing part is less and the freehand is more prominent. This practice session went really well. The Upstroke and Downstroke combination for the past 2 weeks literally had me in tears.
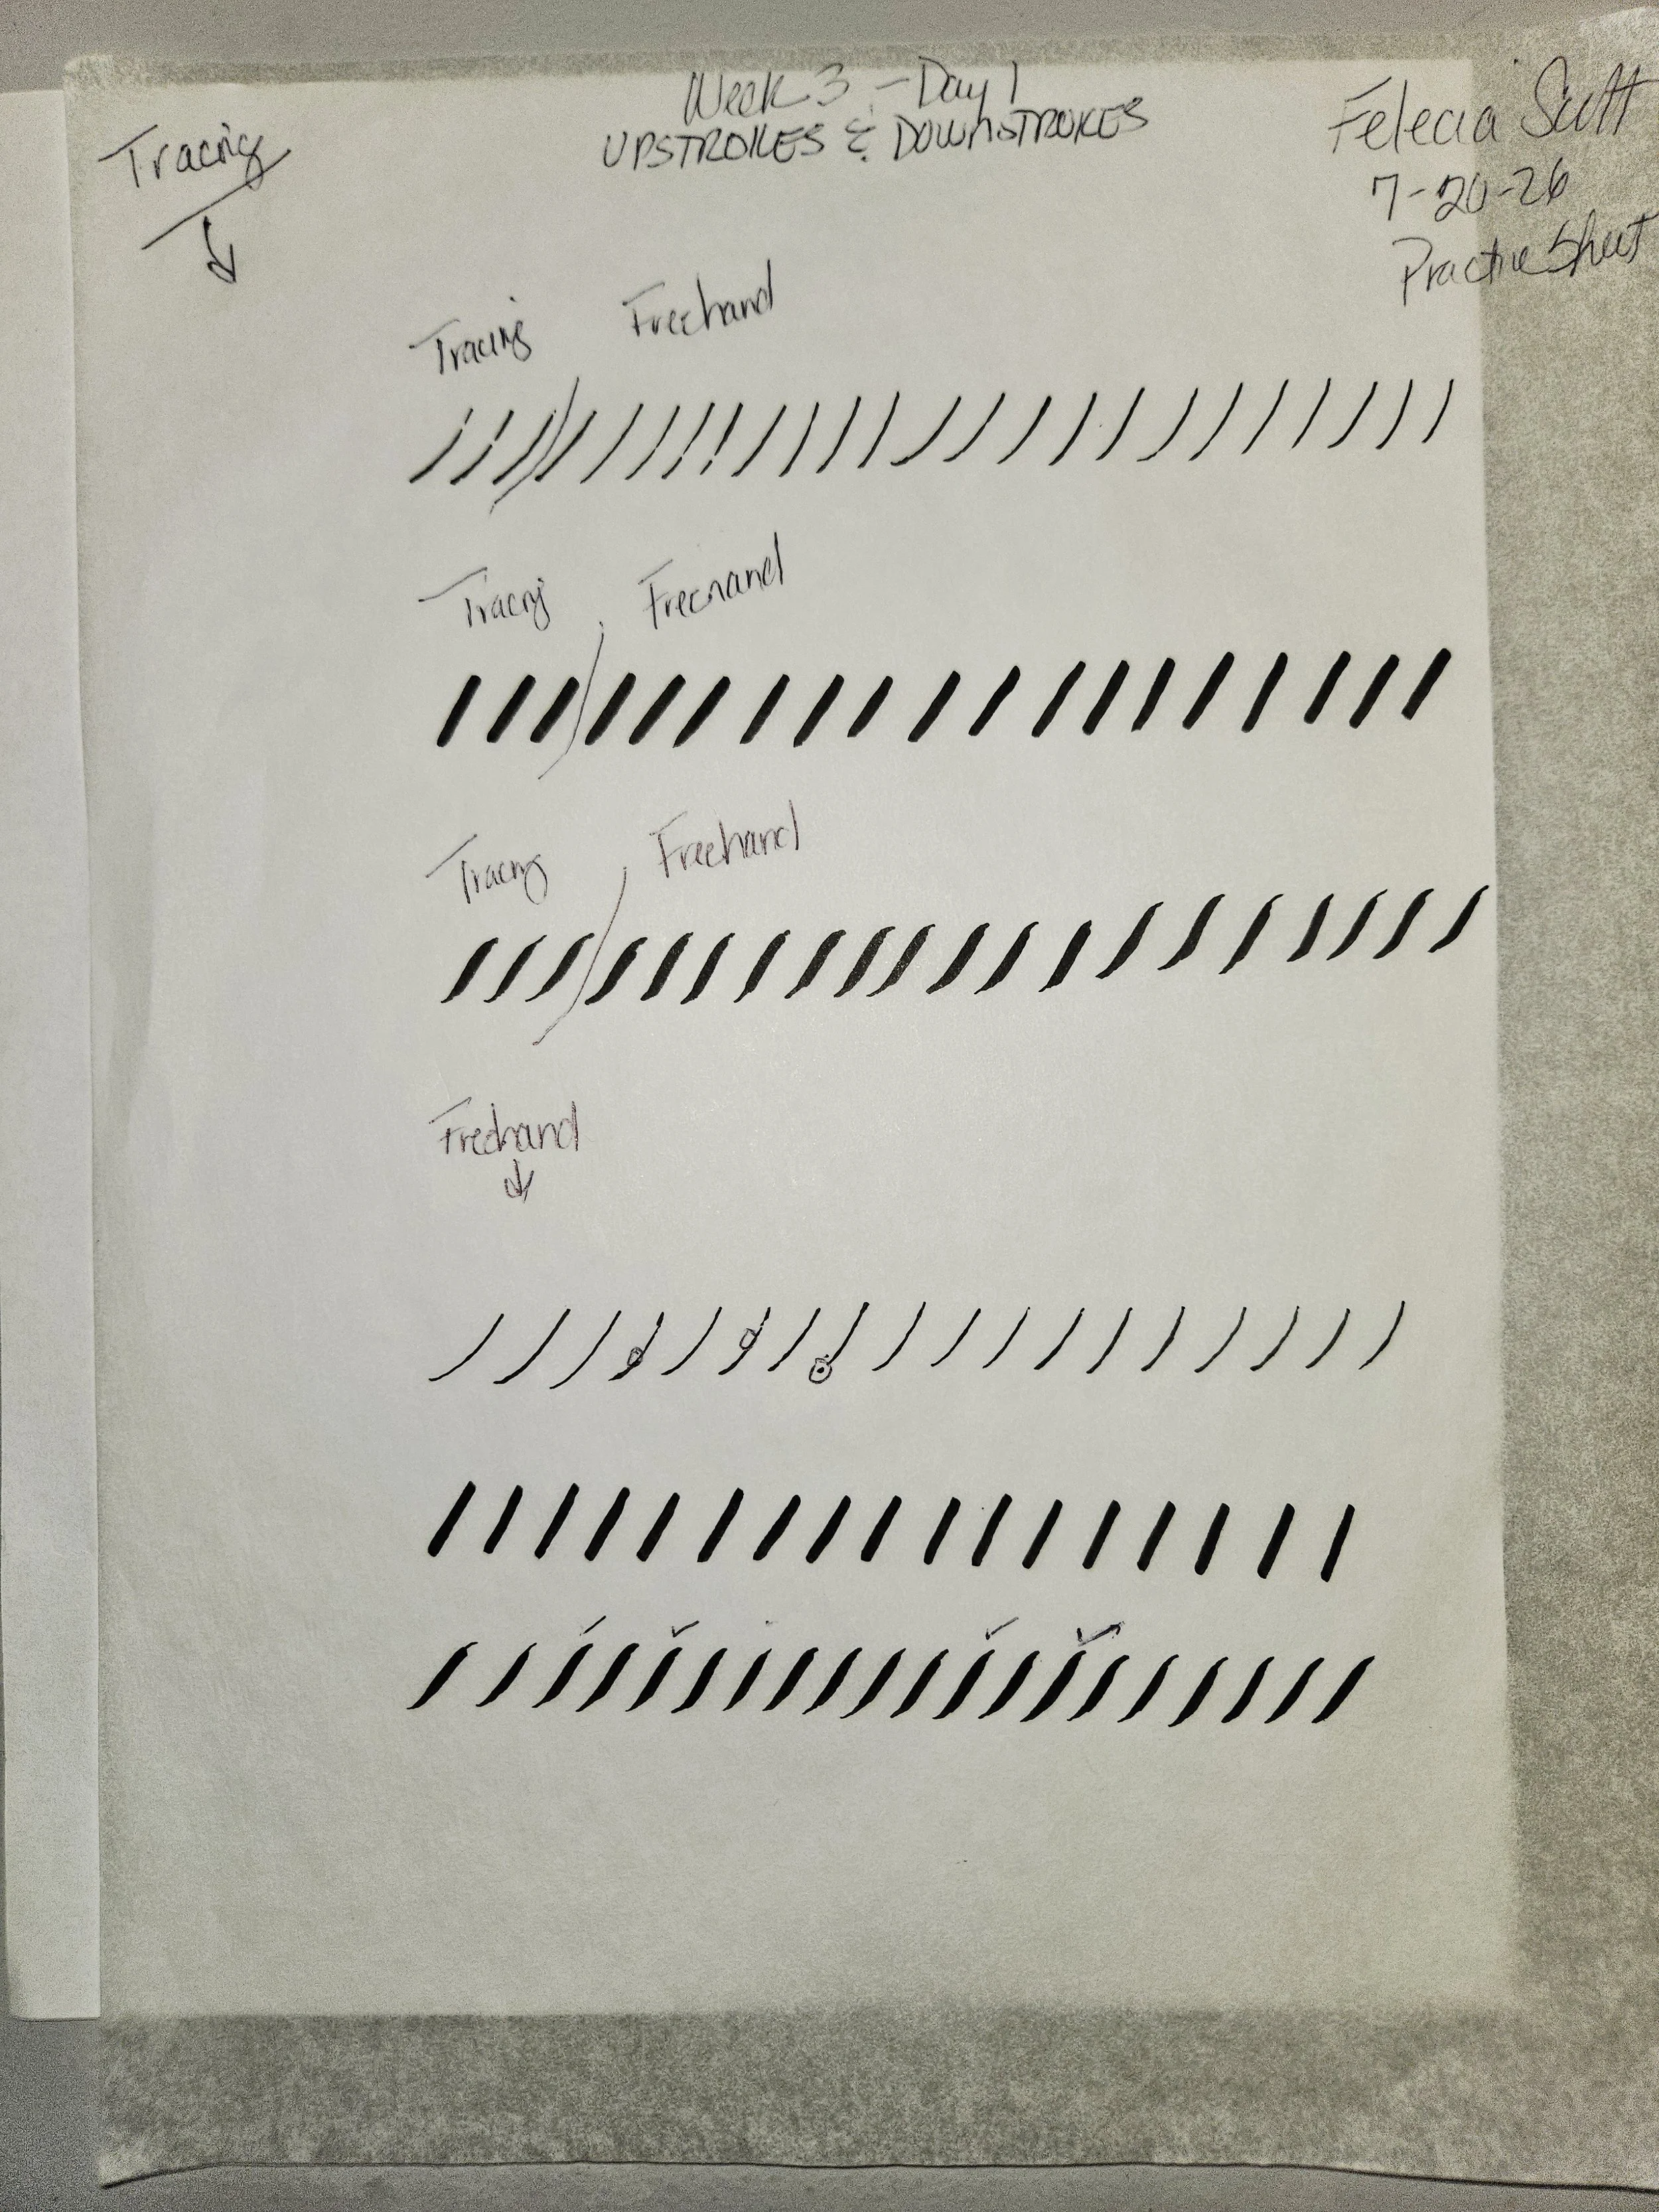
The last line is the Upstroke and Downstroke combination. The strokes that are checked show that I did them correctly. Last week, I had my meltdown. I had been trying to get that stroke to stop looking like baby cobras and became overwhelmed and took my frustration out on my pen and paper.
Well, this week, there is a change in the air. In the pictures below, you can see from last week to this week, I was able to finally get a few of the Upstroke and Downstroke combinations correctly. I am so happy. It took patience, meltdown, and a lot of practice.
For me, what made the difference to doing the stroke correctly was to go slow. I mean break it down to a sloth, moving in action slow. I didn't use tracing. I did it all freehand. The 45-degree angle here is very important. It's what gives your pen the flexibility to do this difficult stroke.
Also, I printed out the blank practice sheets that came with the book. So, I can really improve my calligraphy. I want to wean myself from tracing by the end of the week or sooner. I also have been switching back and forth between the soft tip green brush pen and the blue hard tip brush pen. As Becca, my instructor said, it's always good to know both pens and I agree.
I hope you're enjoying the blog. If there's anything you want to write about or any questions please let me know in the comments section. I will end this post with this. If no one has told you this today, I'm proud of you for sticking with something that's challenging. Whether it's learning calligraphy, writing, ceramics or painting takes patience, persistence, and courage. Keep practicing, keep believing, and keep creating. Your best creative days are still ahead of you.
Day 8 - 14 Reflections from Today’s Practice Corner
On Day 12, which was on July 17, 2026. I had a complete and total meltdown. I was practicing the combo upstroke and downstroke (Day 1) exercise.

On Day 12, which was on July 17, 2026. I had a complete and total meltdown. I was practicing the combo upstroke and downstroke (Day 1) exercise. It’s the foundation that makes all the other strokes. I was having the hardest time transitioning from starting off light then go into a heavy down stroke and end in a light stroke. I watched Becca’s video on this one stroke (I stopped counting after the 10th time). They still kept coming out looking like deformed, baby cobras. I was trying to do it free hand and not using the tracing exercise sheet.
I got so frustrated, I ripped up the tracing paper, the blank practice paper and jammed straight down the tip of the pen into the paper and the tip broke off. My anger, disappointment and yes, frustration got the best of me. I started crying. I was so emotional. I was ready to give up.
Why wasn’t I getting it? Why wasn’t I making any progress? What am I doing wrong? Did I make a mistake trying to learn calligraphy? Maybe it’s too difficult to learn? Because the crazy part is today, Day 12, the Compound Stroke, the hardest basic stroke out of all them, I was getting it. I was able to do the stroke without tracing. So why in the world am I having a hard time getting this one stroke down?
I was ready to toss all my calligraphy supplies in the trash but I stopped myself and stepped away from my desk. I looked down at the carnage of my practice pens (I broke 2 of them) and torn paper and just started breathing slowly. Inhaling and exhaling deeply to calm down and get a hold of my emotions.
I said to myself, “Felecia, you are on day 12 of learning calligraphy. This is the first time in your life holding a calligraphy pen and practicing calligraphy strokes. Wipe your tears and let go of the high expectations you have for yourself. Give yourself some grace.”
Something told me I have to write this. I have to share this. I’m a bit embarrassed and mortified at what I did but it’s part of learning. This is part of my calligraphy journey. After crying, giving myself and little pep talk. I could blame it blame what happened on menopause because I’m going through it but that too easy. The TRUTH is I had unrealistic, high expectations of myself as a novice calligrapher, there was no way I could reach this early on (literally 12 days in) which led to that moment. I got frustrated and let my emotions get the best of me. I had high expectations for myself.
I can say that writing this blog post has really helped put things into perspective. I don’t have anger issues. I was overwhelmed and I should have stopped sooner but didn’t. Instead, I kept pushing through determined to get one stroke right. Now, I know the signs, I will be more aware and do better in the future.
If you are reading this and you are struggling with your own calligraphy journey, I want you to know something: it’s okay to get frustrated. It’s okay to have a bad practice session. It’s okay if your strokes don’t look the way you imagined they would.
Learning something new is not supposed to be perfect from the beginning. When frustration starts taking over, step away for a moment. Take a breath. Come back when you’re ready. Your progress is not measured by one difficult practice session or one stubborn stroke. Starting from absolute zero doesn’t mean you’re behind — it means you’re brave enough to begin. Every shaky stroke, every mistake, and every frustrating moment is building the artist you’re becoming.
Day 14: What is splitting?
Last week's Descending Loop was difficult for me. I got the downstroke but hitting that curve into the loop and transitioning into the light stroke, my hand was trembling.
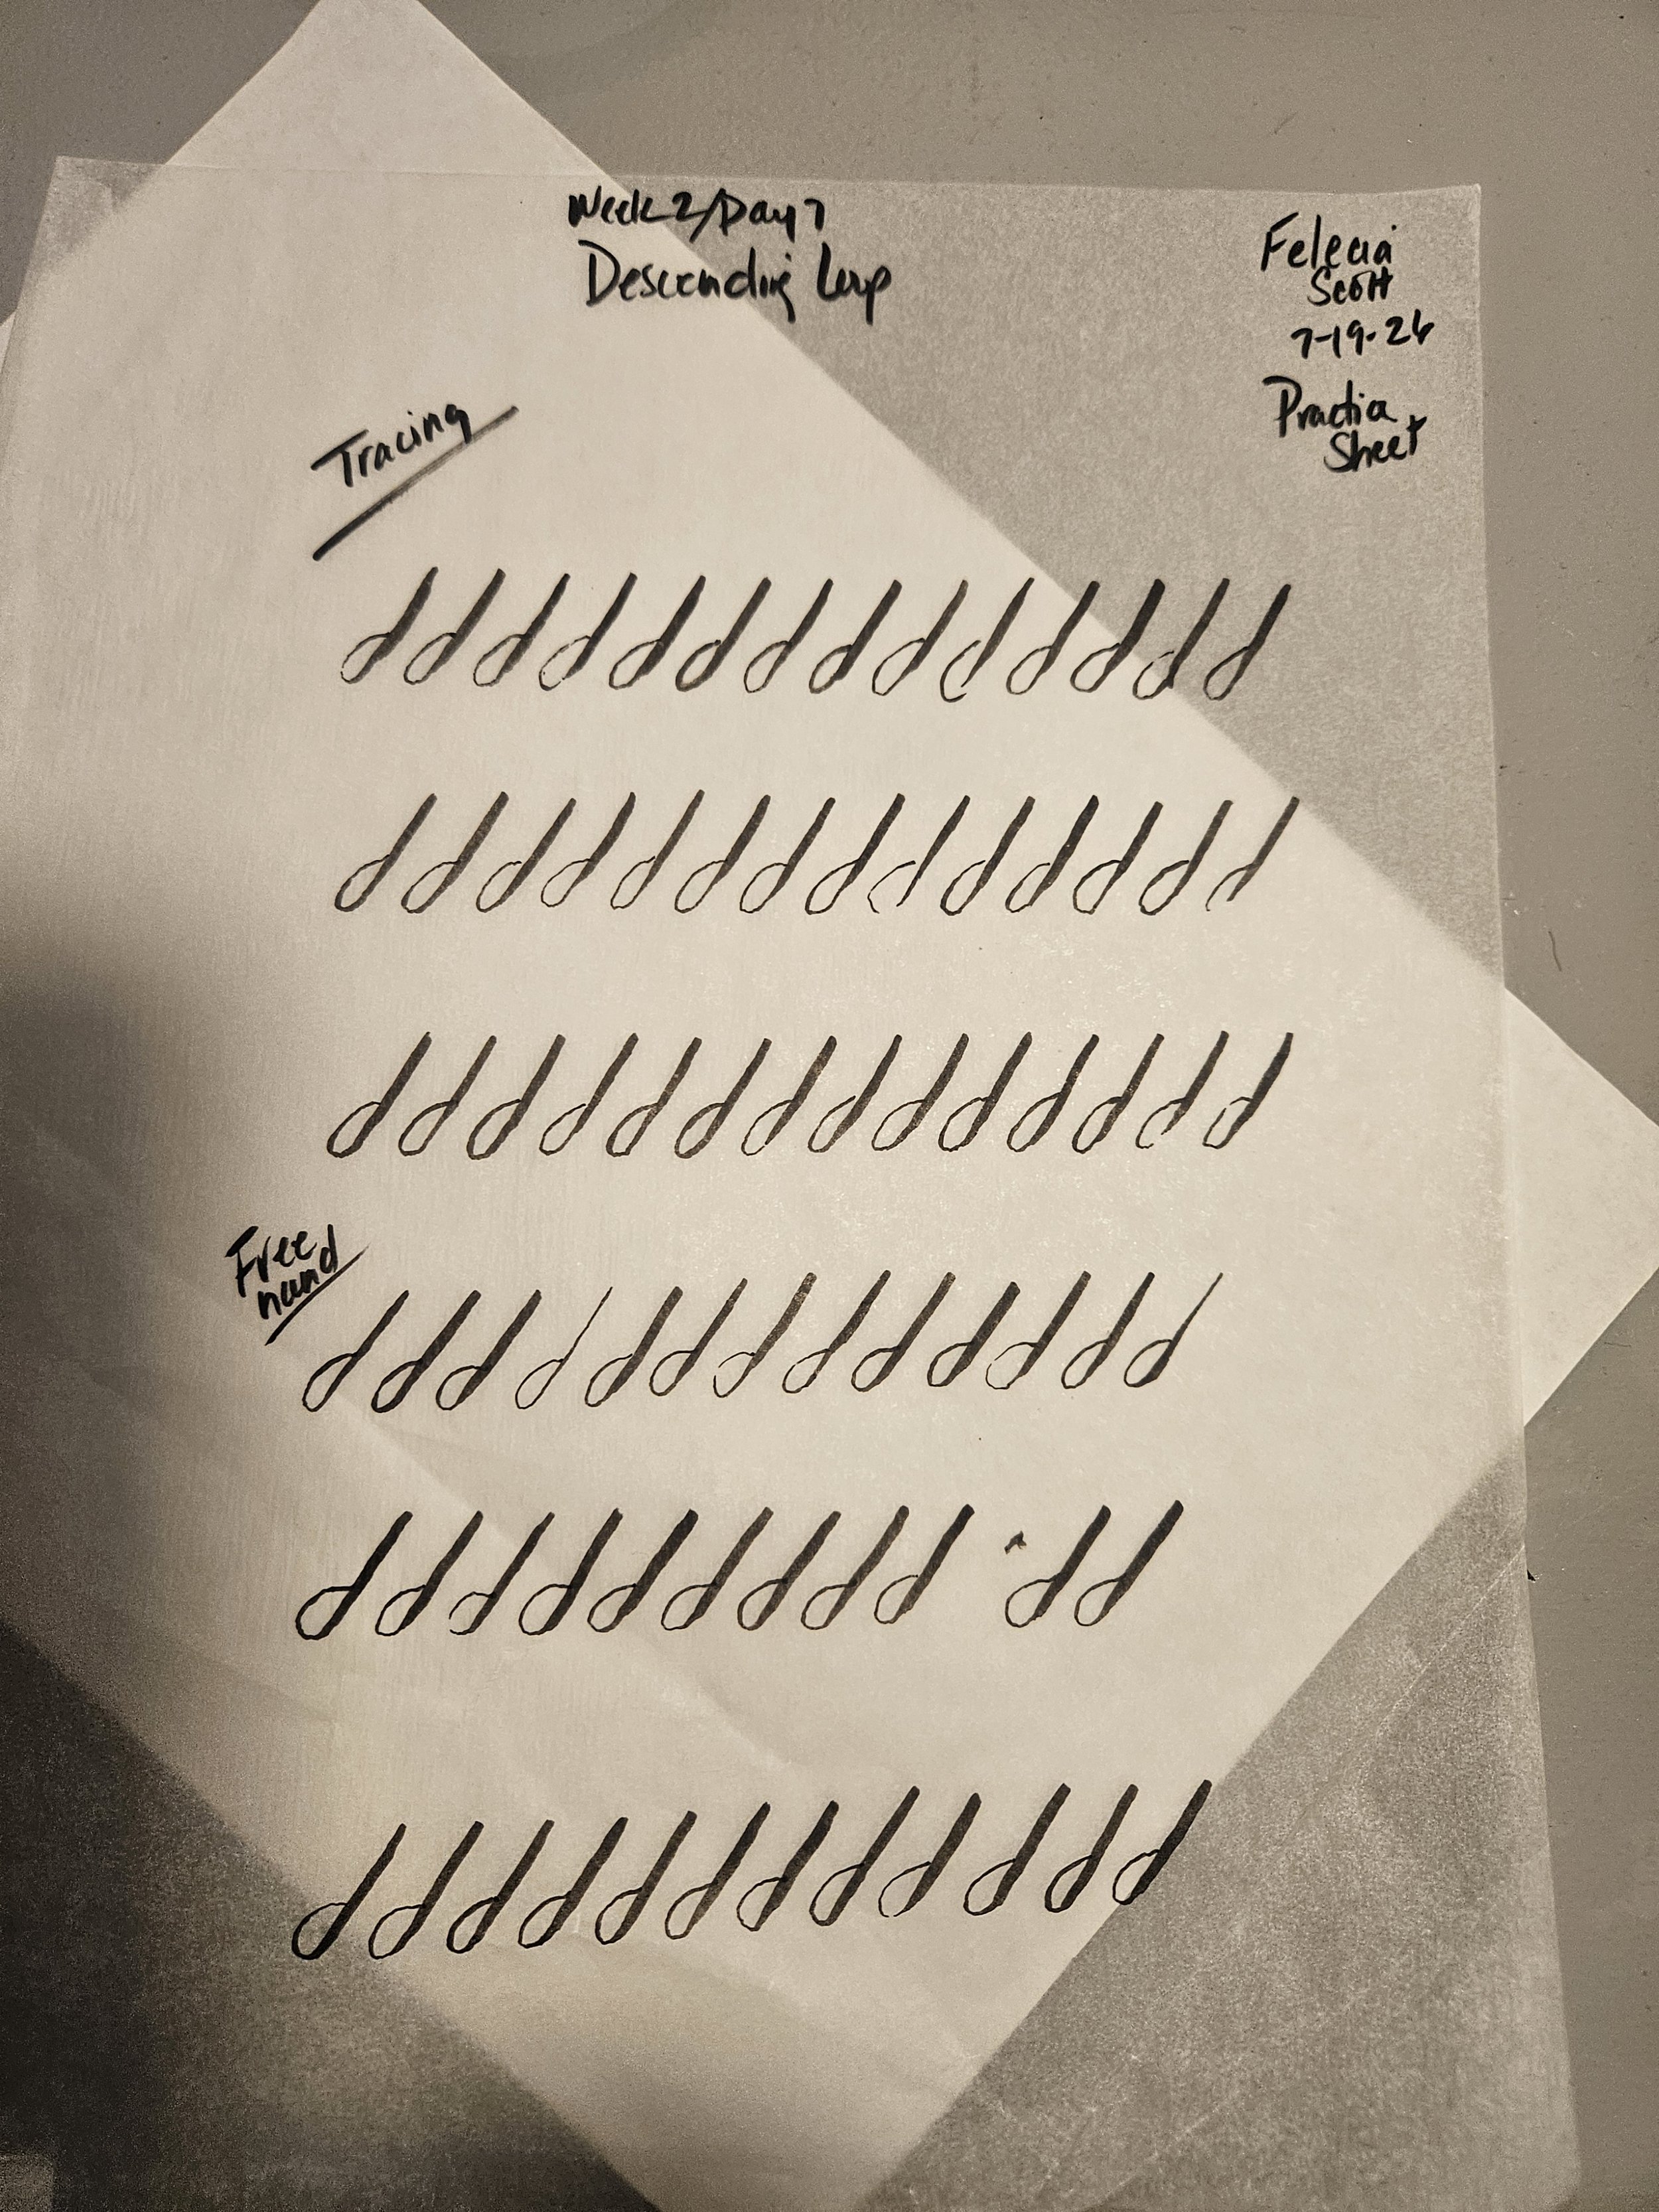
Last week's Descending Loop was difficult for me. I got the downstroke but hitting that curve into the loop and transitioning into the light stroke, my hand was trembling. This was better. I can see the slight improvement, but it was hindered by my fraying/splitting pen. I was wondering why my strokes were heavy even when I wasn't applying hard pressure. After I finished practicing, I looked at the pen and seen the issue. See the picture below.
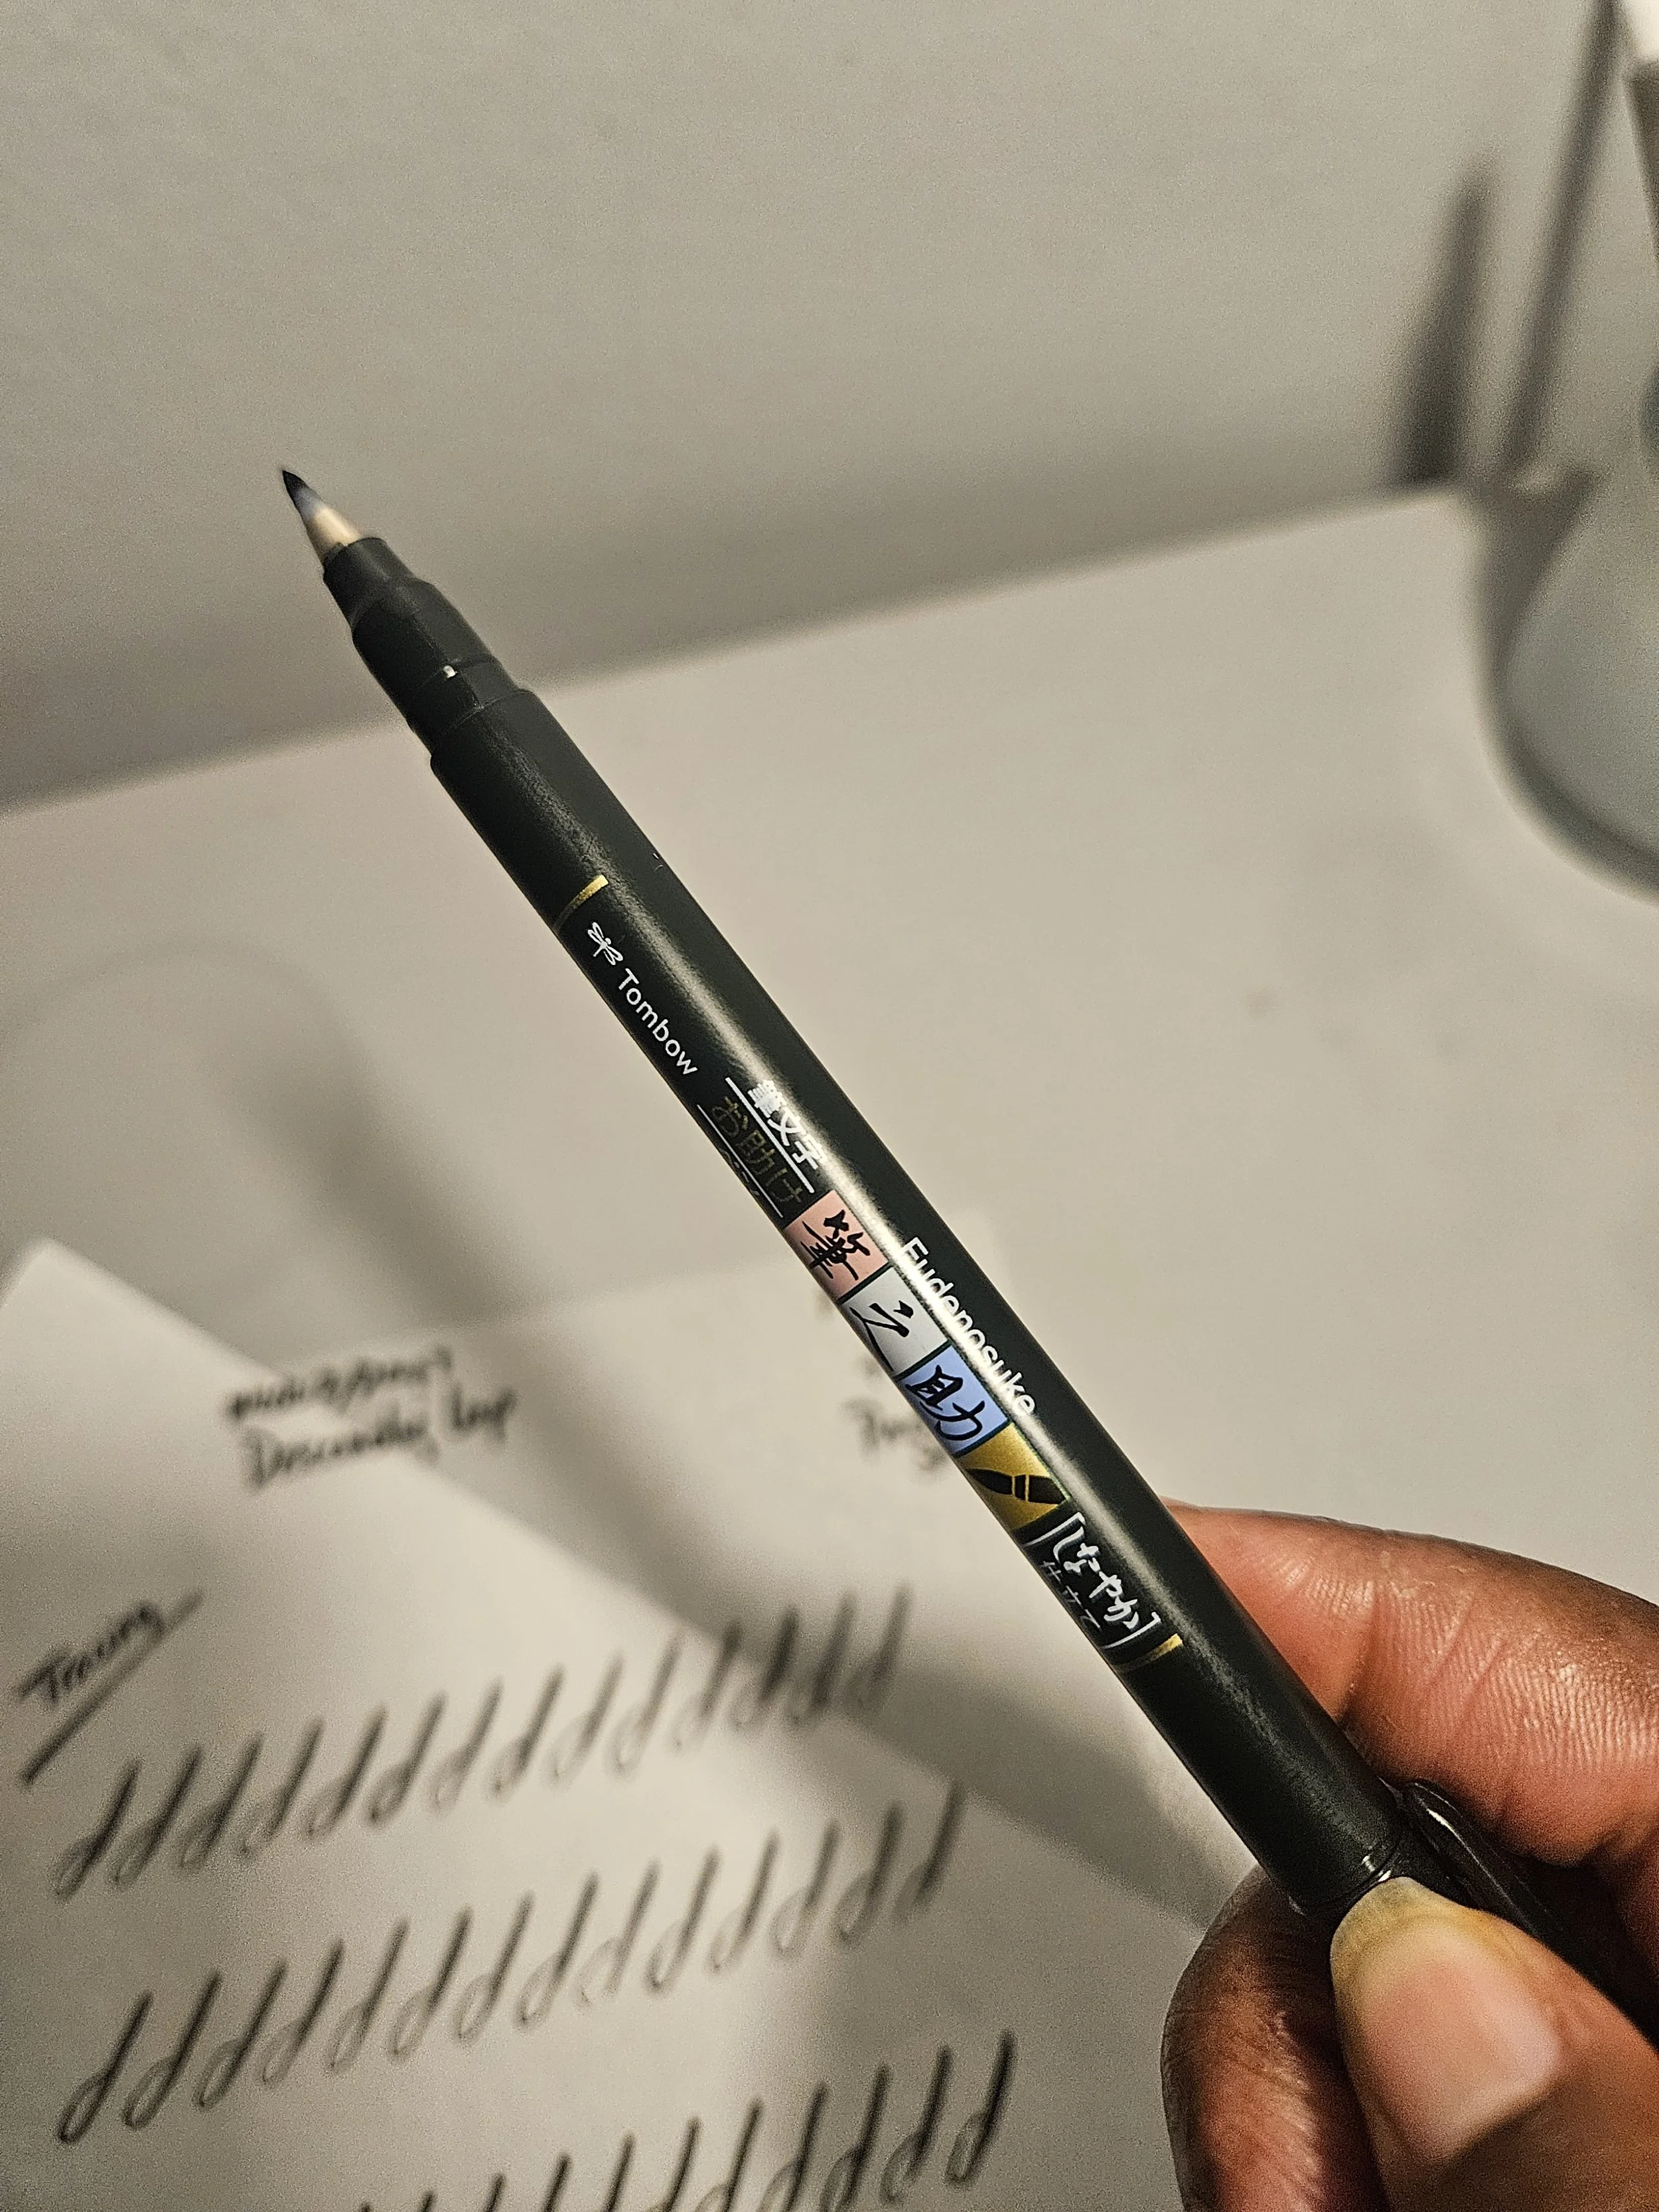
What is splitting/fraying?
Splitting on a soft-tip brush pen is when the brush tip separates into two or more points instead of staying together as a single, smooth tip. It can make your strokes look fuzzy, uneven, or scratchy.
The most common reasons are:
Pressing too hard. This is the #1 cause. Soft brush pens are designed to flex, but too much pressure forces the fibers apart. (This was me)
Using rough paper. Textured or low-quality paper can catch the fibers and cause them to separate.
Moving too quickly with heavy pressure. Fast, forceful downstrokes can stress the tip. (This was me again).
Normal wear. Even the most well-care brush pens eventually wear out after lots of practice. (This is me too).
What does it look like?
Instead of one clean downstroke, you might notice:
A tiny "V" shape at the tip.
Two distinct lines instead of one.
Jagged or fuzzy edges on thick strokes.
Difficulty making smooth transitions from thick to thin. (This was me, again)
That black dot on the 5th row is where I dropped my soft tip brush pen right before I started practicing the Descending Loop.
You can see immediately where the fraying began in the first line. I was thinking it wasn’t that bad and by the fourth line, I gave up. I switched to a brand new soft tip brush pen.
Once the fraying starts can it be fixed? Sometimes. Try these first, lighten your pressure. Rotate the pen slightly as you practice, so the same side isn't always taking the pressure. Write on smooth paper (such as HP Premium 32 or marker paper). If the fibers are only slightly separated, gently reshape the tip with your fingers while the pen is capped. My pen was beyond repair.
If the tip stays split no matter what you do, it's usually worn out and it's time to replace the pen. had to throw mine away but luckily, I bought several. One thing about beginners like us find out, you don't need as much pressure as you think. A soft brush pen will produce beautiful thick strokes with surprisingly little force.
A simple way to remember it is:
✨ Light pressure = thin upstrokes
✨ Gentle, controlled pressure = thick downstrokes
❌ Heavy pressure = split tip and shorter pen life
Many novice calligraphers like me wear out their first soft-tip brush pens. I'm pretty sure some of you already have. It's almost a rite of passage, and as our control improves, the wear and tear on our pens will lighten, and they will last much longer.
Day 13: Tiny Improvements | Ascending Loops
Woke up refreshed and ready to tackle another day of learning calligraphy. Last night I had an epic meltdown, which I will post about on Sunday (Day 14), when I do my week in review.
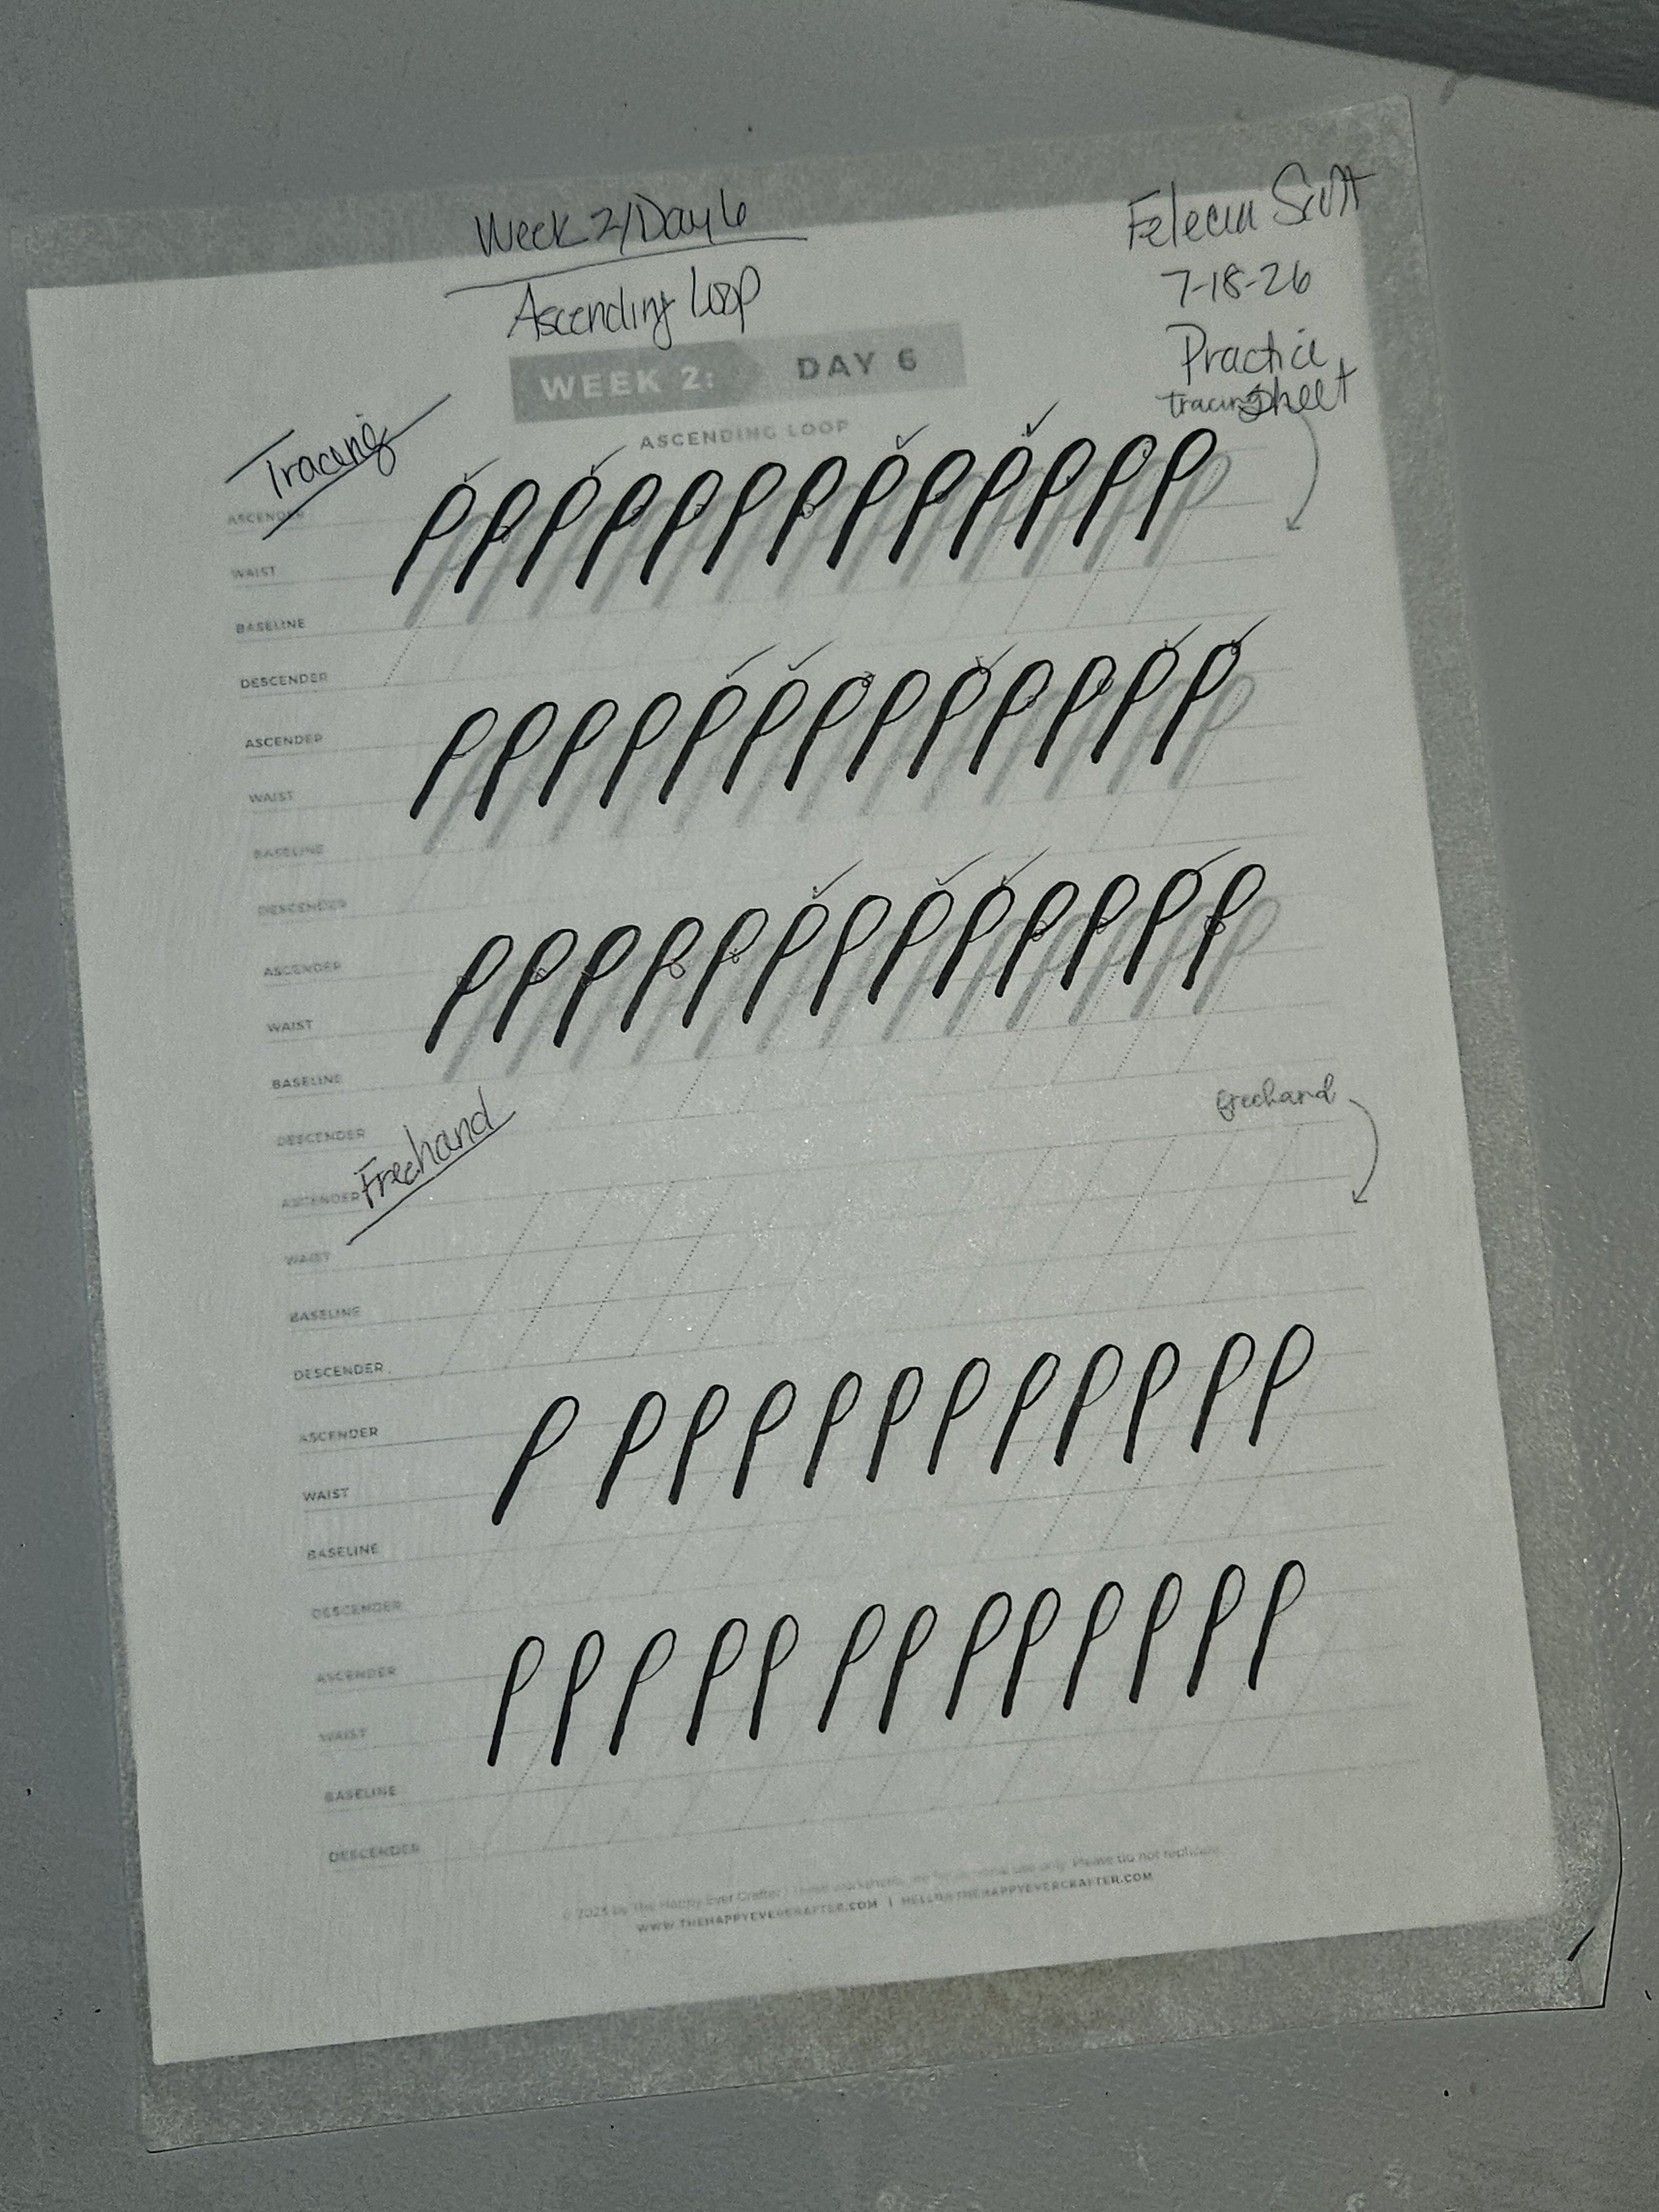
Week 2 Day 6 Ascending Practice Loop Sheet Credit @ Becca at The Happily Ever Crafter / Ascending Loop - Finished Practice Sheet by Felecia Scott
Woke up refreshed and ready to tackle another day of learning calligraphy. Last night I had an epic meltdown, which I will post about on Sunday (Day 14), when I do my week in review. It was spectacular and a very important lesson.
I must say that my tracing has improved since last week. I got a lot more checks (mean good job) than circles (I do this when I did a stroke wrong). The freehand portion, I gave it my best try. It's the first time doing the Ascending Loop without a guide. Out of the two rows, I did two Ascending Loops right. I'll take that win and build from that. A lot of the loops look like upside music notes.
I did notice that my upstroke, which is the light stroke, is coming along. I felt the line was still a bit too heavy and my control with the pen is getting much better. This comes with practice. I practice twice a day for 30 minutes. Once in the morning and the evening. This is what works best for me and my life. This isn't the holy grail of how to practice because what works for me may not work for you and that's okay. If you only have 15 minutes, then do that.
I'm learning that calligraphy isn't about getting it right the first time. It's about having the patience to keep practicing until your hand catches up with your determination.
Day 12: Chasing Better | Ovals
Last week, this one had me on the ropes. I was ready to snap my pen in half, throw my hands up and walk away.
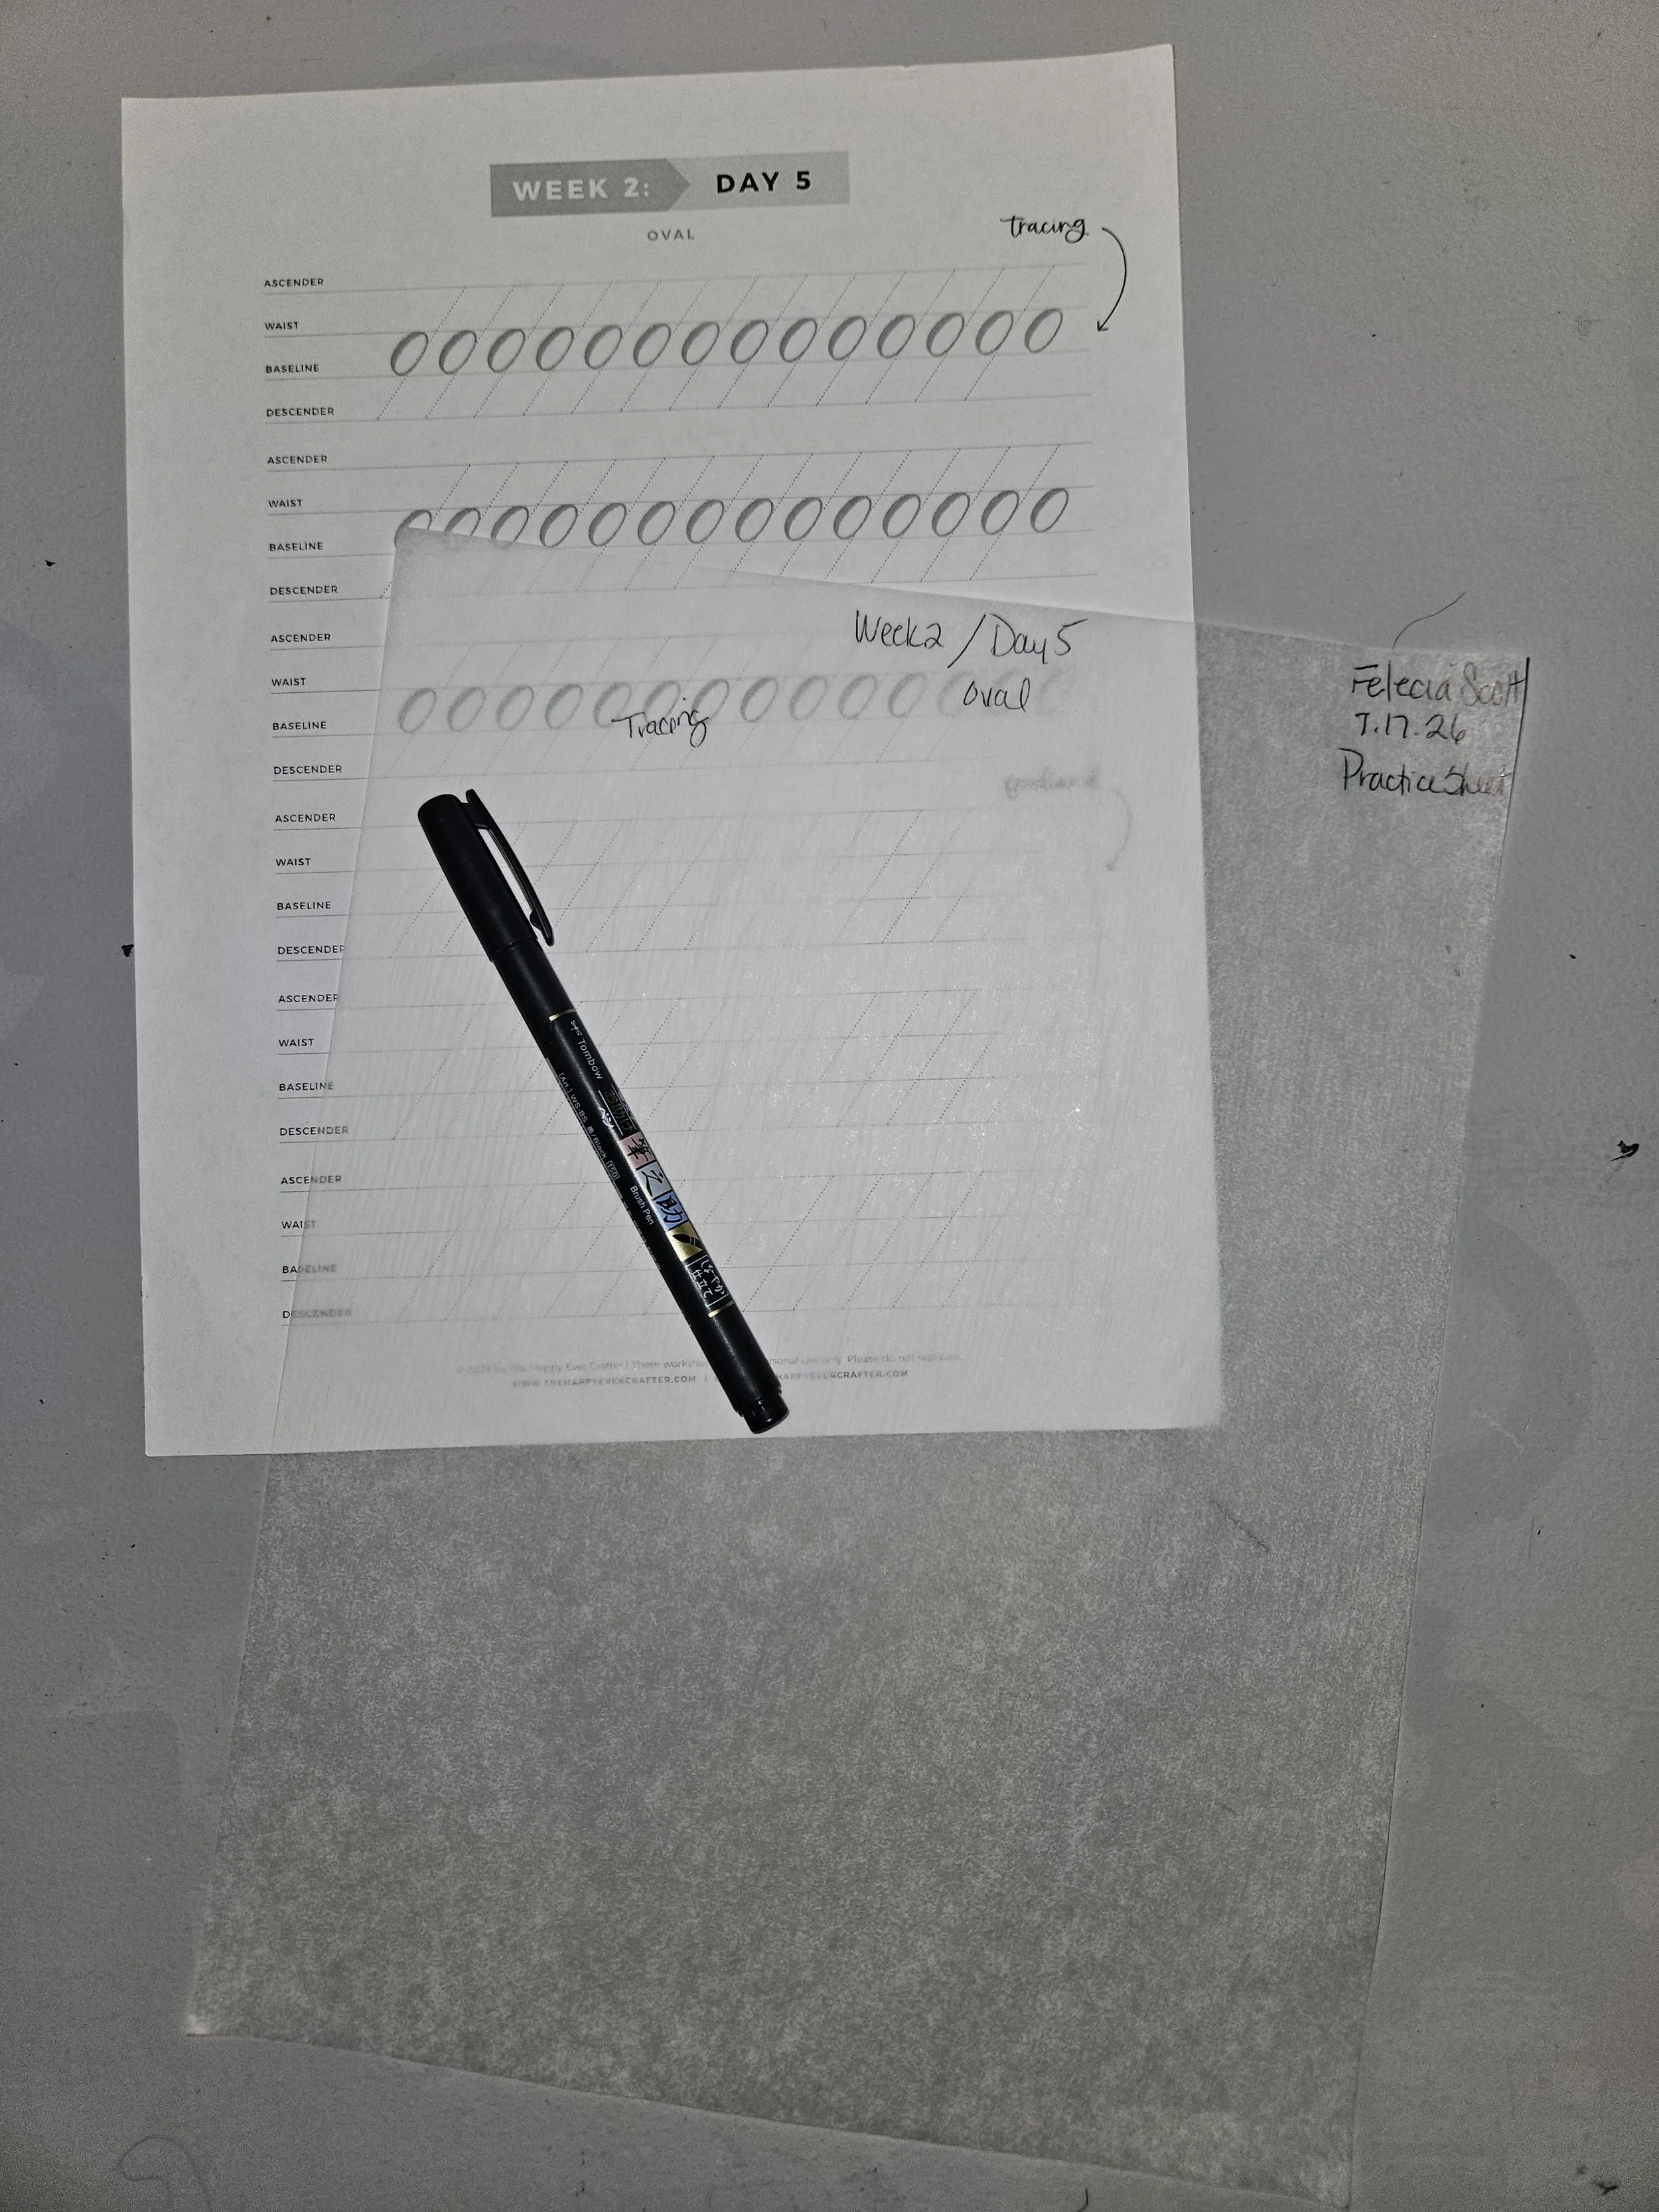
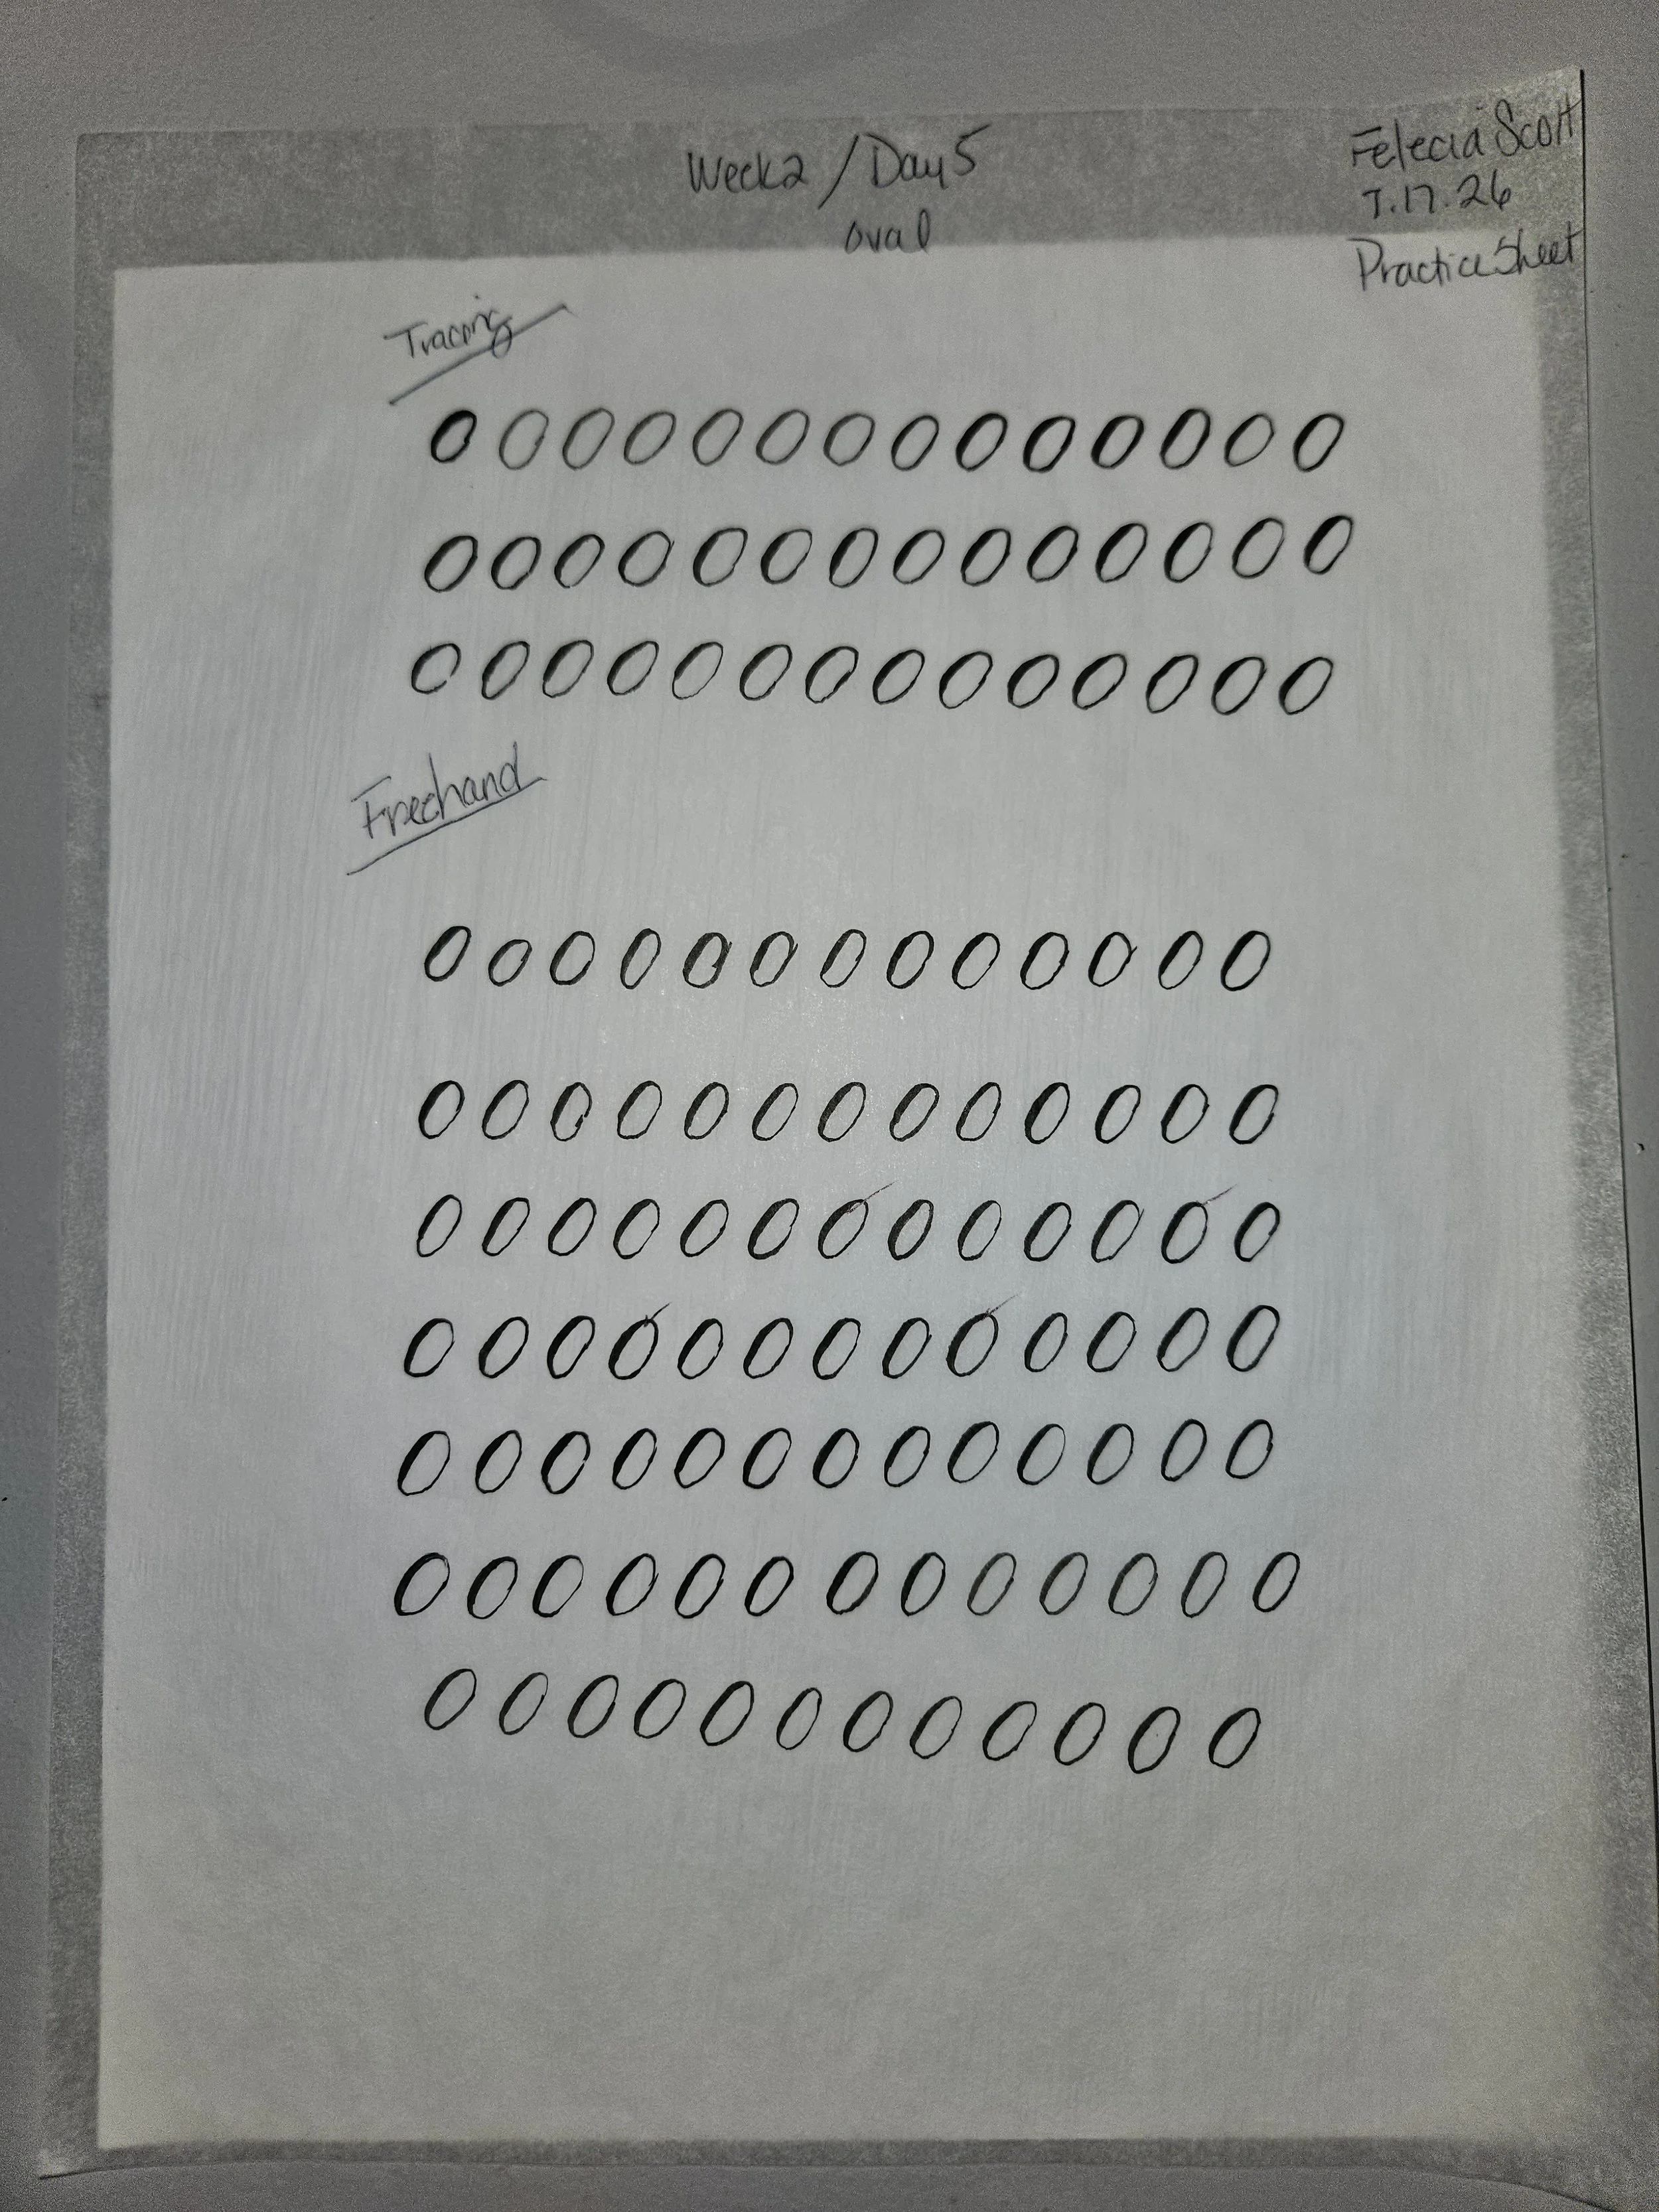
Last week, this one had me on the ropes. I was ready to snap my pen in half, throw my hands up and walk away. My ovals were not coming together. I couldn't get the strokes to line up. It was a mess but this week, I've seen progress. It's been small but noticeable. At least for me.
A lot of my issues had to do with my pen angle. I noticed I wasn't keeping it at a 45-degree angle. This allows for better flexibility of the brush tip pen. It allows the pen to bend more easily. Doing two 30-minute practice sessions in the morning and evening has helped. I felt that I did better with the freehand than with the tracing on Day 12.
Above I posted last week (my first week) and this week's Oval practice sheet. I would love opinion on the two practice sheets for comparison and tell me what you think? Yes, with more practice this I will get better and write this stroke accurately and beautifully.
Day 11: Learning Patience | Compound Curves
This time practicing the Compound Stroke wasn't as stressful as it was last week. My strokes were slightly more confident and less shaky.
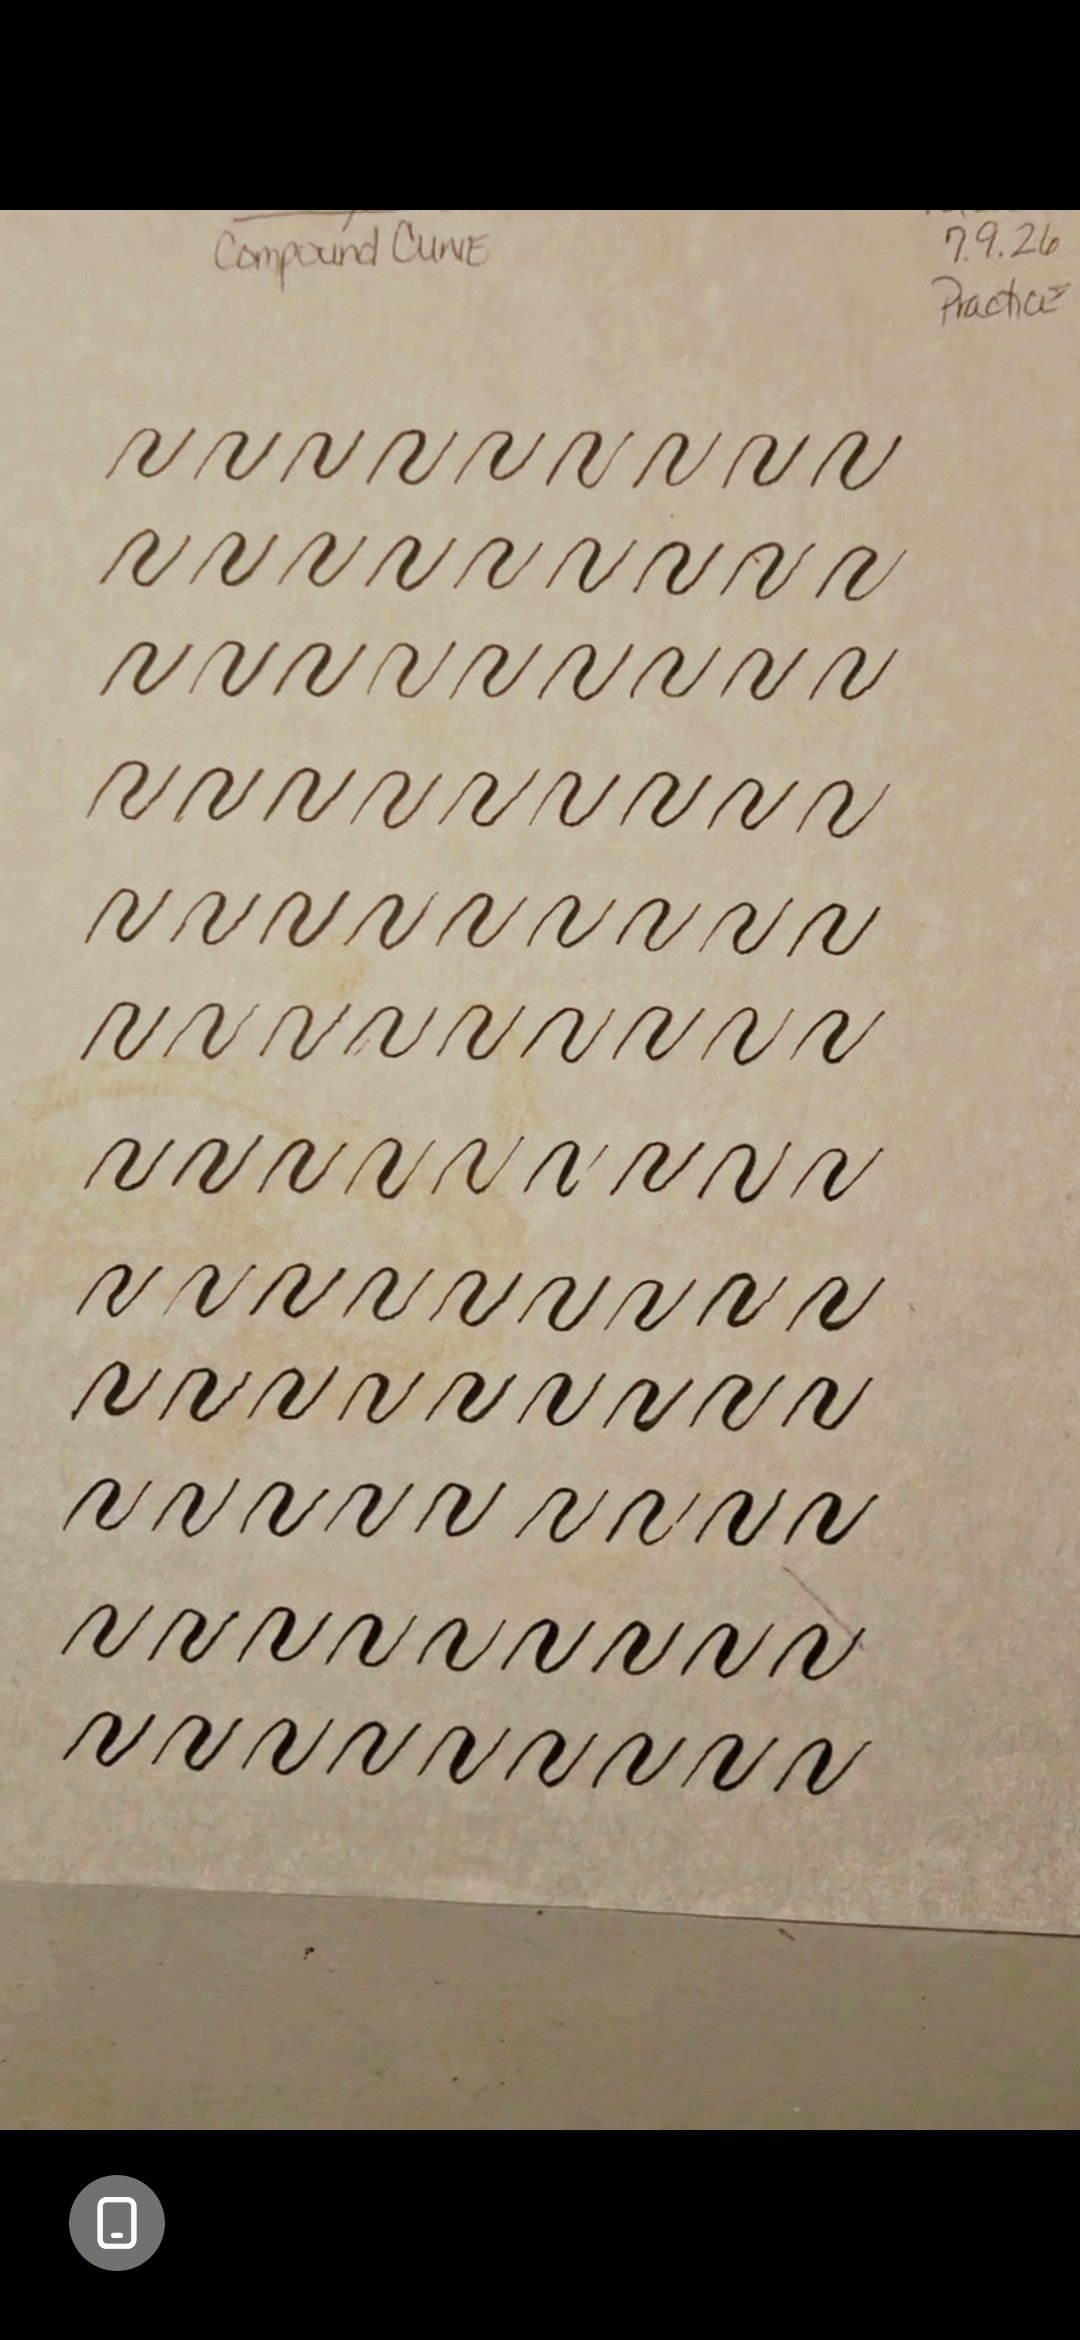
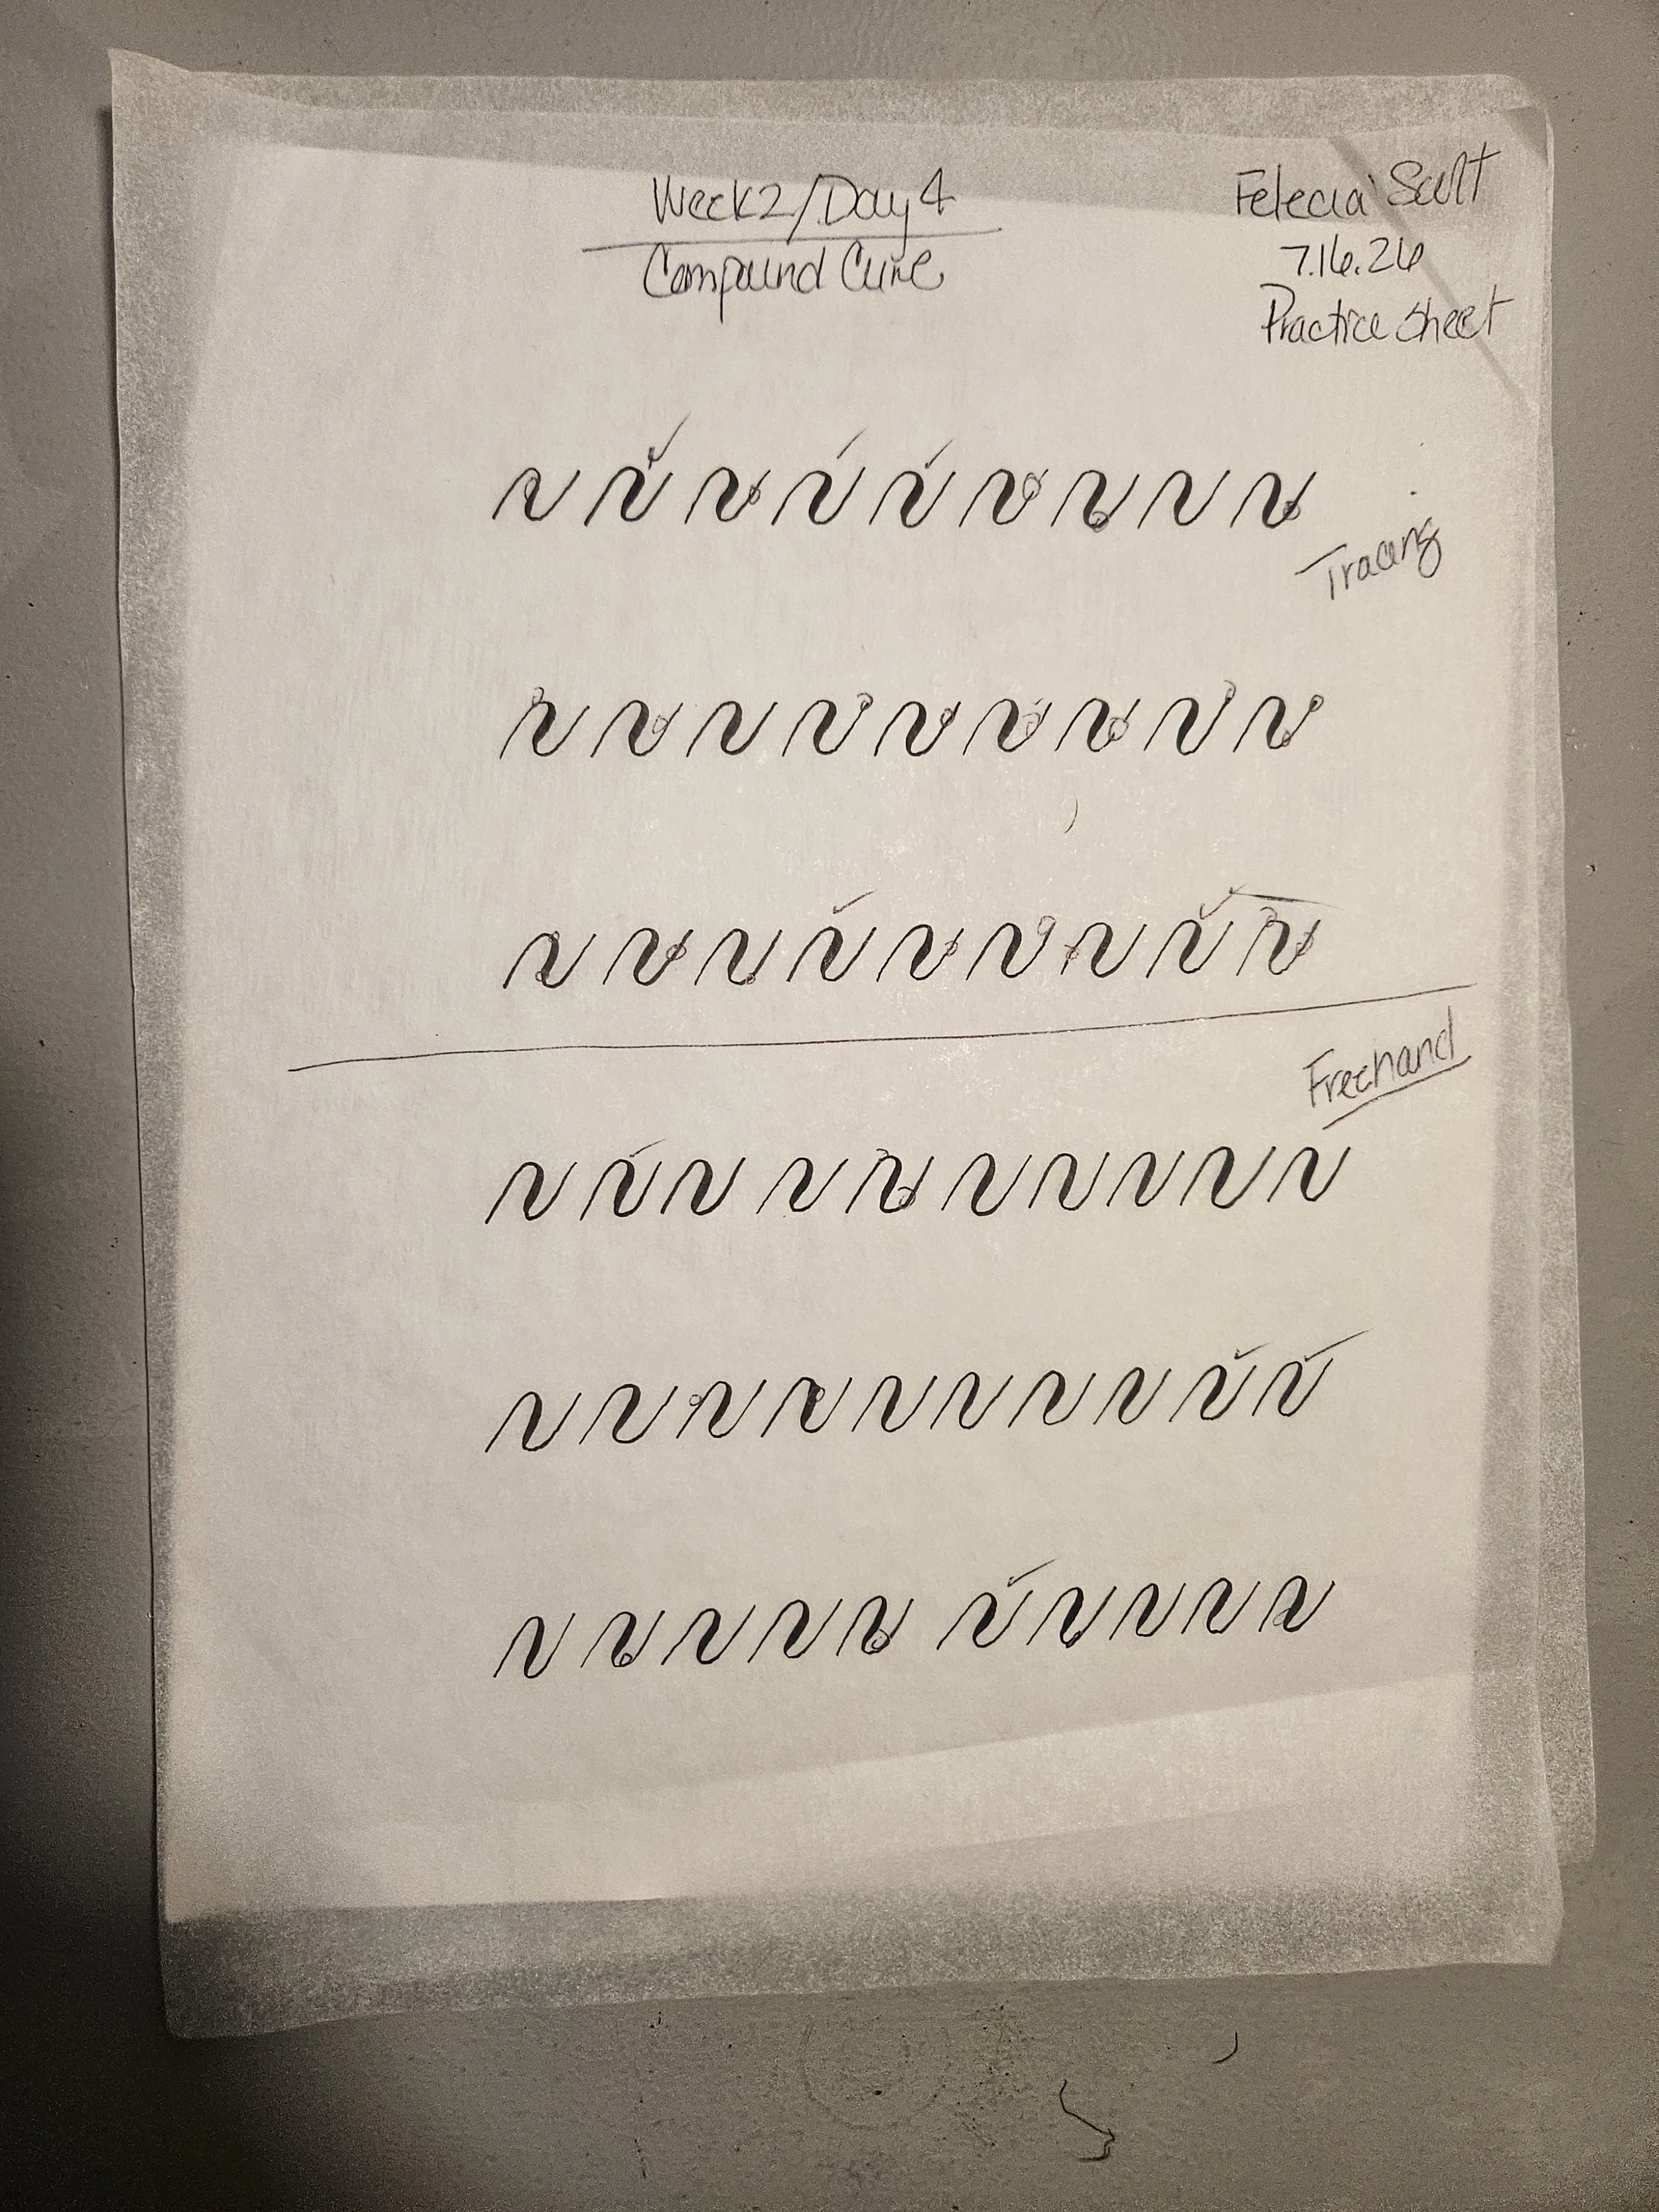
(Left) Week 1 Compound Curve (Right) Week 2 Compound Curve
This time practicing the Compound Stroke wasn't as stressful as it was last week. My strokes were slightly more confident and less shaky. I still did struggle but my frustration level was way down. After completing several Compound Curves, especially in the freehand part. You know what? They were really good and I gave myself a mental pat on the back. All I keep thinking was that I'm going to master this stroke, continuing practicing twice a day in the 30-minutes increments and I will get more confident. I will continue to fall more in love with calligraphy.
Side note because of calligraphy, I started writing slower, no longer in a rush. People would say that I have nice handwriting but now, it’s been noticed more. I work in a hotel, and my co-workers will come to me and ask, "Hey can you write something nice on this card for a guest. Your handwriting is so pretty, or your handwriting is nicer than mine. Of course, I'm more than happy to. I can't wait until I can write letters and words so I can create an amazing guest experience with my calligraphy.
Above I posted a picture of my first second-week side by side comparison of practicing the Compound Curve. I would love to get your critique and see how did I do? It's amazing what one week of consistent practice can do.
Day 10: Slowing Down to Improve | Underturn Strokes
I watched today’s video on Instagram and seen in real time, being played back of what I did right and wrong is so helpful.
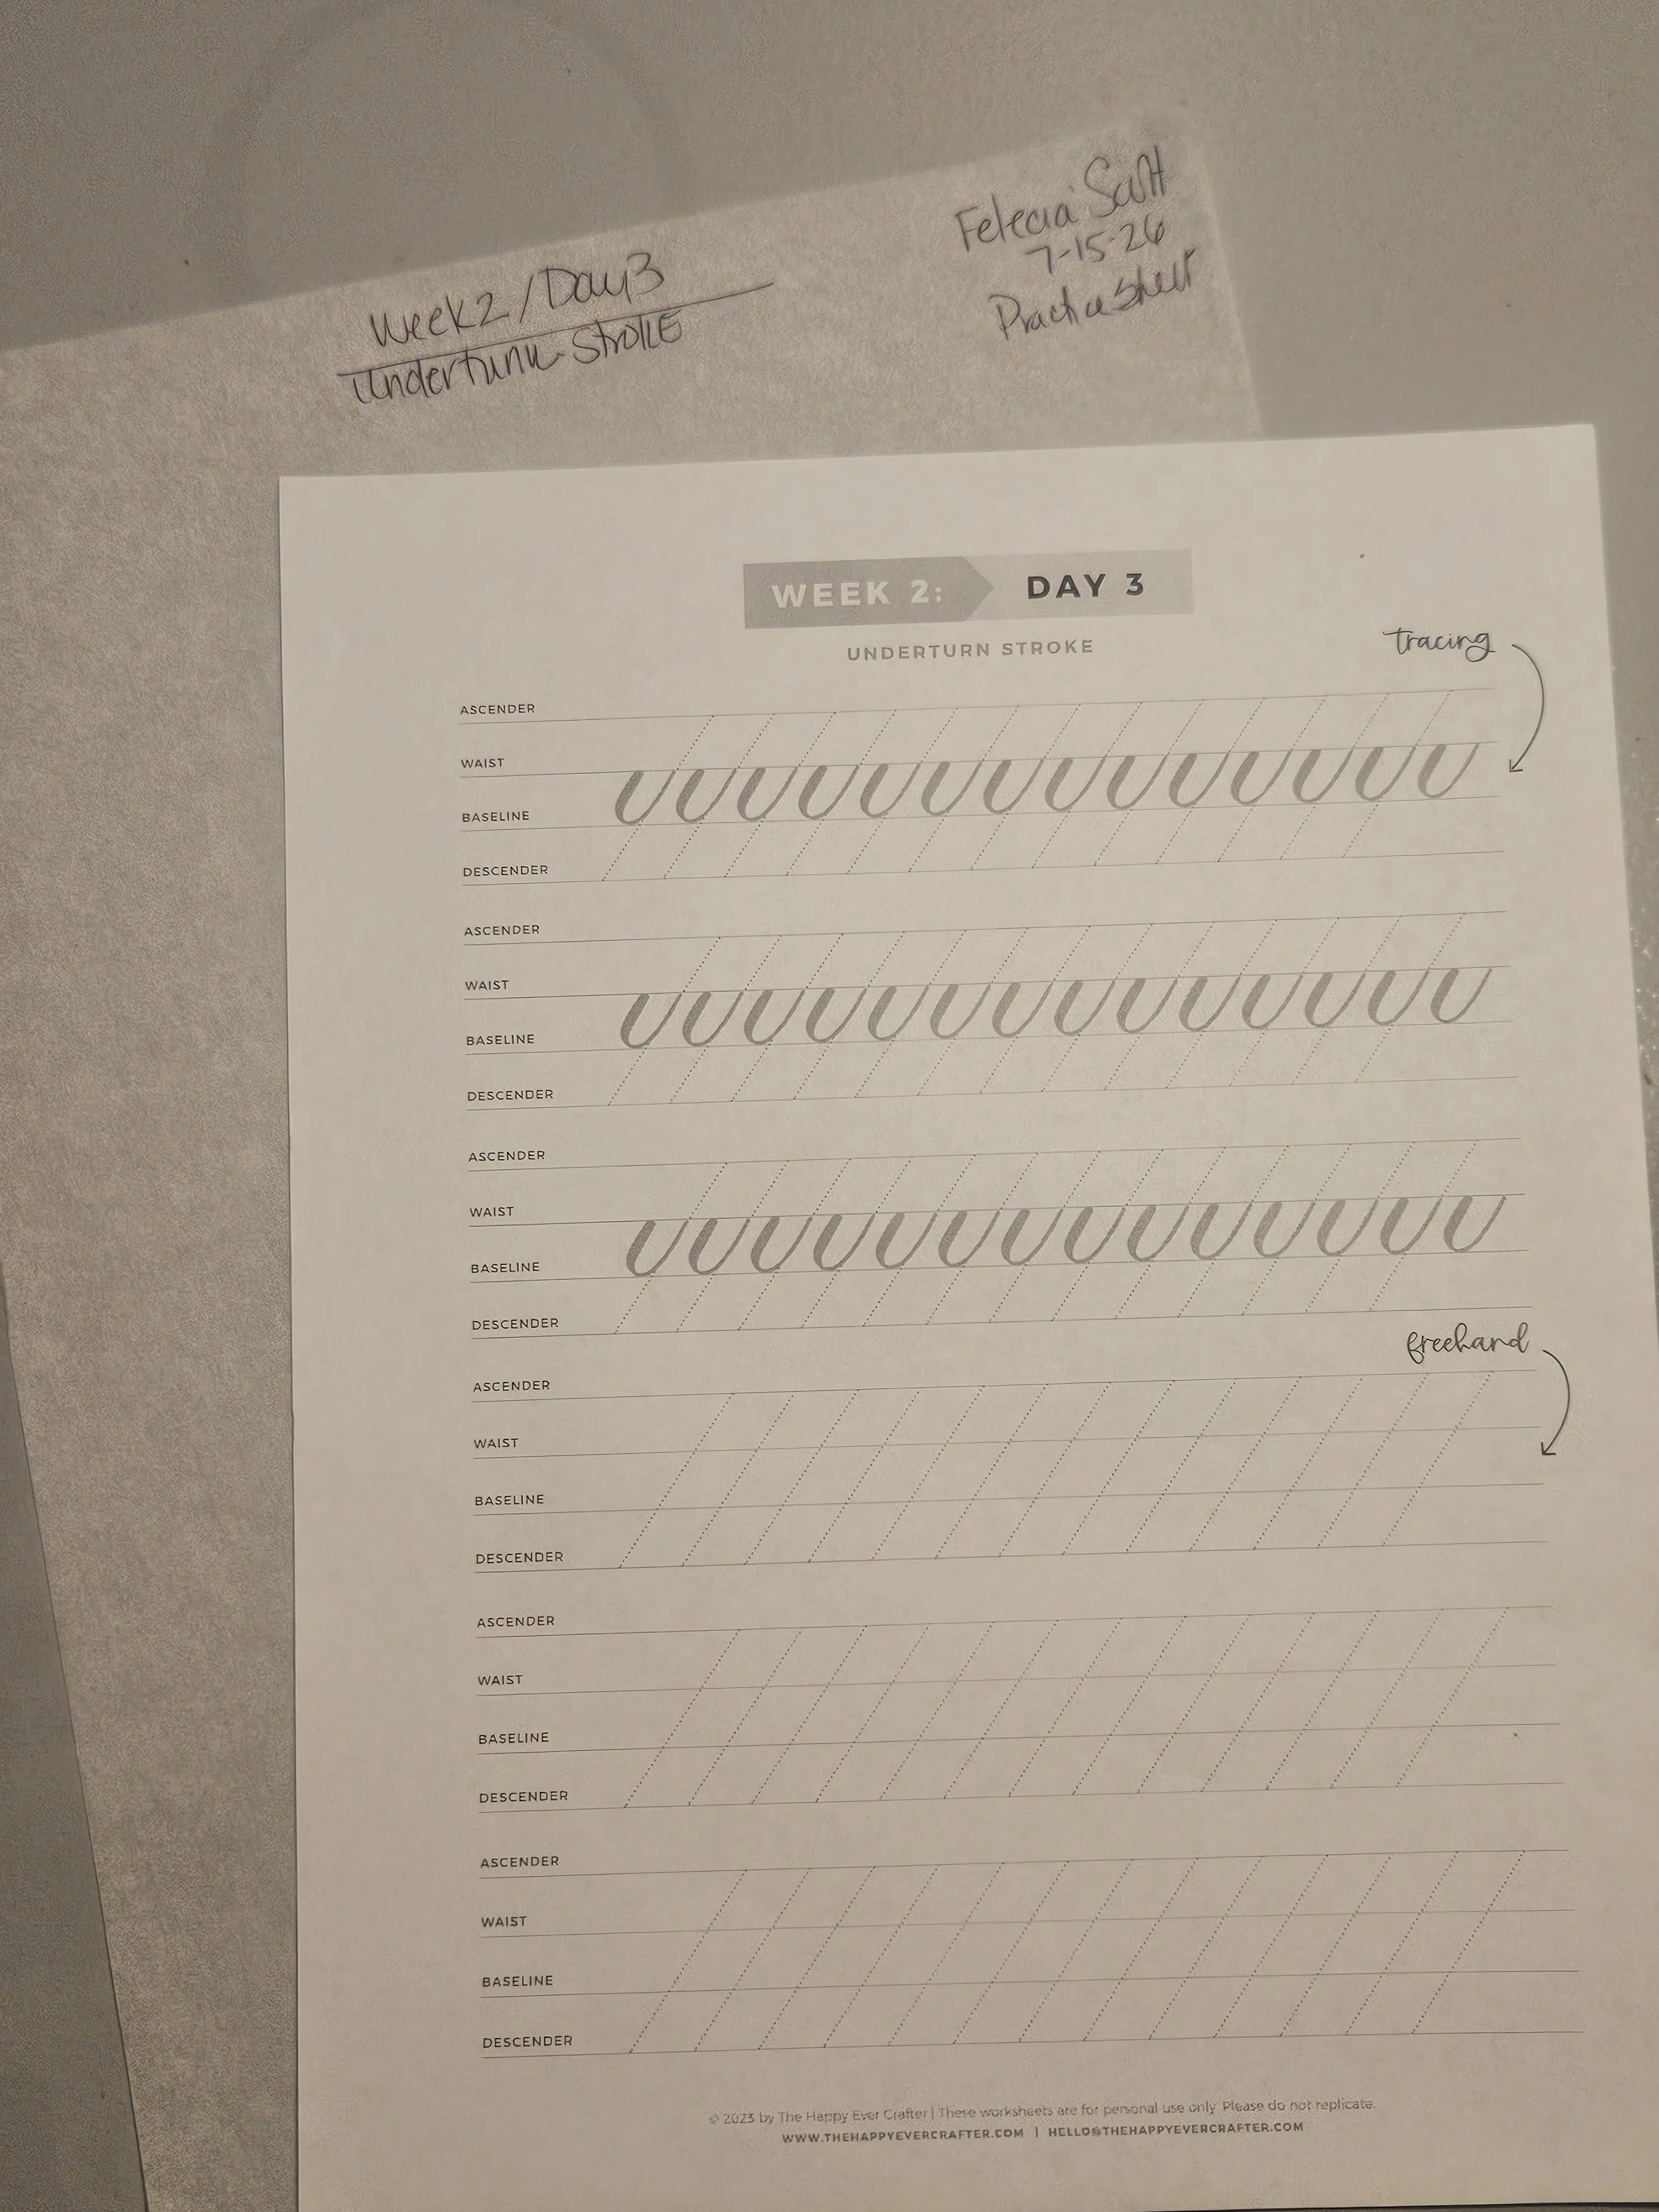
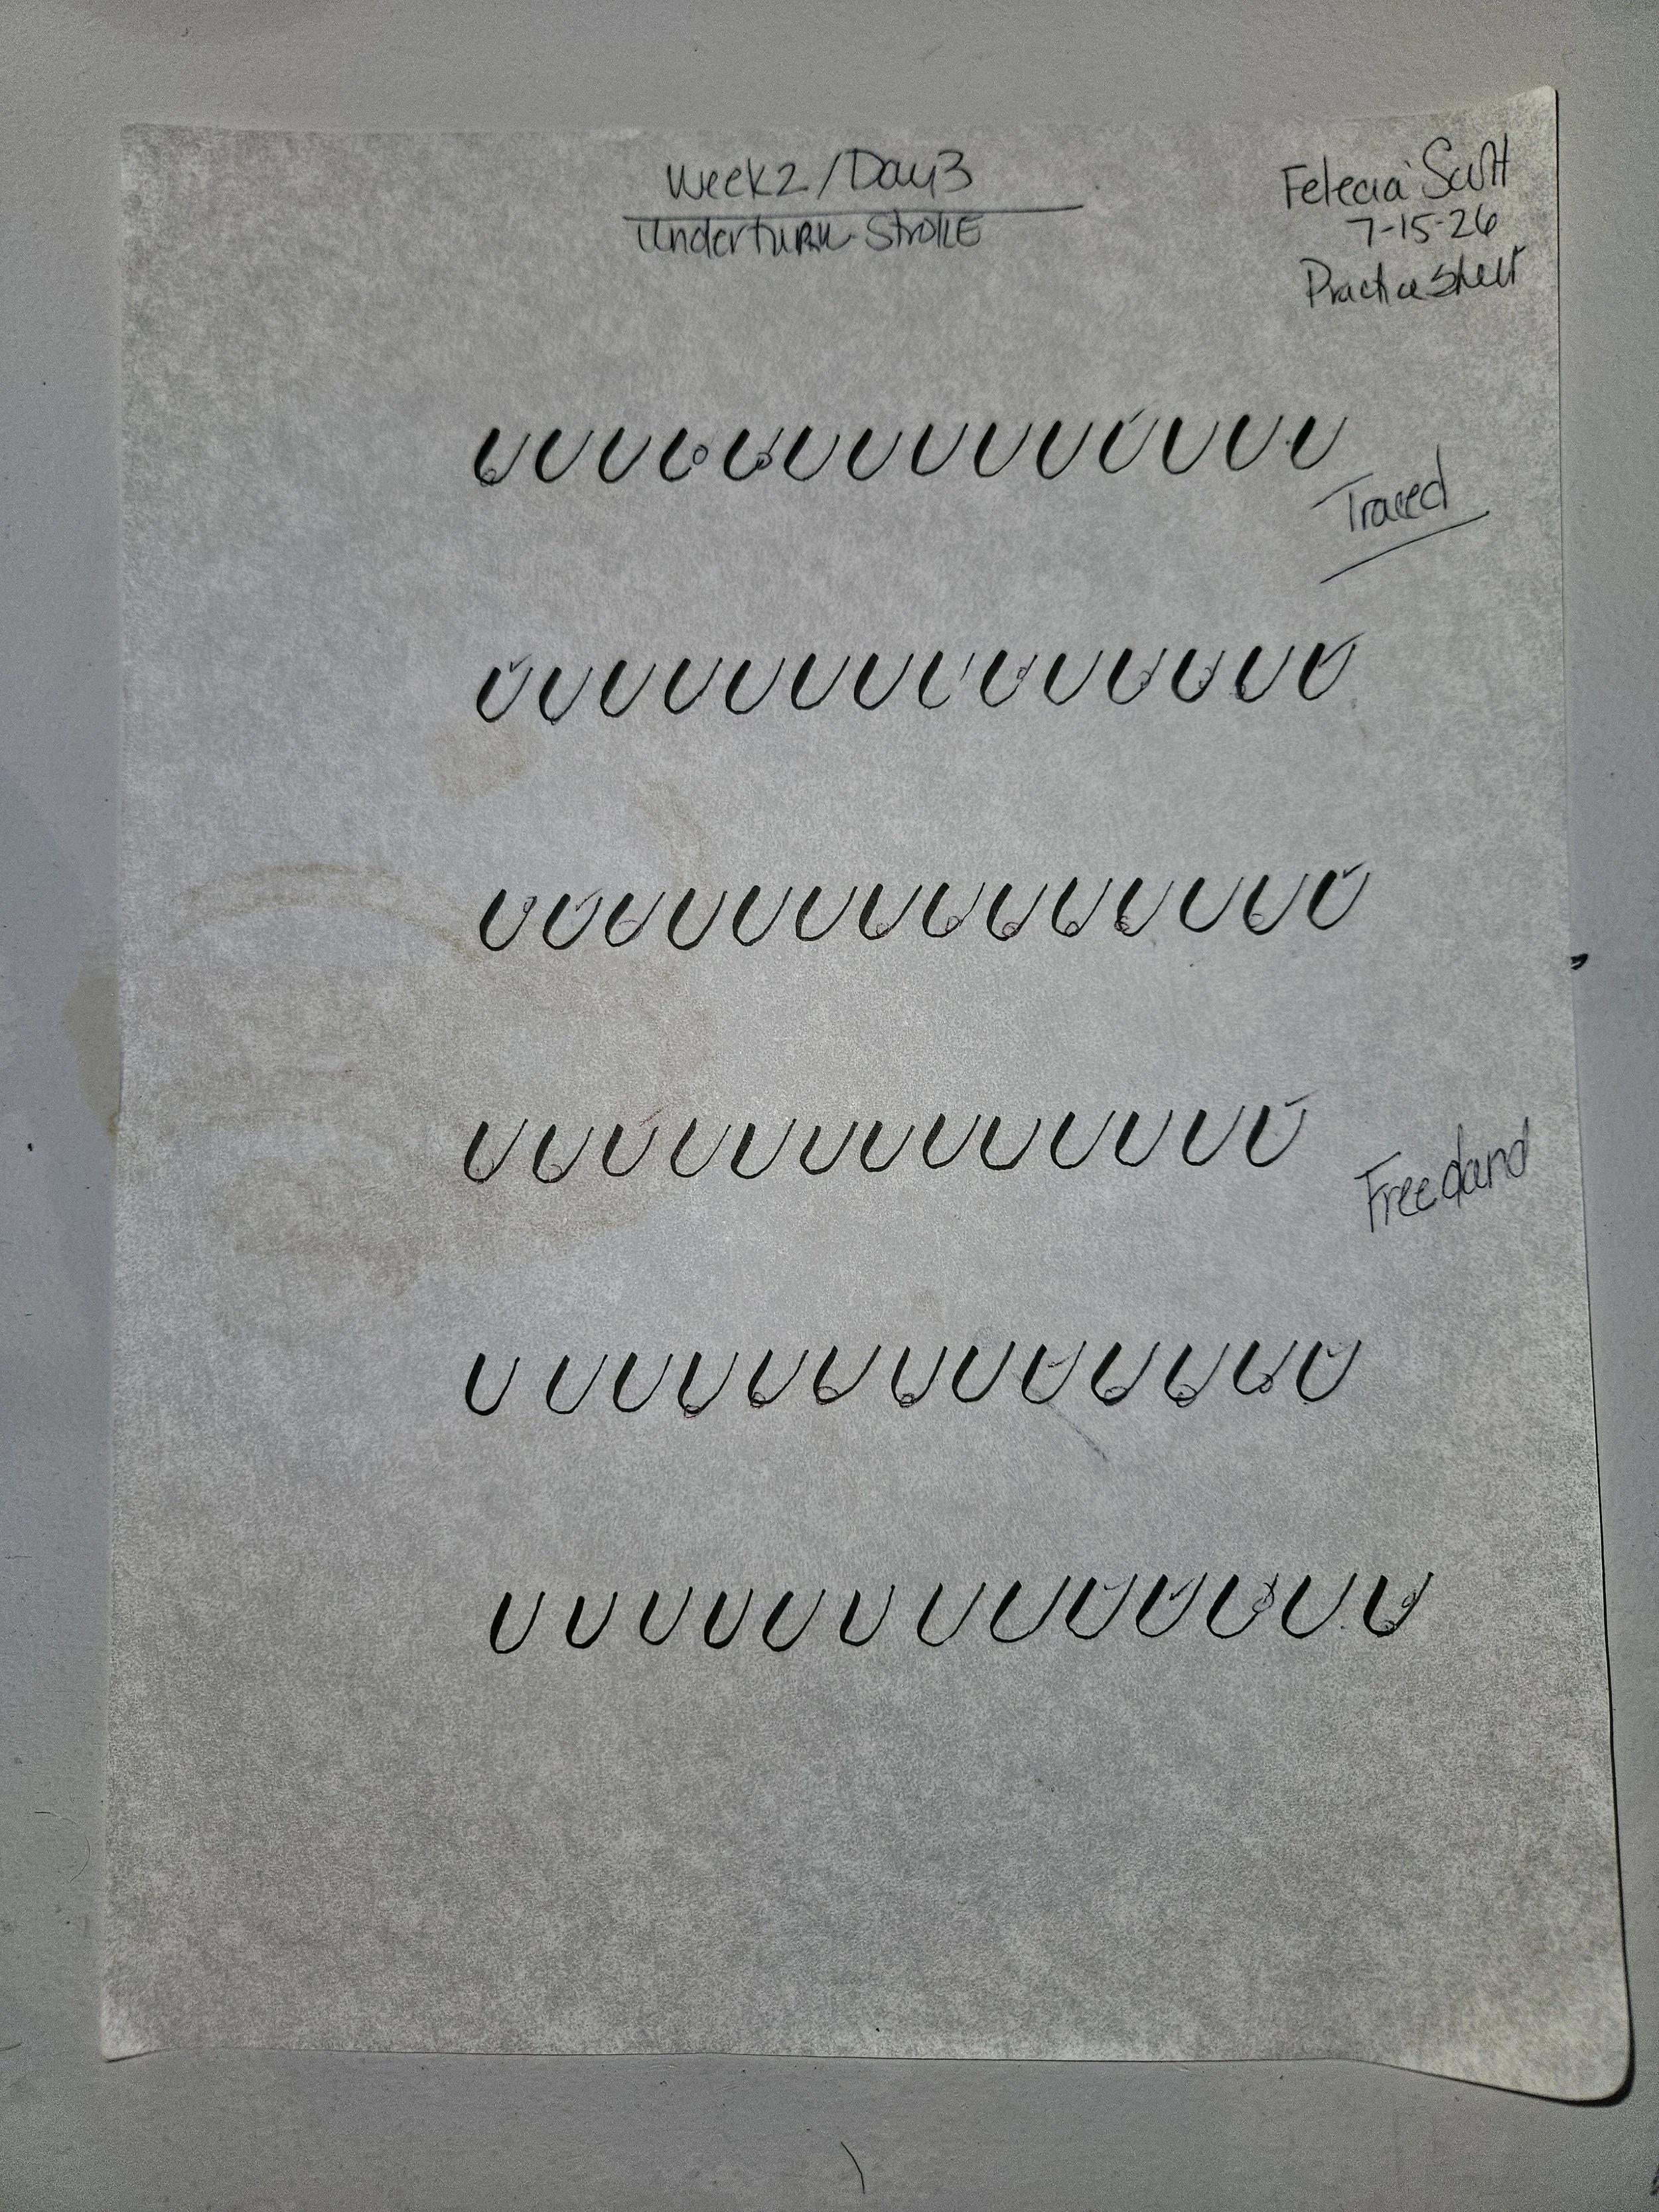
(Left) Underturn Practice Sheet (Credit Becca C. Rafter) @ The Happily Every Crafter (Right) My finished practice sheet for the Underturn Stroke.
I can’t believe it. I’m already on Day 10. Where did the time go and yes, practice does pay off. I watched today’s video on Instagram and seen in real time, being played back of what I did right and wrong is so helpful. I can see where I was going to fast from the thick downstroke transitioning to the curve up (this is where I’m still need to slow down). I will keep this in mind for my second practice drill that I will be doing this evening. I still have some shakiness but not as much. The shakiness comes when I’m doing the upstroke and I’m pressing too lightly. The pen and ink lose contact with the tracing paper.
For the things I did well, consistently holding my pen at a 45-degree angle. Holding the pen at this angle allows me to bend the tip to get the thick down strokes and flexibility in my grip to do the light upstrokes without stopping for a smooth transition. Rotating the pen every few strokes without having to constantly remind myself. This allows for even use of the brush tip. Because my mind wasn’t focused on those two things anymore, I could really focus more on the strokes, getting them right even during the freehand.
I do highly recommend that if you can, video yourself practicing your calligraphy strokes. The camera catches everything, positive and negative. It's amazing what ten days of consistent practice can do. I started from absolute zero. Today, I'm beginning to recognize my own mistakes before someone else has to point them out—and that feels like real progress.
Day 9: Building Consistency | Overturn Strokes
Last week’s Overturn Stroke had me stressed out. My lines were shaky. I failed every time trying to make the curve smoothly transition into the heavy downstroke.
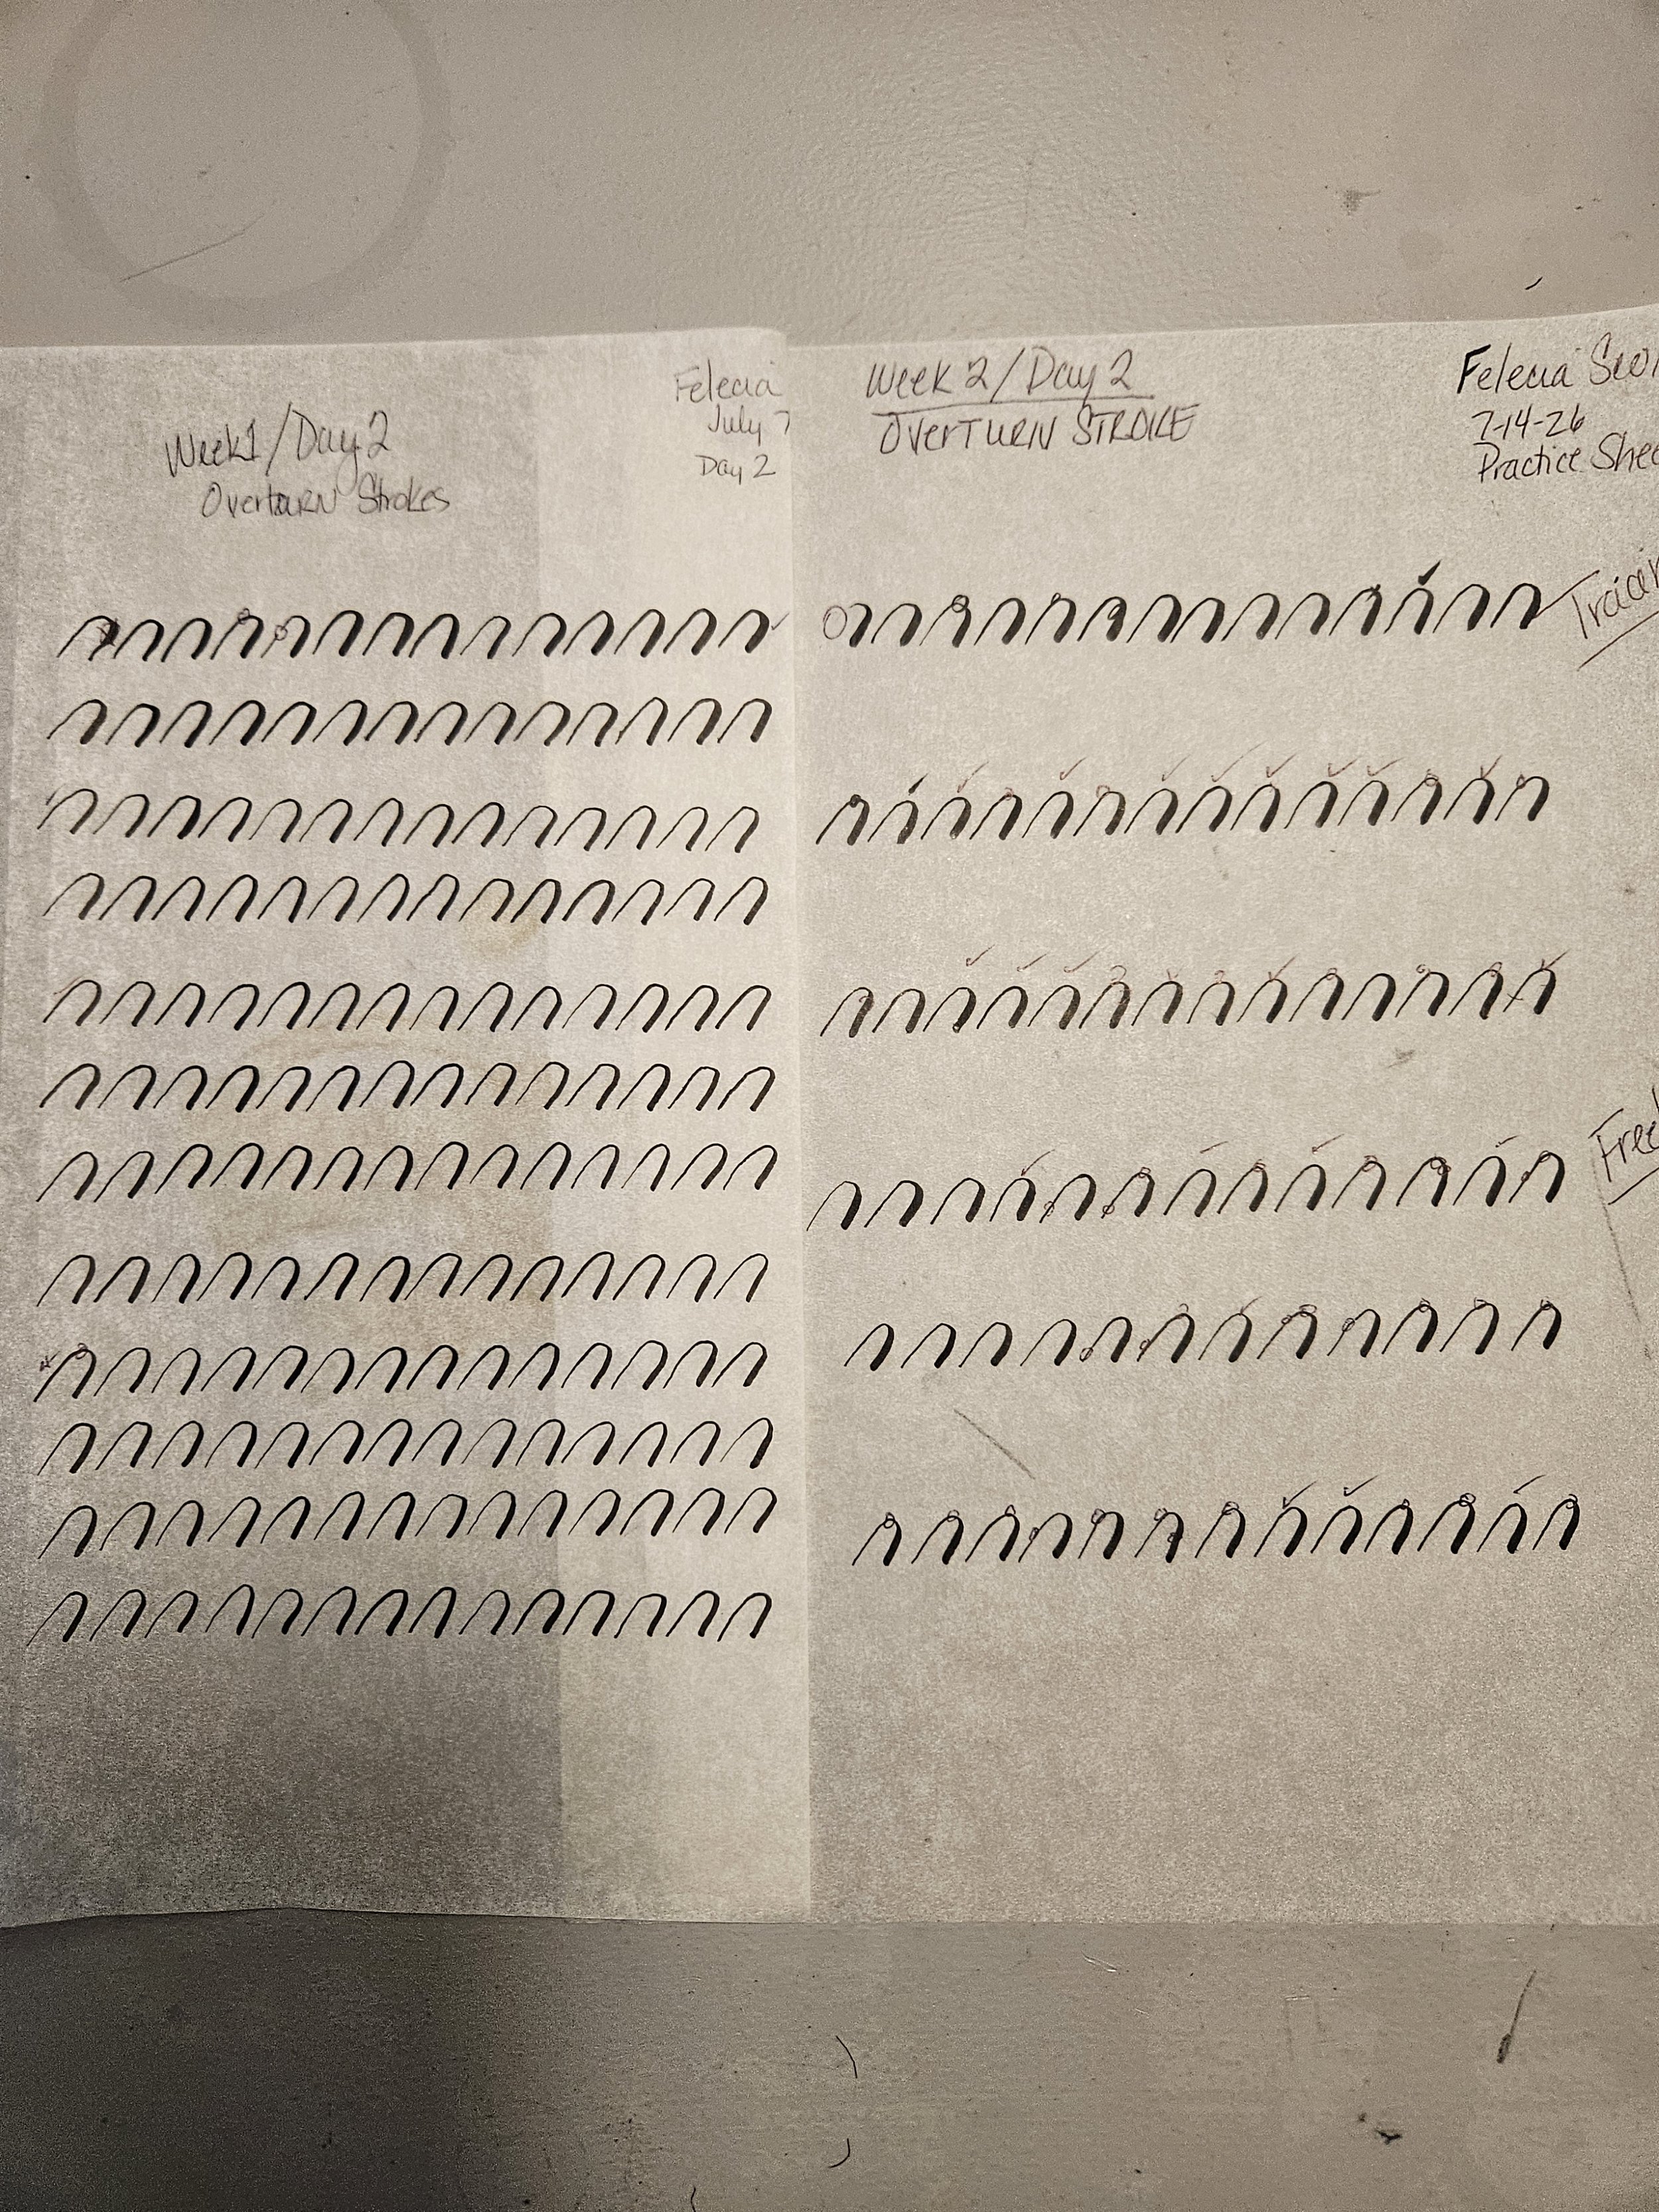
(Left) Week 1 Vs (Right) Week 2 Overturn Stroke
Last week’s Overturn Stroke had me stressed out. My lines were shaky. I failed every time trying to make the curve smoothly transition into the heavy downstroke. This week was a whole lot better. I mean night and day. I found my grip to my soft tip brush pen (this is the blue pen) and the thirty minute sessions practicing in the morning and evening really did pay off.
This practice sheet is a bit different than last week. It’s 50% tracing and 50% freehand. The tracing portion of the practice I felt good about doing. When it came to the freehand, I stared at the person for good two minutes before beginning. It’s intimidating not having the guide there and I’m just beginning my second week. All that was going through my head on top knowing I was going to be recording a calligraphy stroke that was hard for me to do.
Below are my drawings from The Overturn Stroke from Week 1 and today’s (week 2) to see the progress. Some days the practice sheet looks better than others. Some days I still fight the urge to rush through a stroke or compare my work to someone who has been doing this for years. But I’m starting to appreciate where I am right now because this is my beginning. I really am learning calligraphy from absolute zero.
Day 8: Back to the Basics | Upstrokes & Downstrokes
As you see in the sheet, this week the Up and Downstroke practice sheet looks a little different. The first three lines are traced, and the last three lines are freehand.
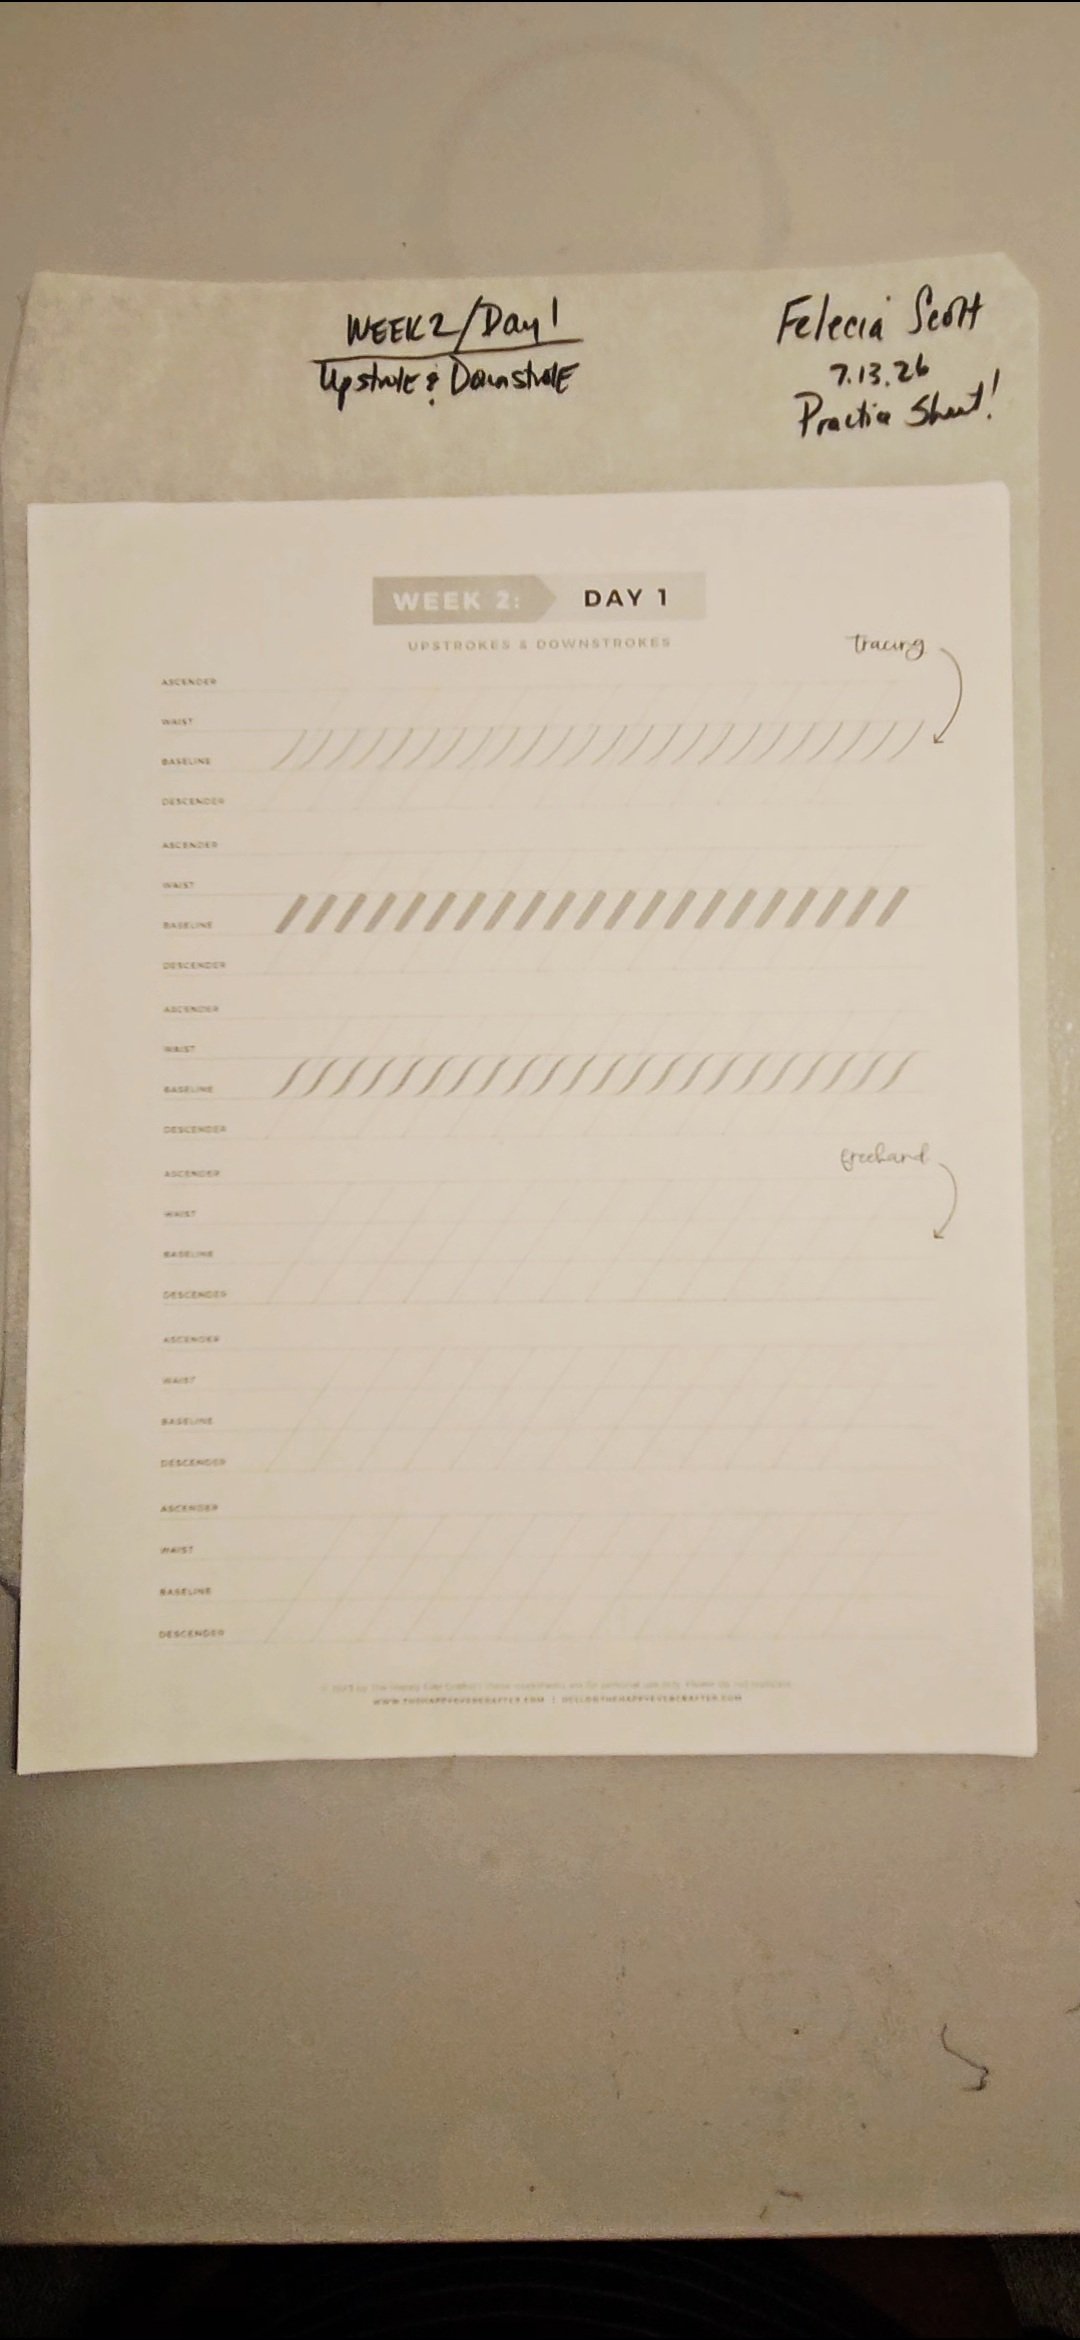
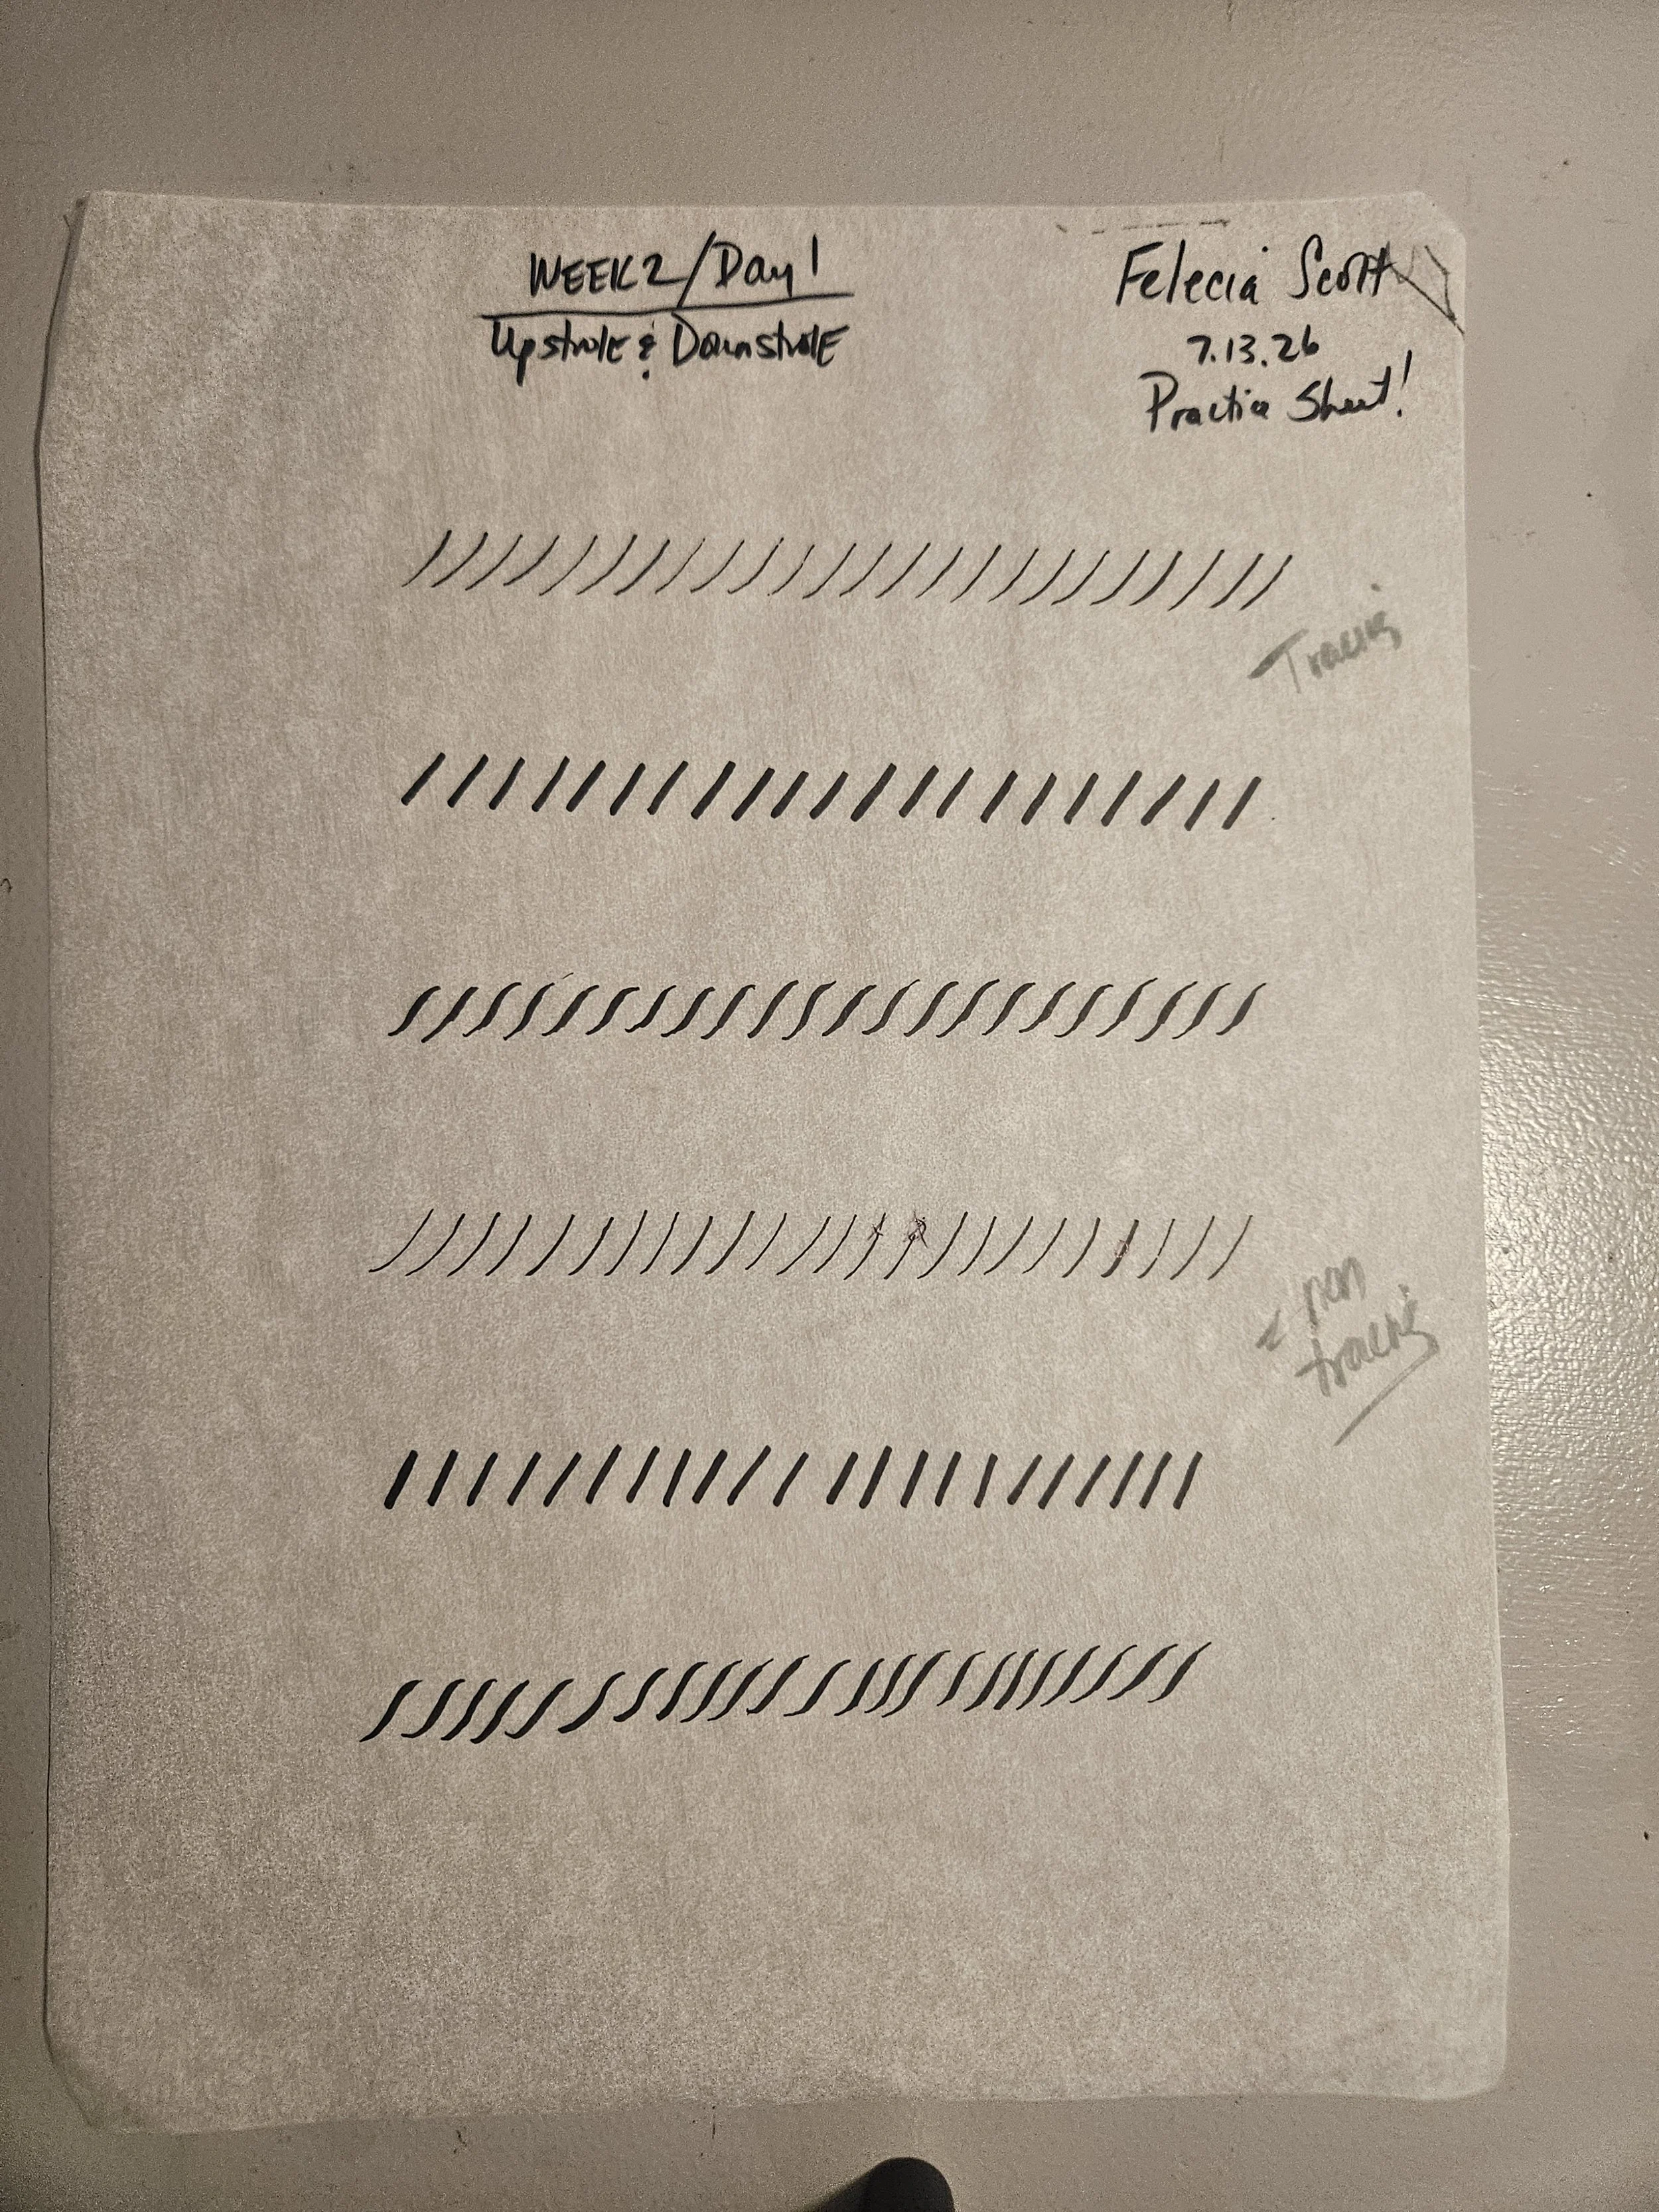
(Left) Upstroke and Downstroke Practice Sheet (Credit Becca C. Rafter) @ The Happily Every Crafter (Right) My finished practice sheet for the Upstroke and Downstroke Stroke.
As you see in the sheet, this week the Up and Downstroke practice sheet looks a little different. The first three lines are traced, and the last three lines are freehand. When I was tracing the first line, my hands were still shaky but not as much. I felt that I did have better control of the brush pen since I found my grip. I’m able to concentrate better on doing the strokes.
The downstroke, which is the second line, which has a heavy, thick stroke was easy, but I didn’t want to rush it. Even what appears to be an easy stroke deserves just as much attention as the other. This course is to solidify and master the basic calligraphy stroke. These are the building blocks to write words.
The last line is a combination of heavy and light strokes; it was rough. There’s no sugar coating it. I completely fell apart during the freehand. They look like little baby cobra snakes. 🐍😂
Honestly, I was going to post it because I was embarrassed by that last line up of light and dark strokes, but this is part of the journey to learning calligraphy. It’s not always beautiful in the beginning. It takes time to learn. If you are practicing calligraphy like me and see this and your practice drills look like what I posted below. There’s nothing to be embarrassed or feel defeated about.
Whether it’s learning calligraphy or any new skill, decide to go all in. A year, six months or even three months from now, it will look a lot different. We will feel more confident, happy, and excited about our progress. From where we started to where we are now.
Tomorrow is another chance to improve, one stroke at a time.
Days 1-7: Reflections From Today’s Practice Corner
I’m just going to jump right into what I’ve learned so far from my first week learning calligraphy.
I’m just going to jump right into what I’ve learned so far from my first week learning calligraphy.
Increased practice time. I started with 15 minutes and by day two, I bumped it up to 30 minutes a day. Then increased my practice from one time to two times a day for thirty minutes. By the end of my first week, I bumped it up to one hour practice sessions twice a day. The reason I bumped it up twice a day because, I’m really enjoying practice and sometimes, I get so engrossed that I go past the thirty minutes. If I get tired, I will stop.
Chose My Brush Pen: After alternating on and off all week with soft tip pen and a hard tip pen, I chose the (blue) hard tip pen. I was able to control the flow of ink better.
Patience and Be Gentle: This first week has been a series of highs and lows. Some strokes were easier for me to do and others such as The Oval, Compound Curve and Ascending Loop, I was almost in tears because they were so difficult for me. I’m not a failure because I didn’t master the stroke the first time. I did a lot of self-soothing and reminding myself, I’m a novice. This is the first time and first week of me learning and practicing.
Put the Cap Back on Pen When Done: This should be a no brainer but I forgot to. On Day 3, I was doing the Underturn Stroke that evening. I was really tired from the evening practice. I thought I had placed the cap back on the hard tip brush pen and didn’t. When I woke up the next morning and start Day 4, the Compound Stroke, it had dried out considerably. It was all caught on video. I even uploaded to Instagram. See here. I uploaded it to for transparency and honesty. The good, the bad and the dried out. 😂
Even though my practice sheets aren't perfect, I can already see small improvements. I'm excited to see what week two has in store.
Day 7 - Descending Loop
I went into this lesson pretty confidently. I did pretty well with the Ascending Loop but calligraphy has a way a humbling a person. It humbled me.
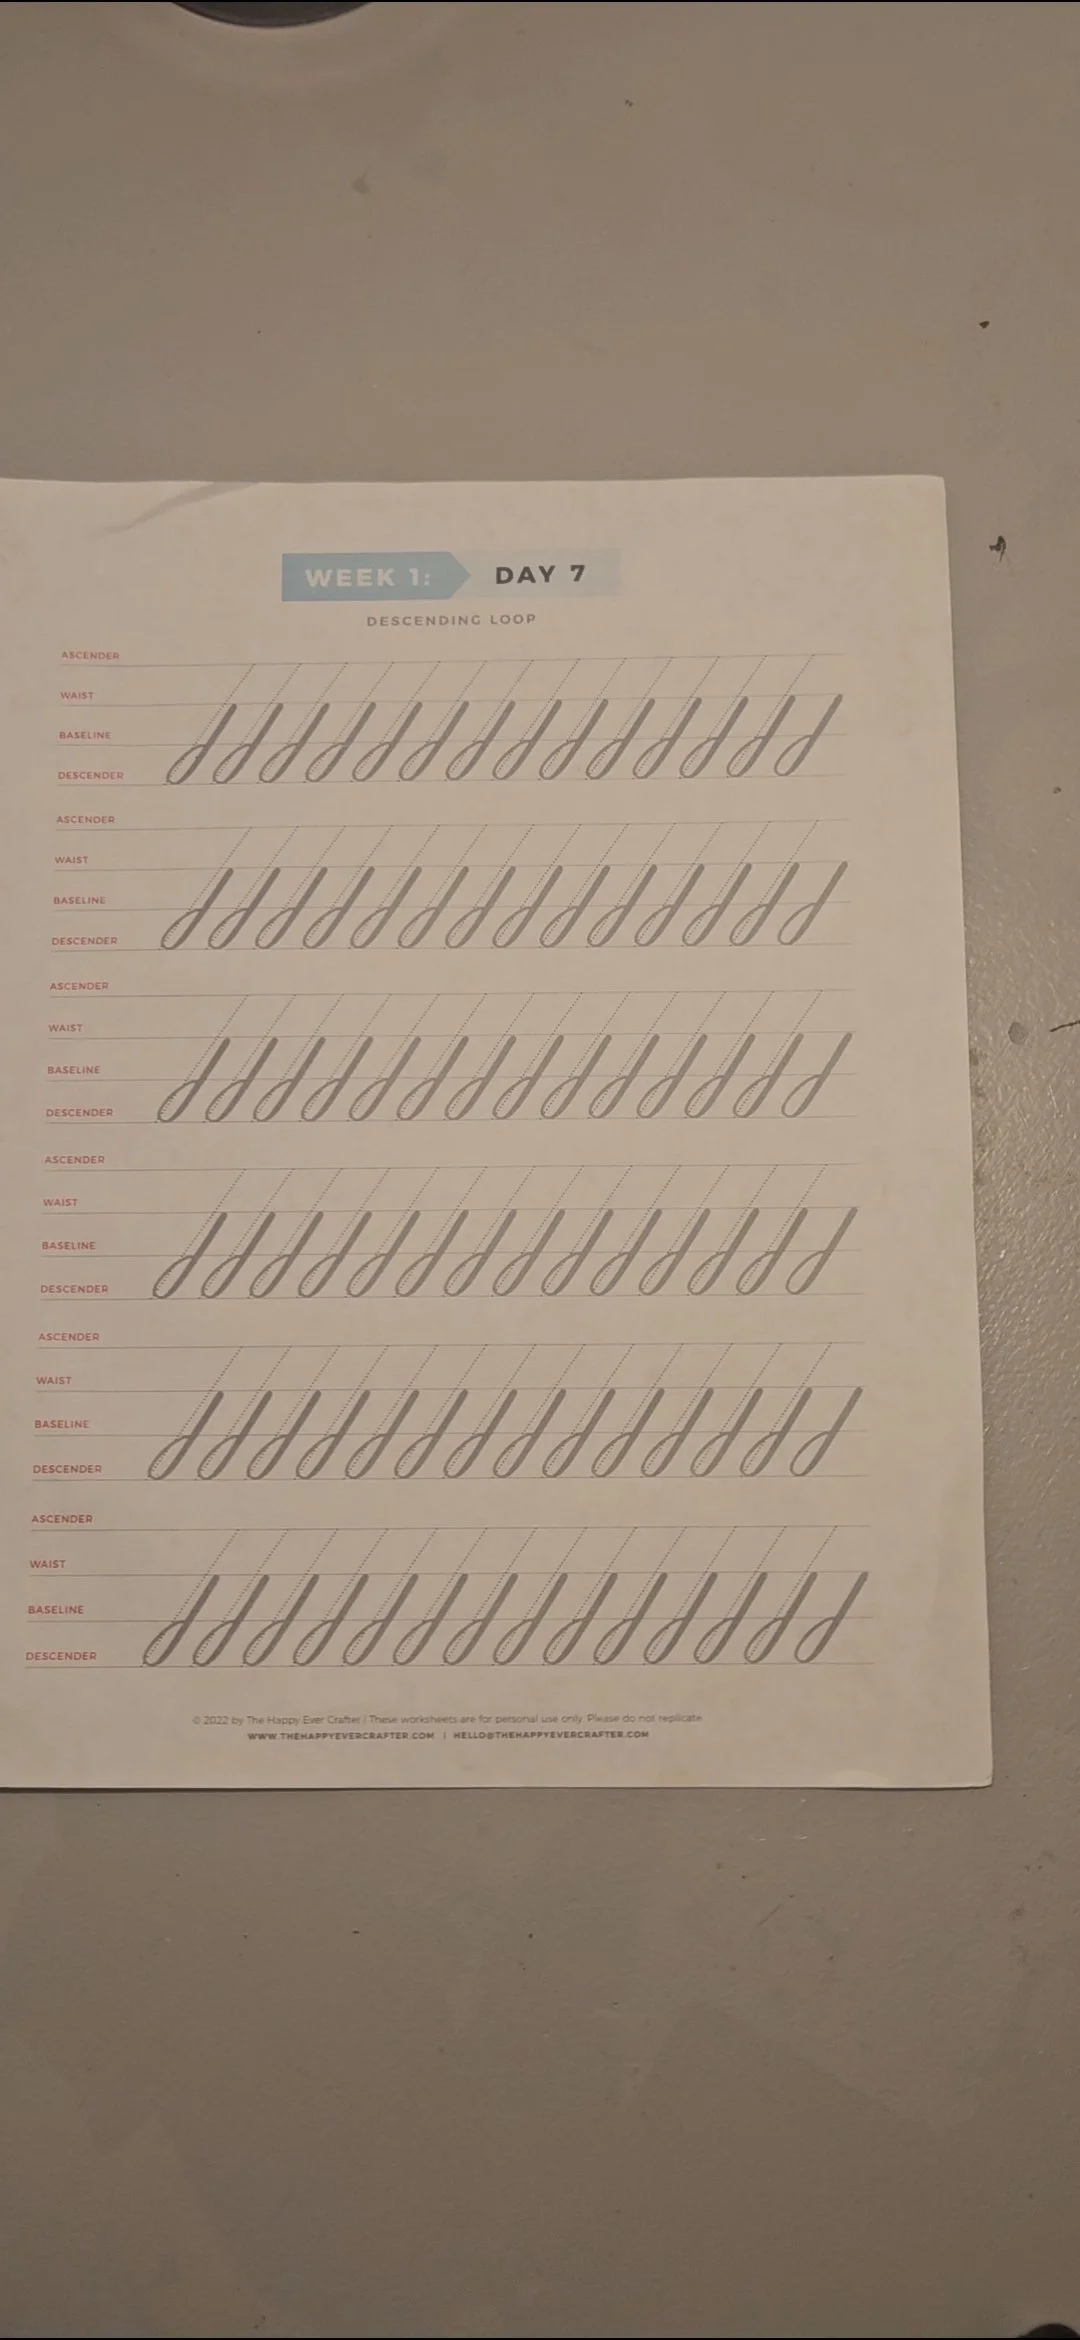
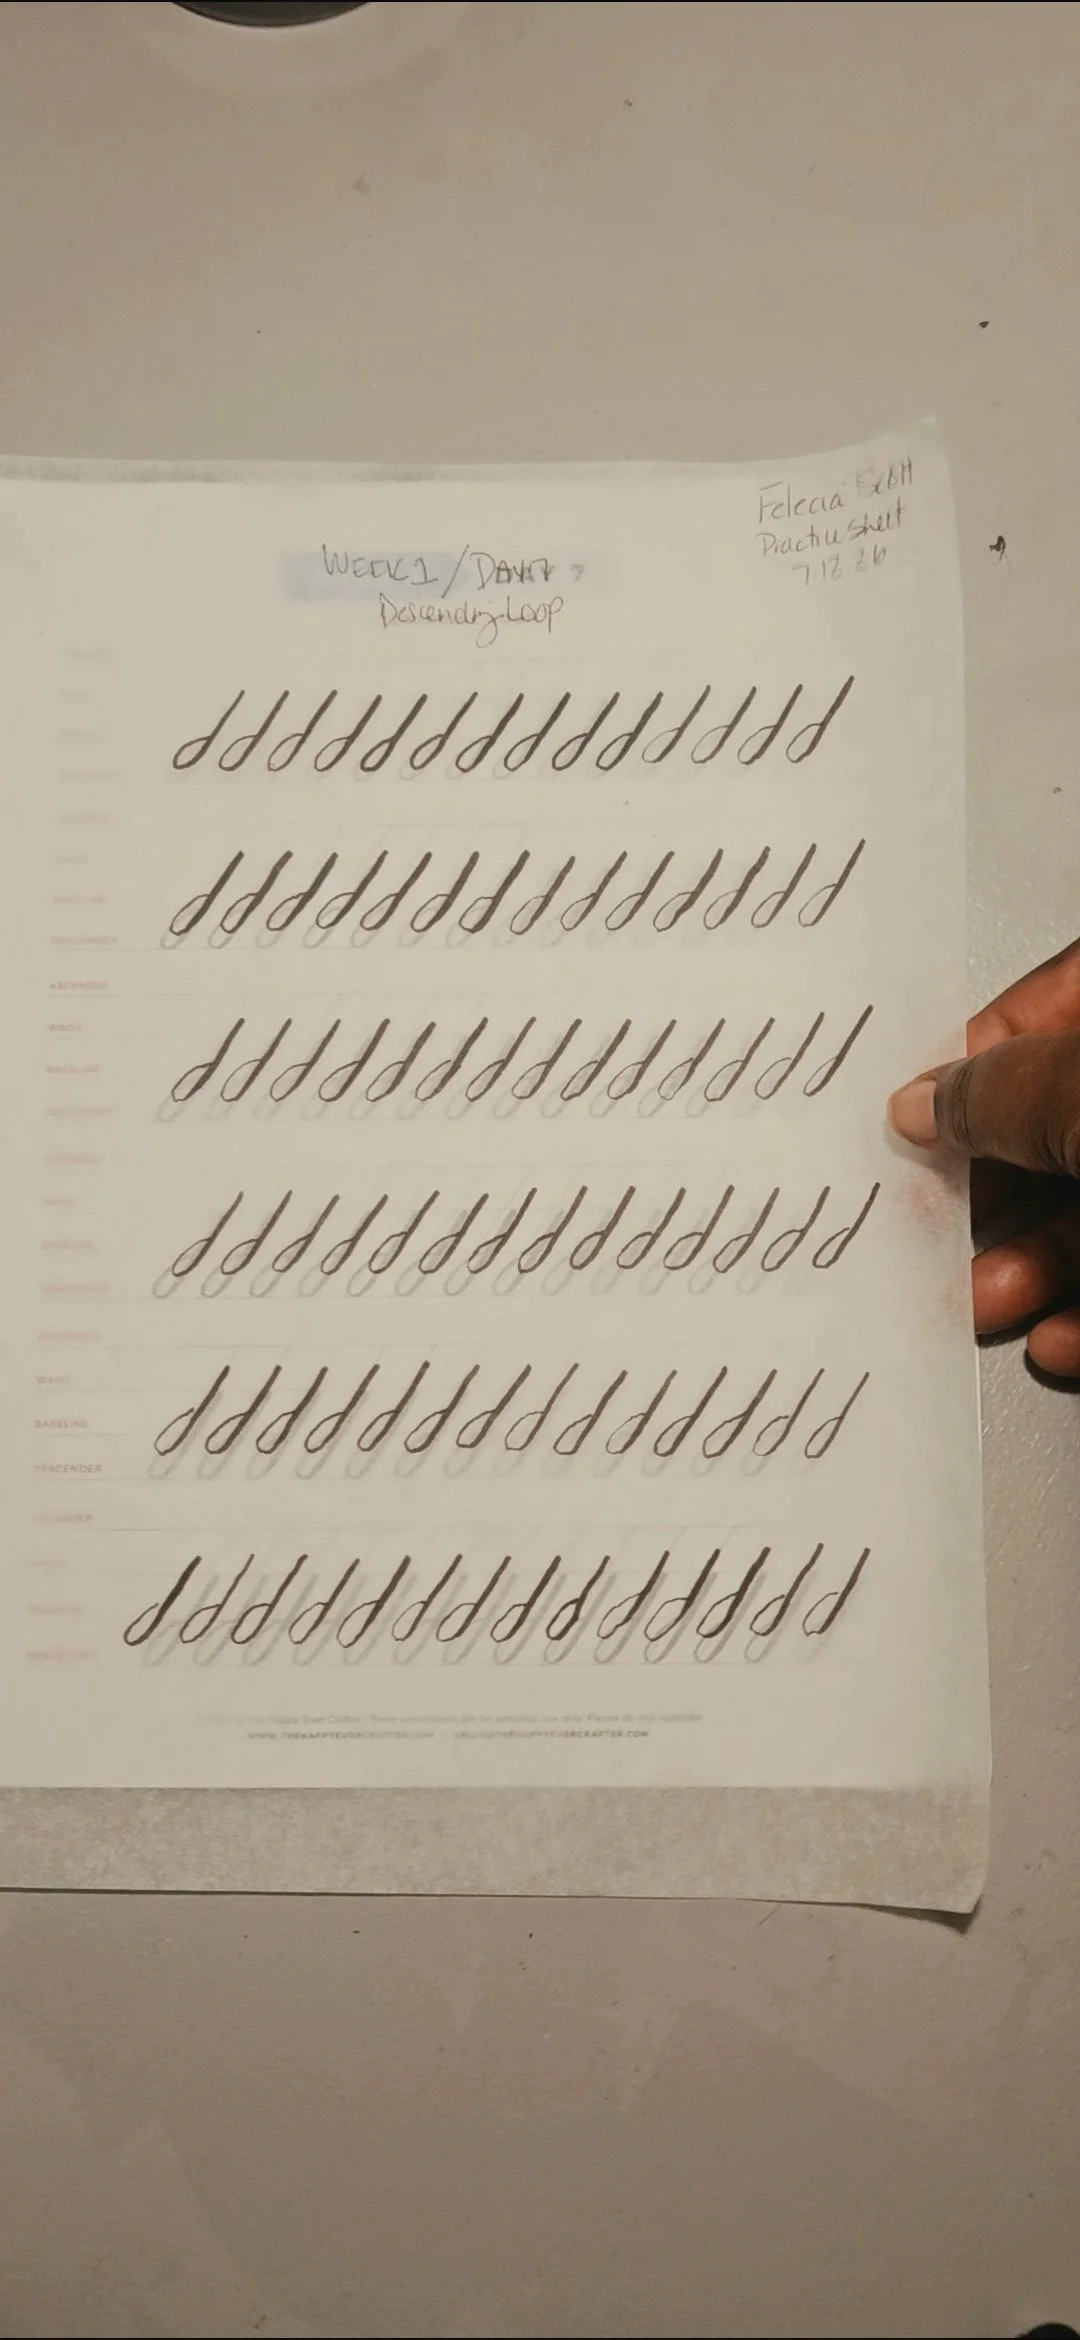
(Left) Descending Loop Practice Sheet (Credit Becca C. Rafter) @ The Happily Every Crafter (Right) My finished practice sheet for the Descending Loop.
I went into this lesson pretty confidently. I did pretty well with the Ascending Loop but calligraphy has a way a humbling a person. It humbled me. I struggled from the very beginning of the Descending Loop until the end. It felt like I was using my left hand, which is my non-dominant hand. I write with my right hand. From the downstroke to the curve into the loop, nothing came together. I was shaking all over the place. One of the Descending Loops looks like a man’s sperm 😯. I’ve circled that one for you to see. When I reached the end of the practice sheet, I was tired.
The Descending Loop, I will have to really work hard on but on a positive ending, I completed my first week of learning calligraphy basic strokes. This is a huge win for me. I’m very, happy and excited to be here learning, sharing and documenting this journey into calligraphy. It was one of my goals for this year. I have a question for you. Is anyone else learning a new hobby or skill this year? I would love to hear about it and tell me how’s it going? Thanks for following my journey as I learn calligraphy from absolute zero. See you tomorrow!
Day 6: Ascending Loop
This loop was challenging, but it was also a lot of fun to practice. At the beginning of the exercise, I noticed my hand was still trying to figure out the movement.
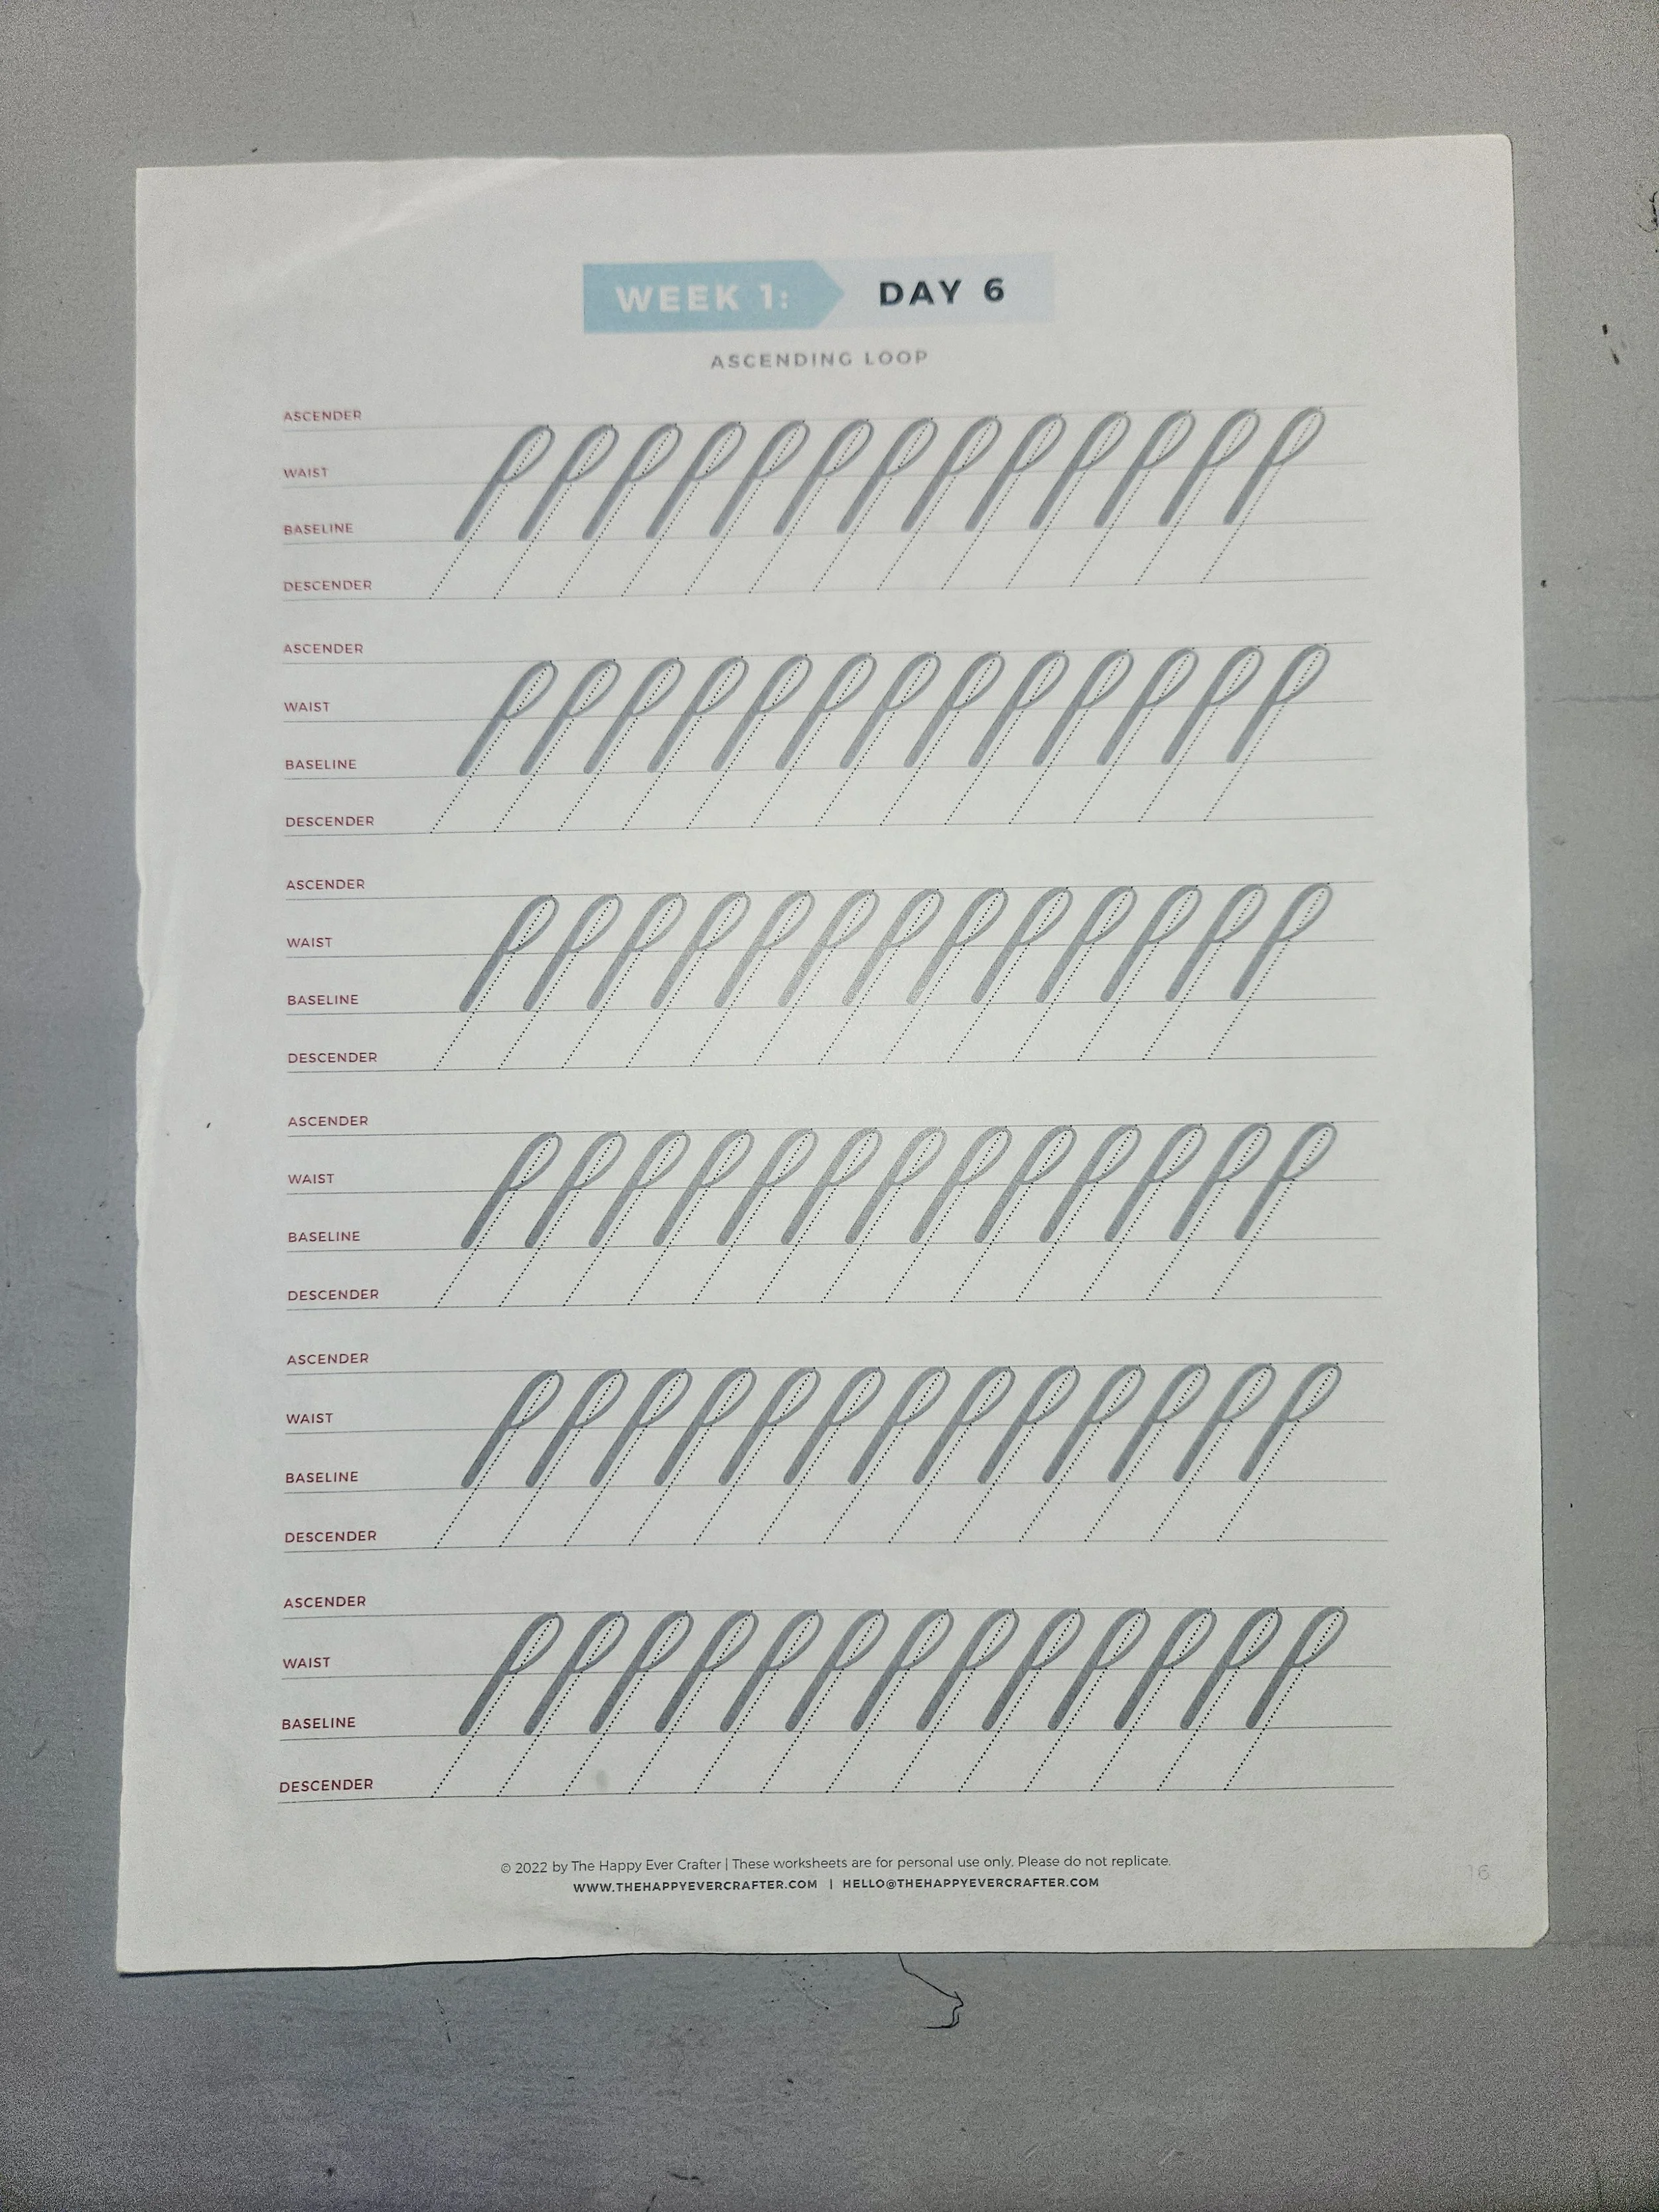
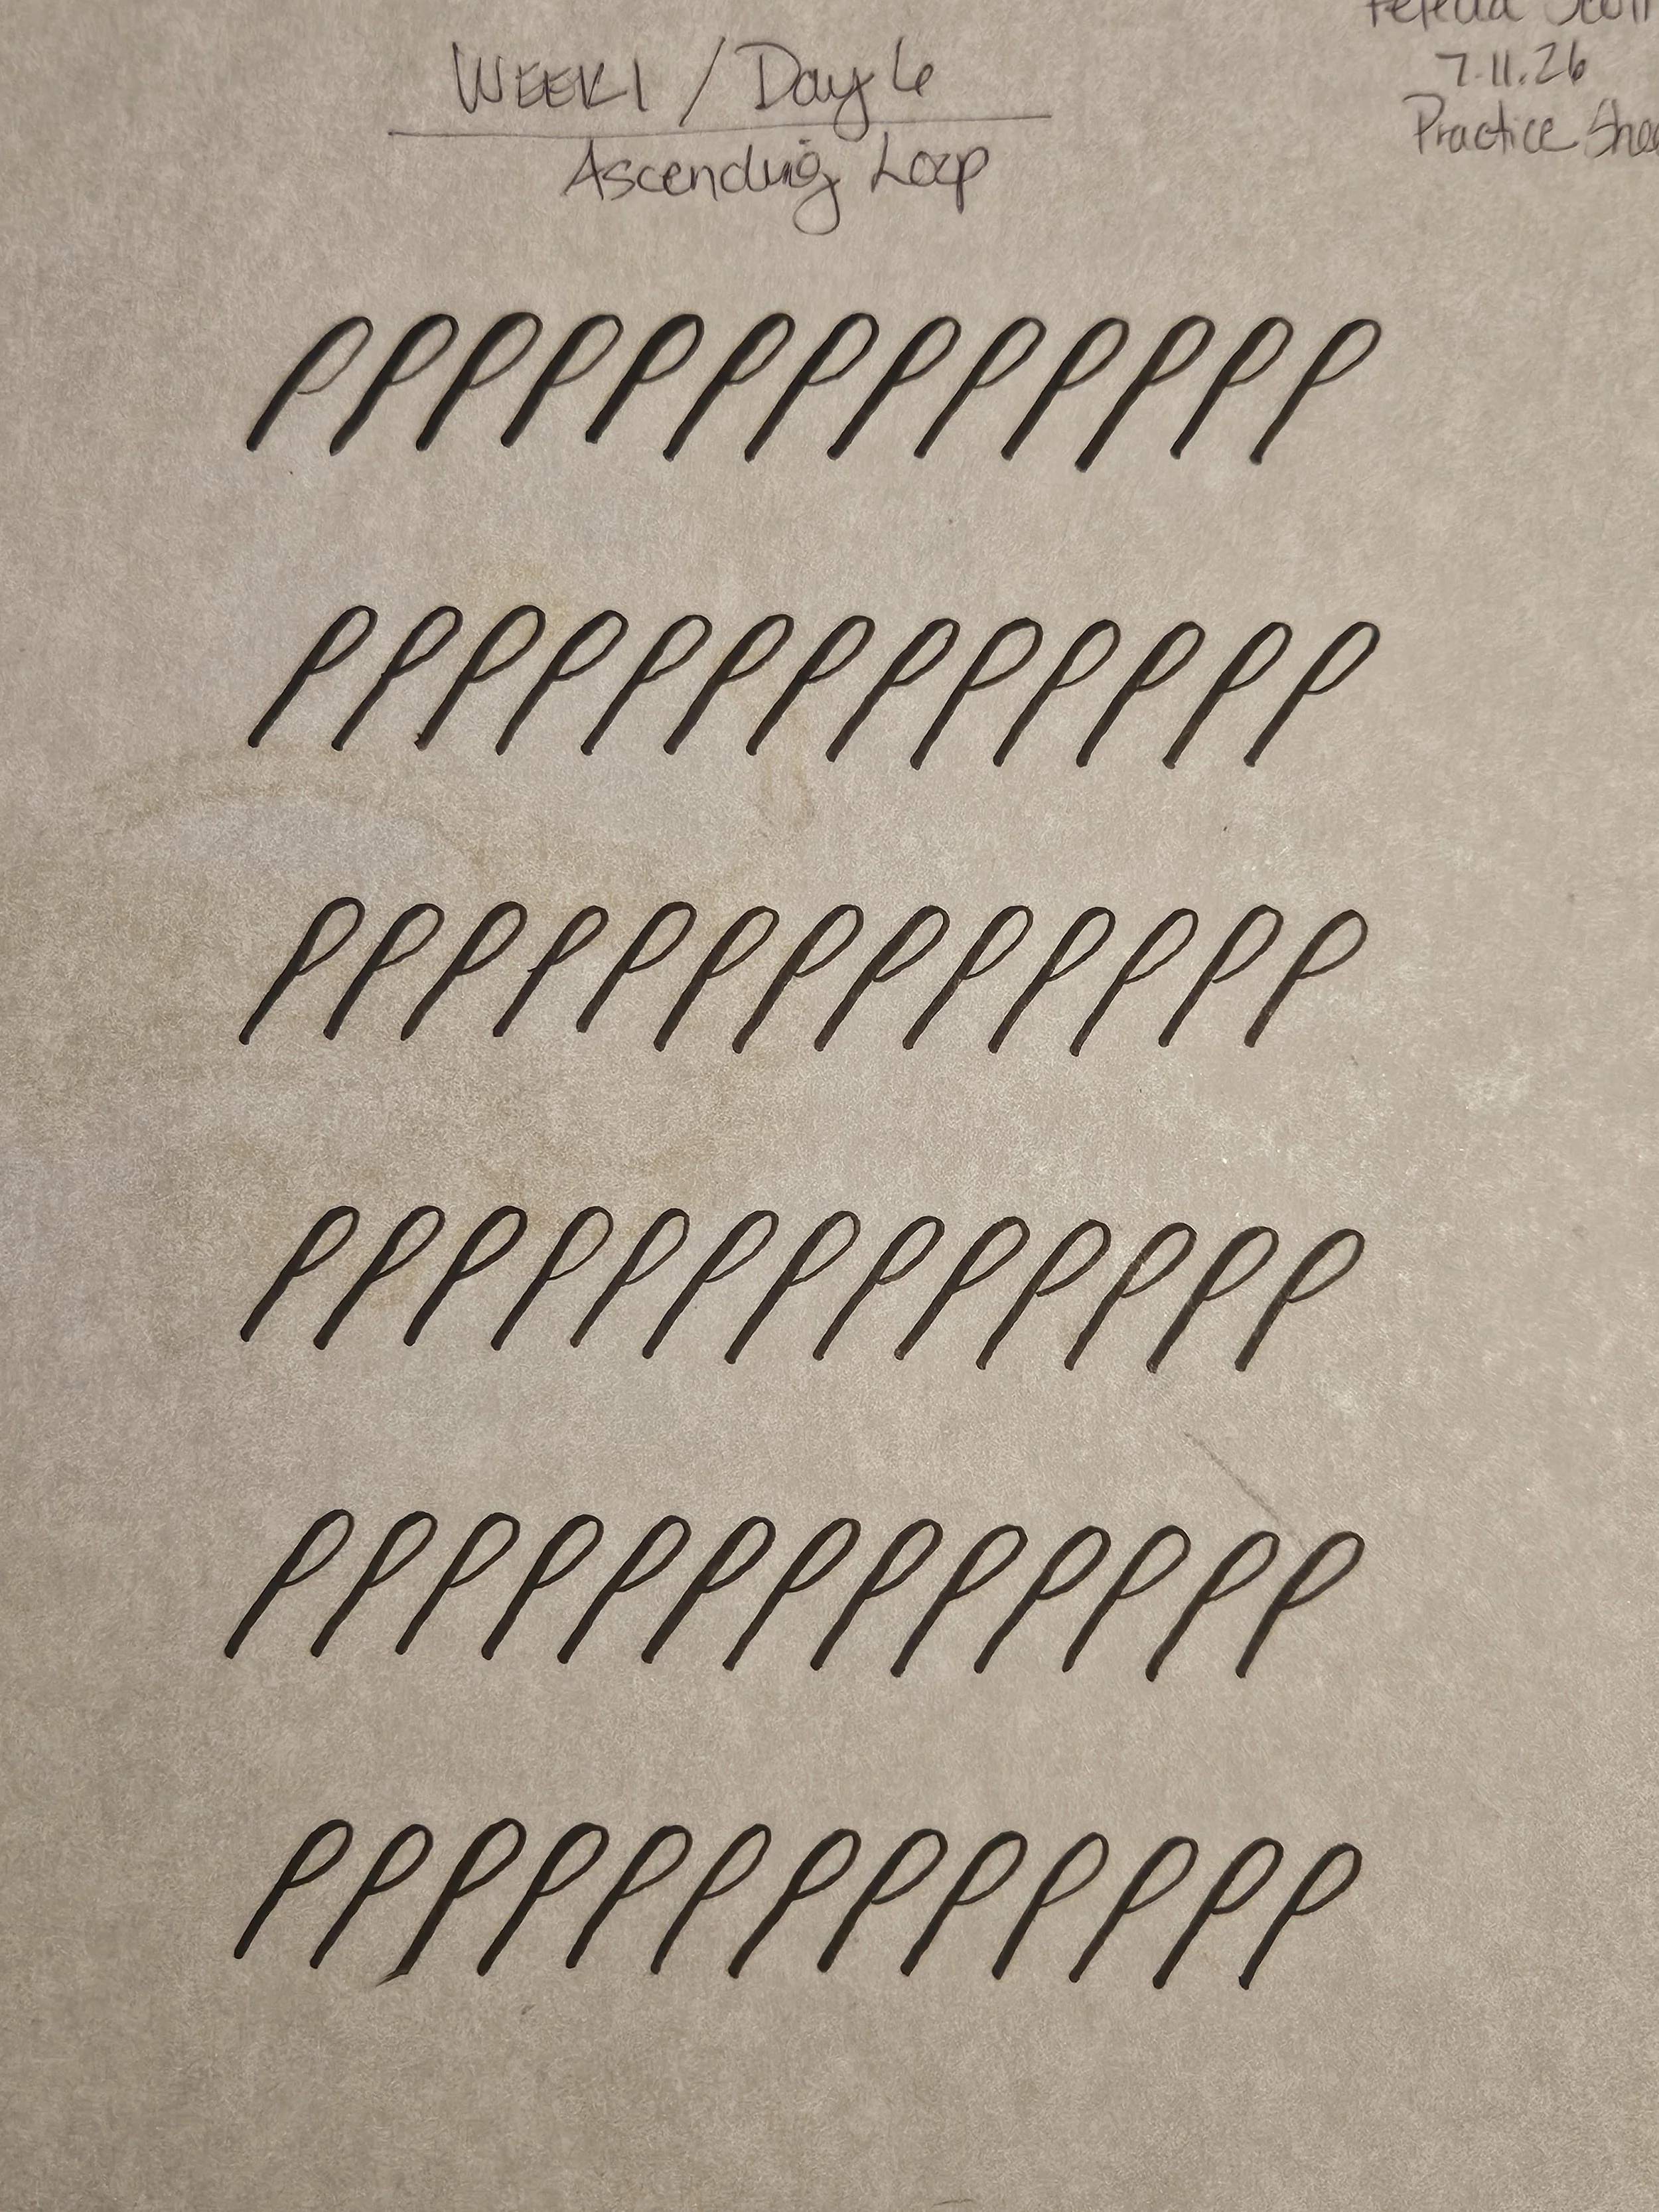
(Left) Ascending Loop Practice Sheet (Credit Becca C. Rafter) @ The Happily Every Crafter (Right) My finished practice sheet for the Ascending Loop.
This loop was challenging, but it was also a lot of fun to practice. At the beginning of the exercise, I noticed my hand was still trying to figure out the movement. The Ascending Loop is one of the larger strokes compared to some of the previous drills we’ve practiced. For me, that actually made it a little easier to understand the movement because I had more space to focus on the shape and the flow of the stroke. It helped me slow down, pay attention to my pressure, and focus on creating a smoother motion rather than rushing through it.
Of course, there were mistakes. There were uneven lines, loops that weren’t quite the right shape, and strokes that didn’t come out the way I imagined. But that’s part of learning something completely new. I’m only on day six, and I’m reminding myself that every shaky line and imperfect stroke is part of building muscle memory.
So far, this journey has been such a positive experience. I’m excited to continue learning from Becca, my instructor, over the next three weeks and see how much progress I can make with each new lesson.
Day 5: Oval
Today’s lesson gave me problems all the way around and I mean that literally. This was because of the overlapping as you can see on my practice sheet.
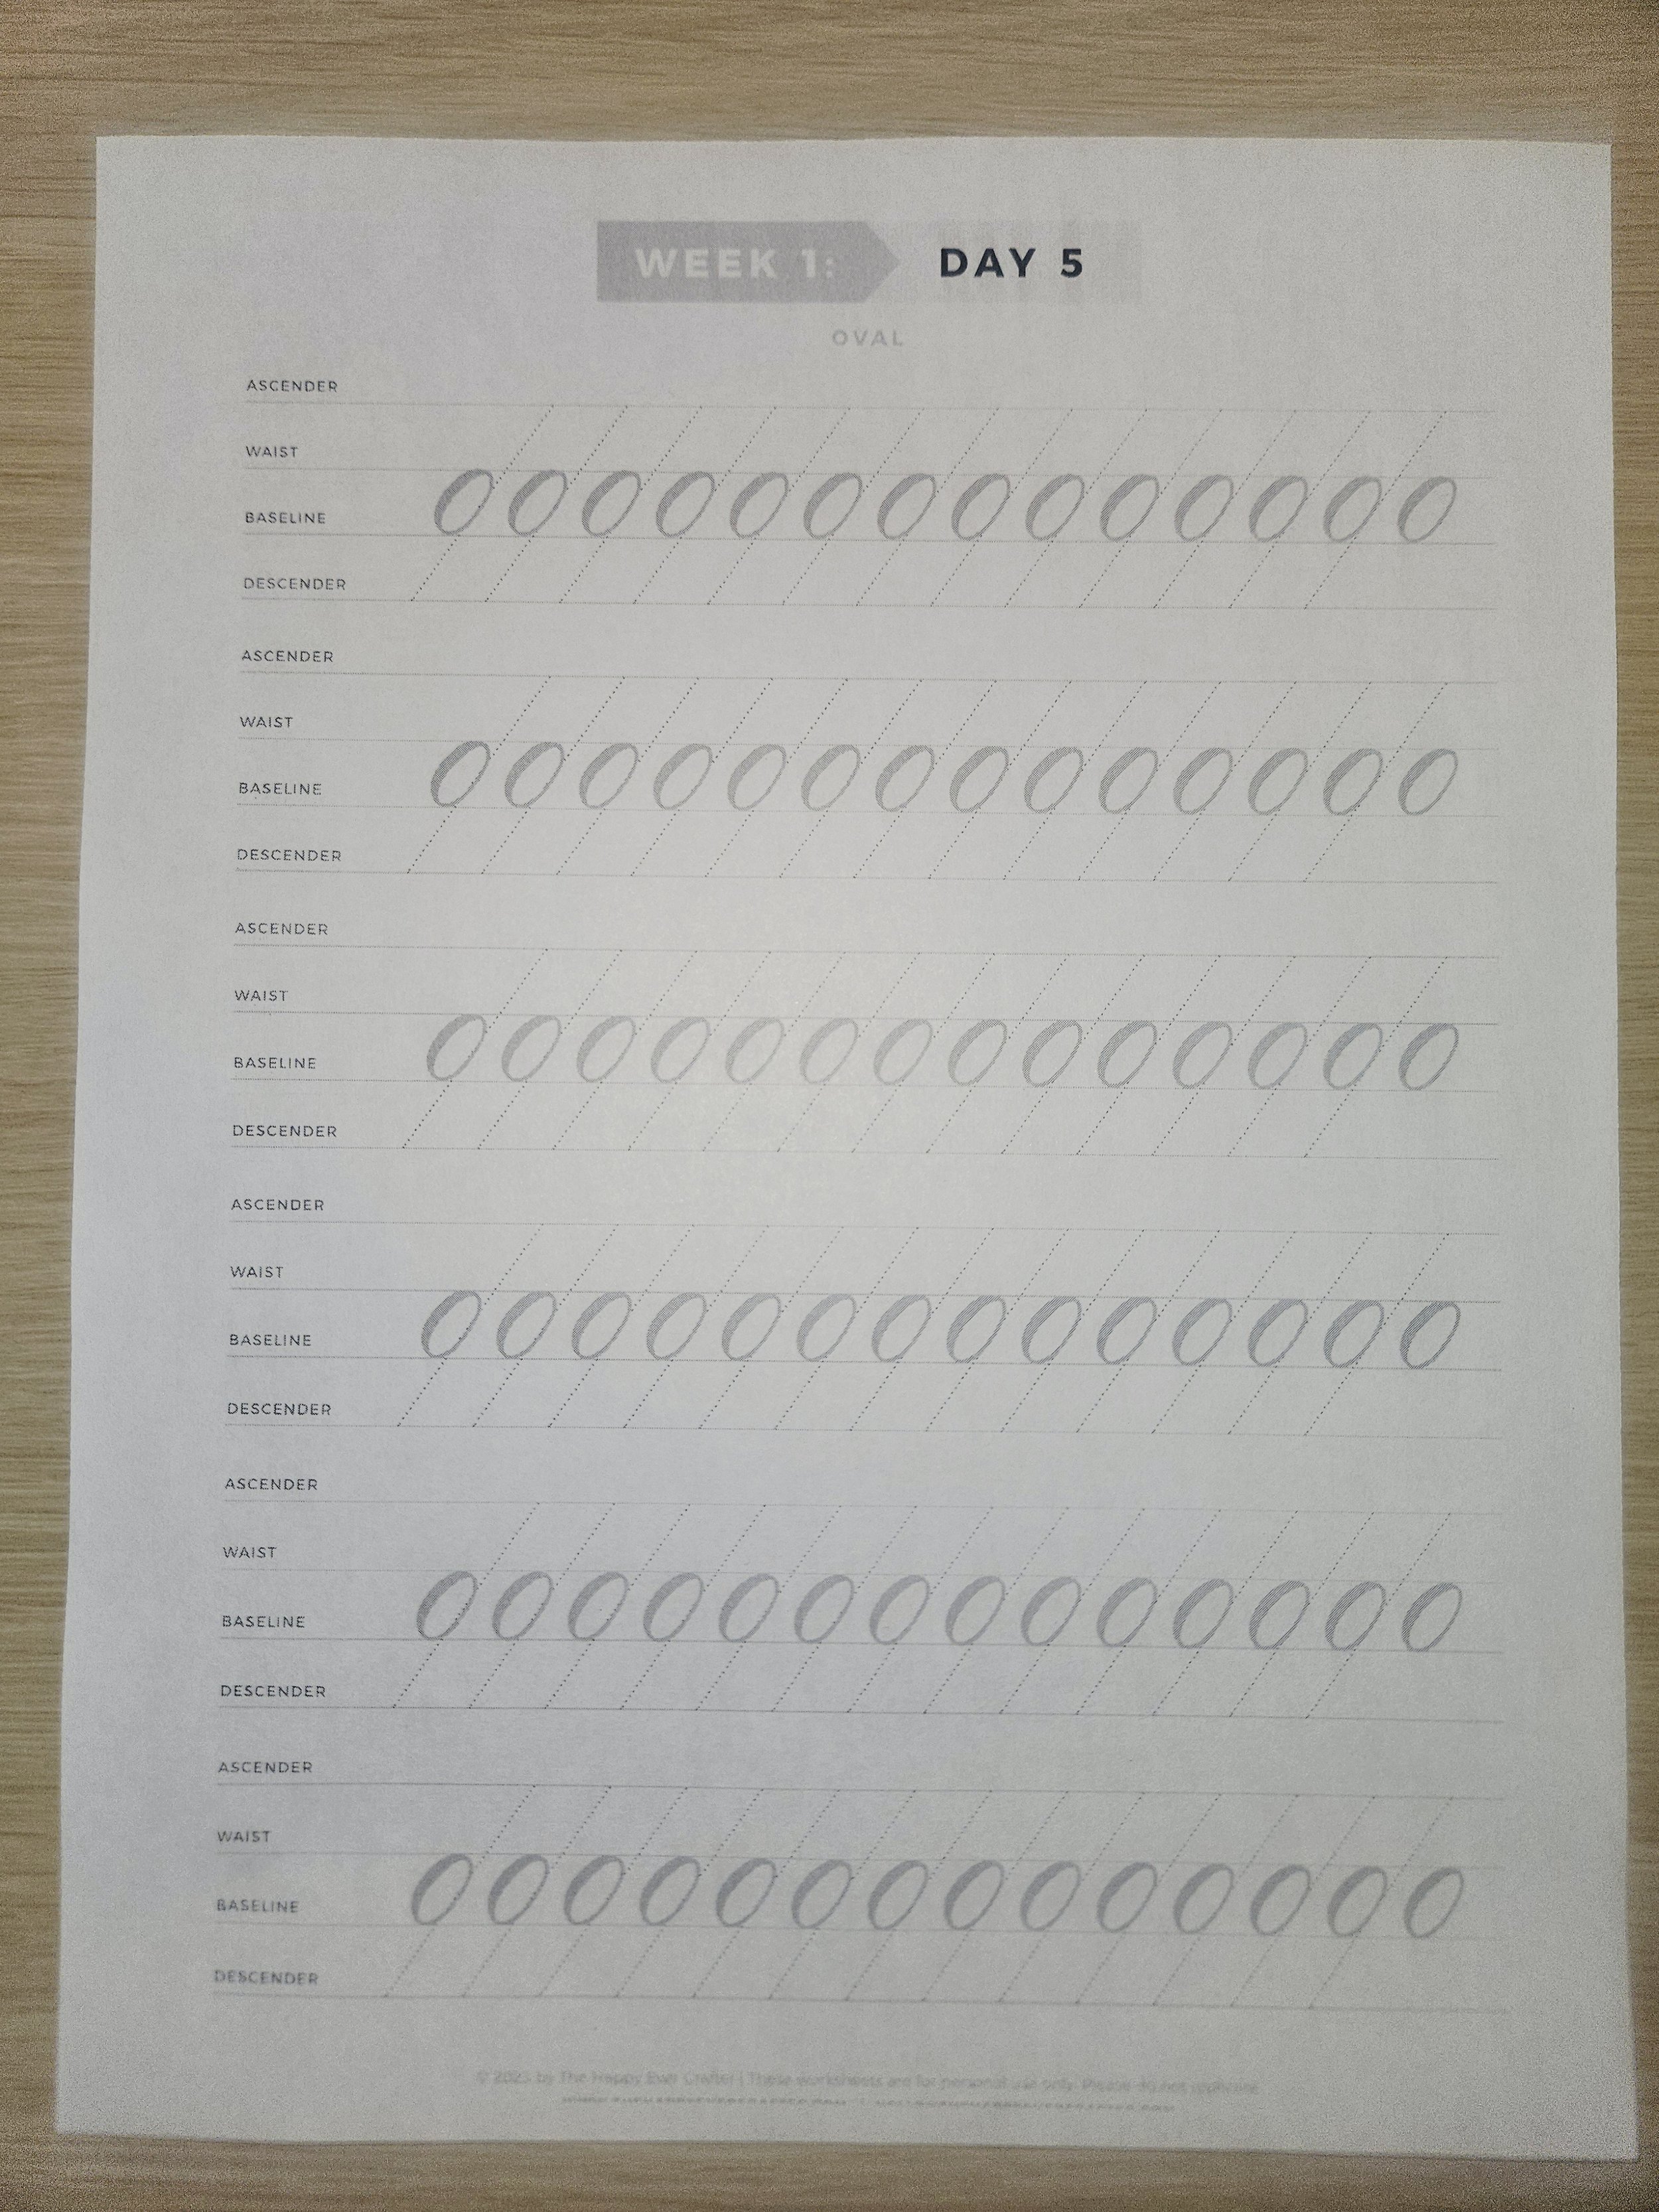
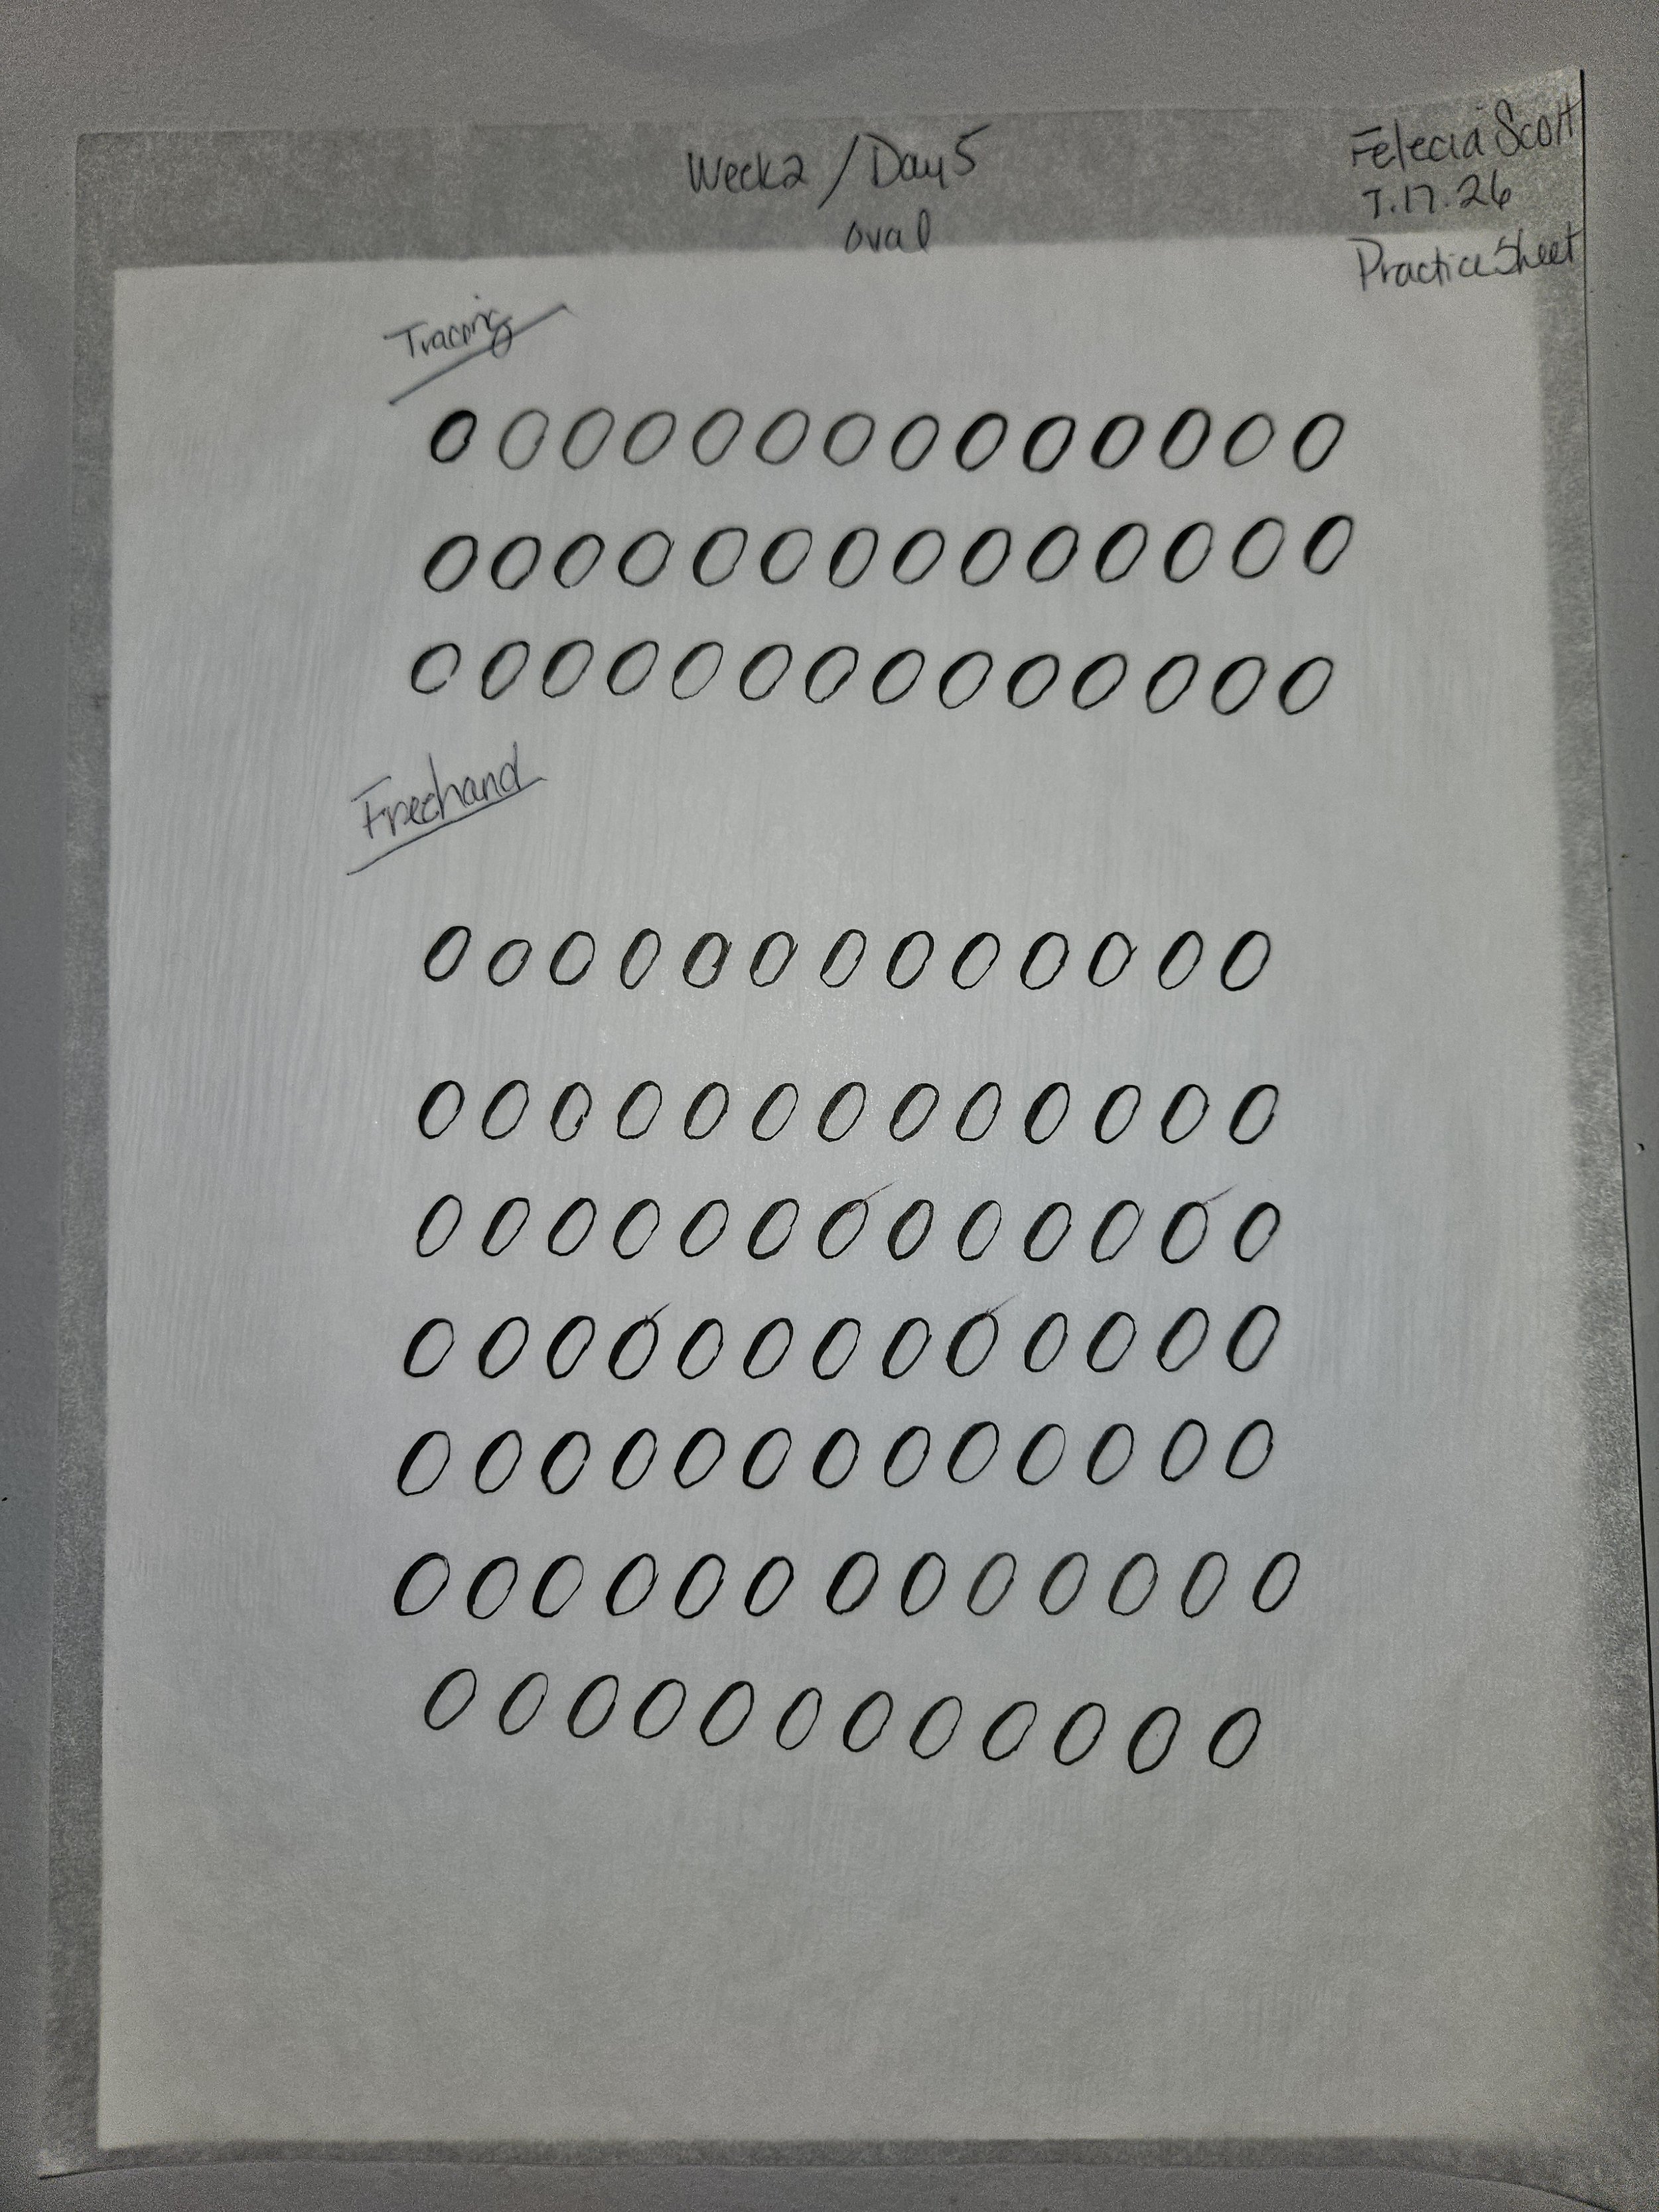
(Left) Oval Practice Sheet (Credit Becca C. Rafter) @ The Happily Every Crafter (Right) My finished practice sheet for the Oval.
Today’s lesson gave me problems all the way around and I mean that literally. This was because of the overlapping as you can see on my practice sheet. I circled where I made mistakes and where the overlapping should be clean and smoothly blended together. I think out of the attempts I made doing this stroke, I did one correctly. I’ll take that win. How do they say it on social media? “A win is a win.” 😂
I’ve been alternating between the green soft tip brush pen and blue hard tip brush pen. I will be using the blue brush tip pen. I like working with and can control the ink better which allows for more flexibility when practicing my strokes. One thing I've learned throughout this challenge is that choosing the right tool helps you understand the fundamentals better.
With today's lesson complete, I've now learned five of the seven basic calligraphy strokes. Only two more foundational strokes remain before I move on to the next part of this adventure. See you tomorrow for the Ascending Loop, the sixth stroke.
Day 4: Compound Stroke
This one gave me the most trouble. You can see the from the down struck into the light upstroke at the end, the shakiness, line are too thick and the spaces from the two thin lines to the thick lines weren’t lining up.
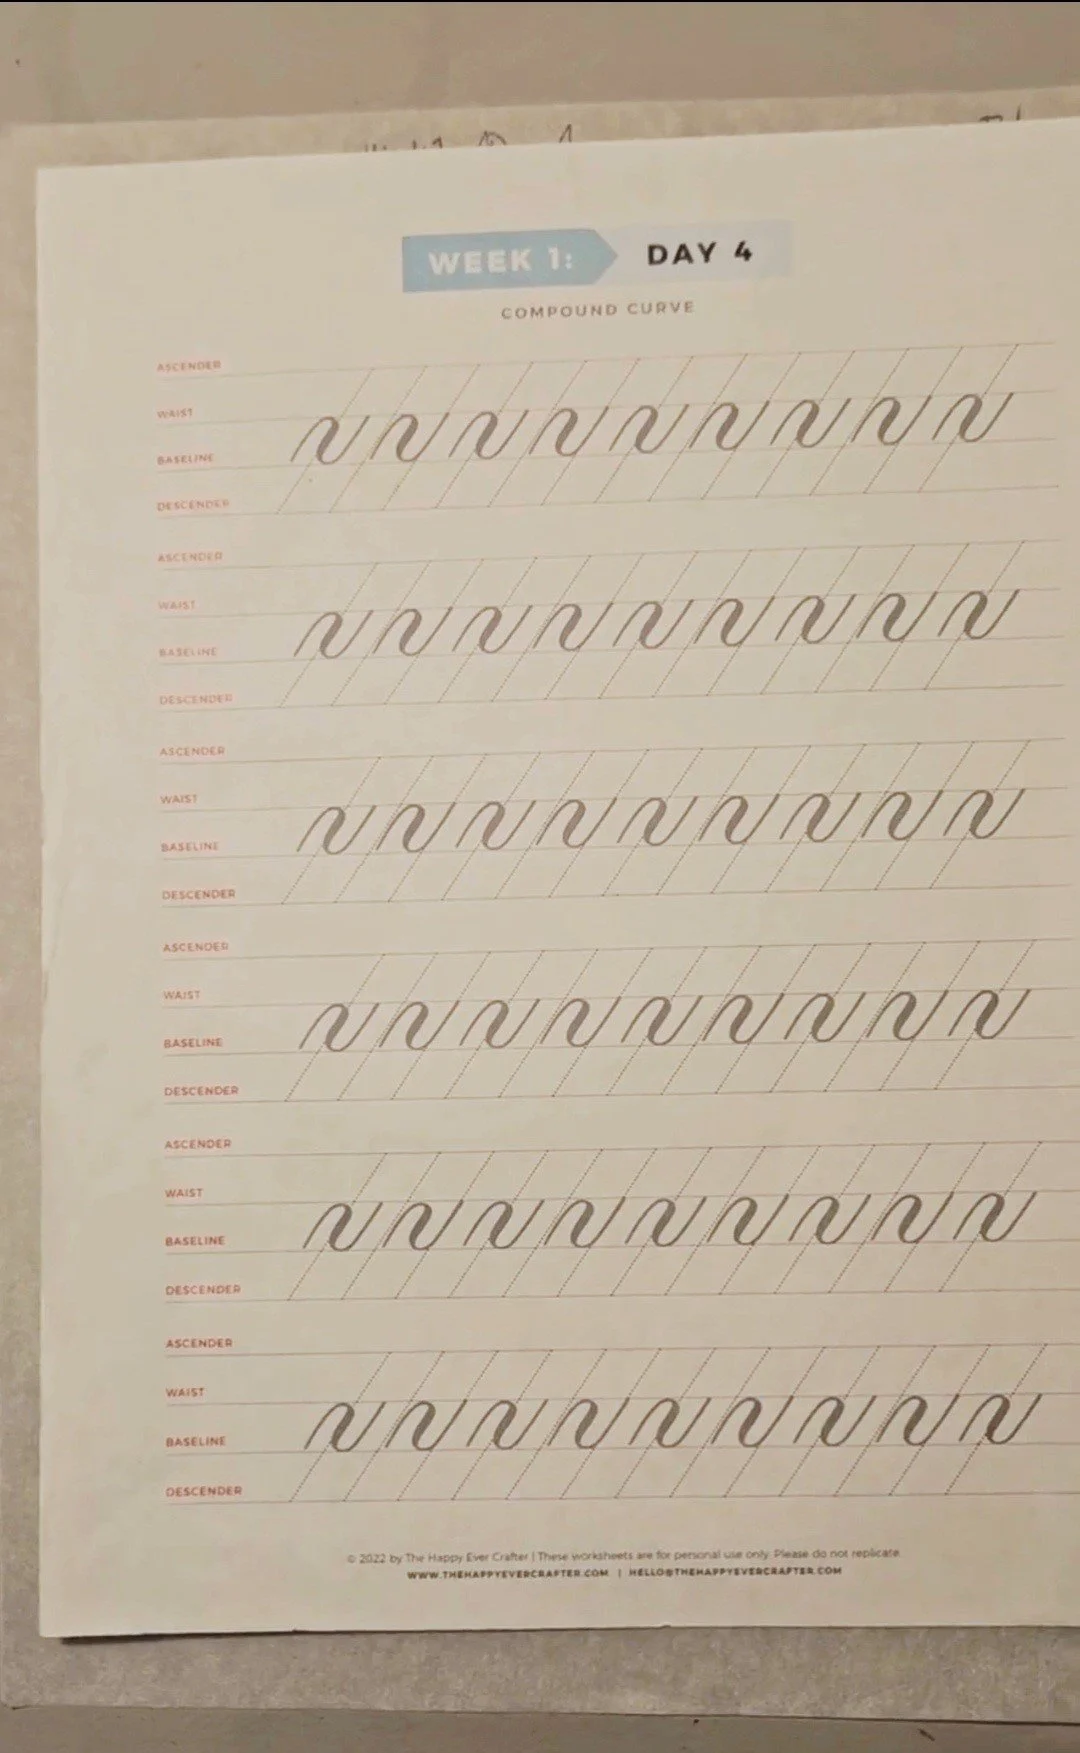
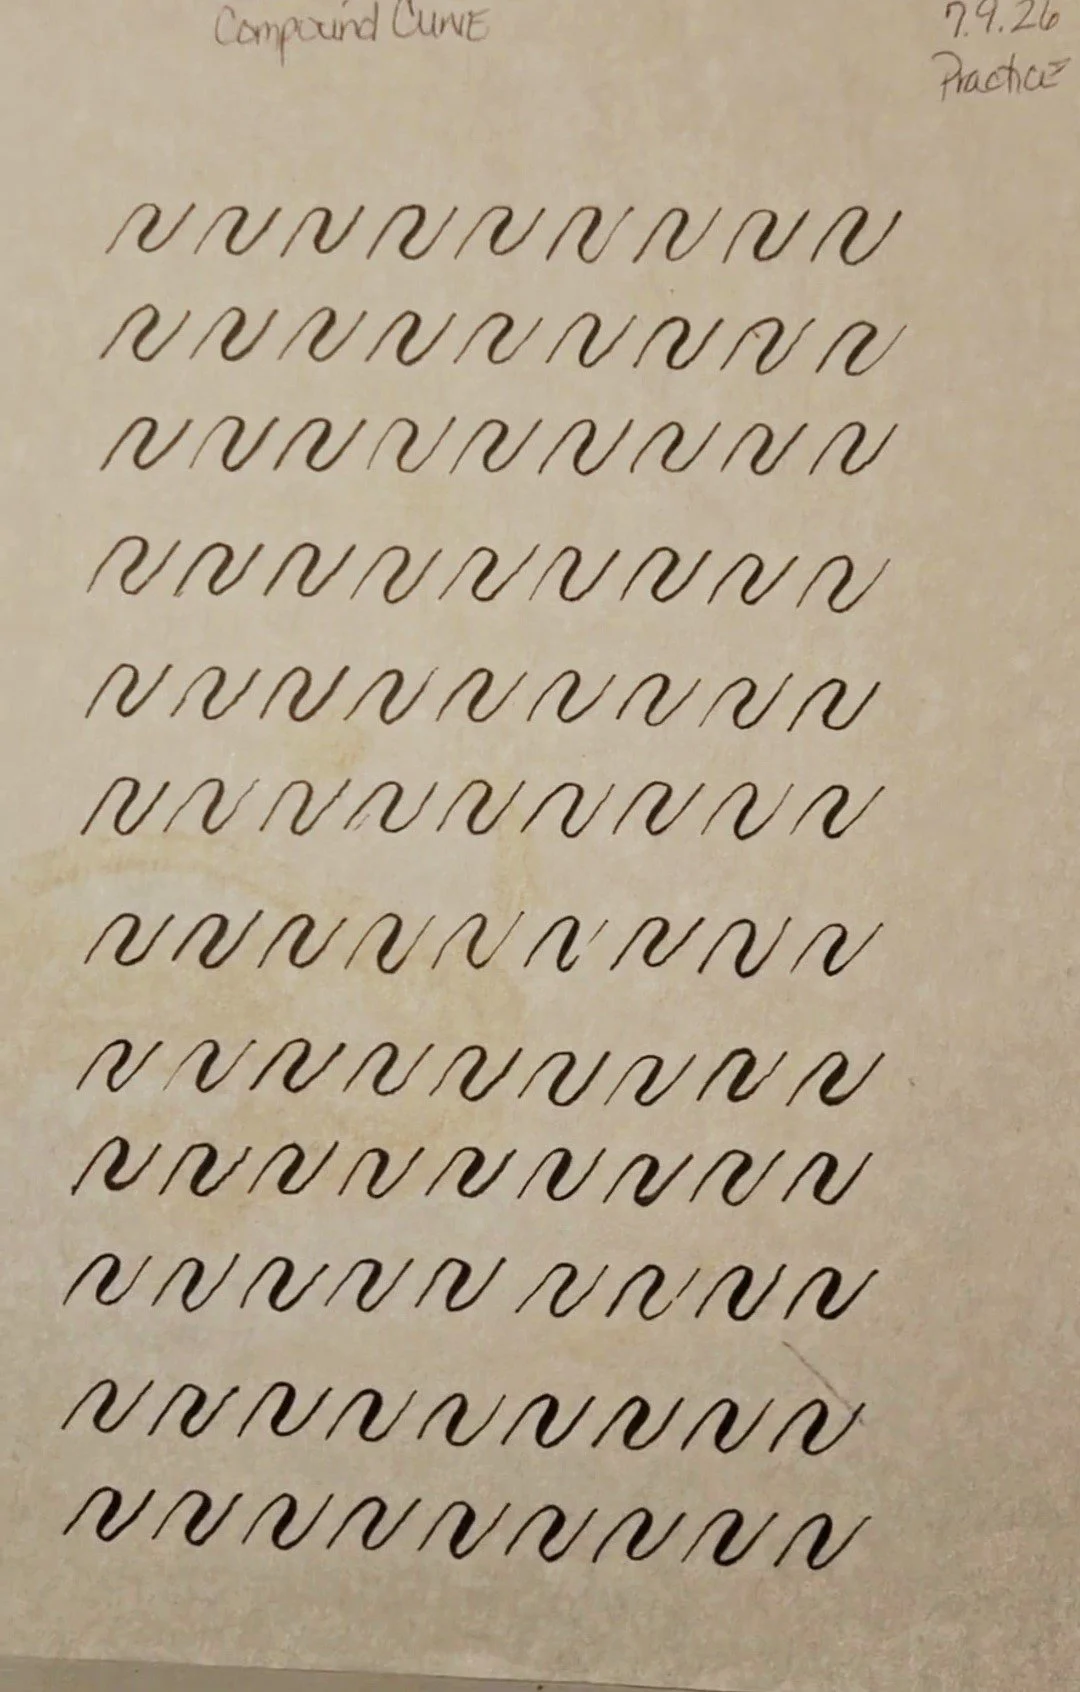
(Left) Underturn Practice Sheet (Credit Becca C. Rafter) @ The Happily Every Crafter (Right) My finished practice sheet for the Underturn Stroke.
This one gave me the most trouble. You can see the from the down struck into the light upstroke at the end, the shakiness, line are too thick and the spaces from the two thin lines to the thick lines weren’t lining up. No matter how hard I tried.
Per Becca, the instructor the Compound Curve is the hardest stroke to master. I wholeheartedly agree. If you look at my practice calligraphy sheet, you can see it in every struggle. I’m transitioning from light to heavy back to light strokes. You have to keep not only the strokes fluid, but the gaps between have to be even. You can click here and it will take you to my Instagram, and you can watch me practice the stroke and see just how difficult it is.
I also decided that in the evening practice session, I will also go back and practice each stroke I already have done. I get better at calligraphy. Just practicing one stroke each day, not that I will forget, but it will take me longer to get it. Repeated consistency is key for me to learn. My way of learning will probably be different than yours and there’s nothing wrong with that. Keep showing up, keep practicing, and not give up or convince yourself that success isn’t possible.
Day 3: Undertone Stroke
This stroke was a bit easier for me than the Overturn curve and connecting to the upstroke. I really liked this one.
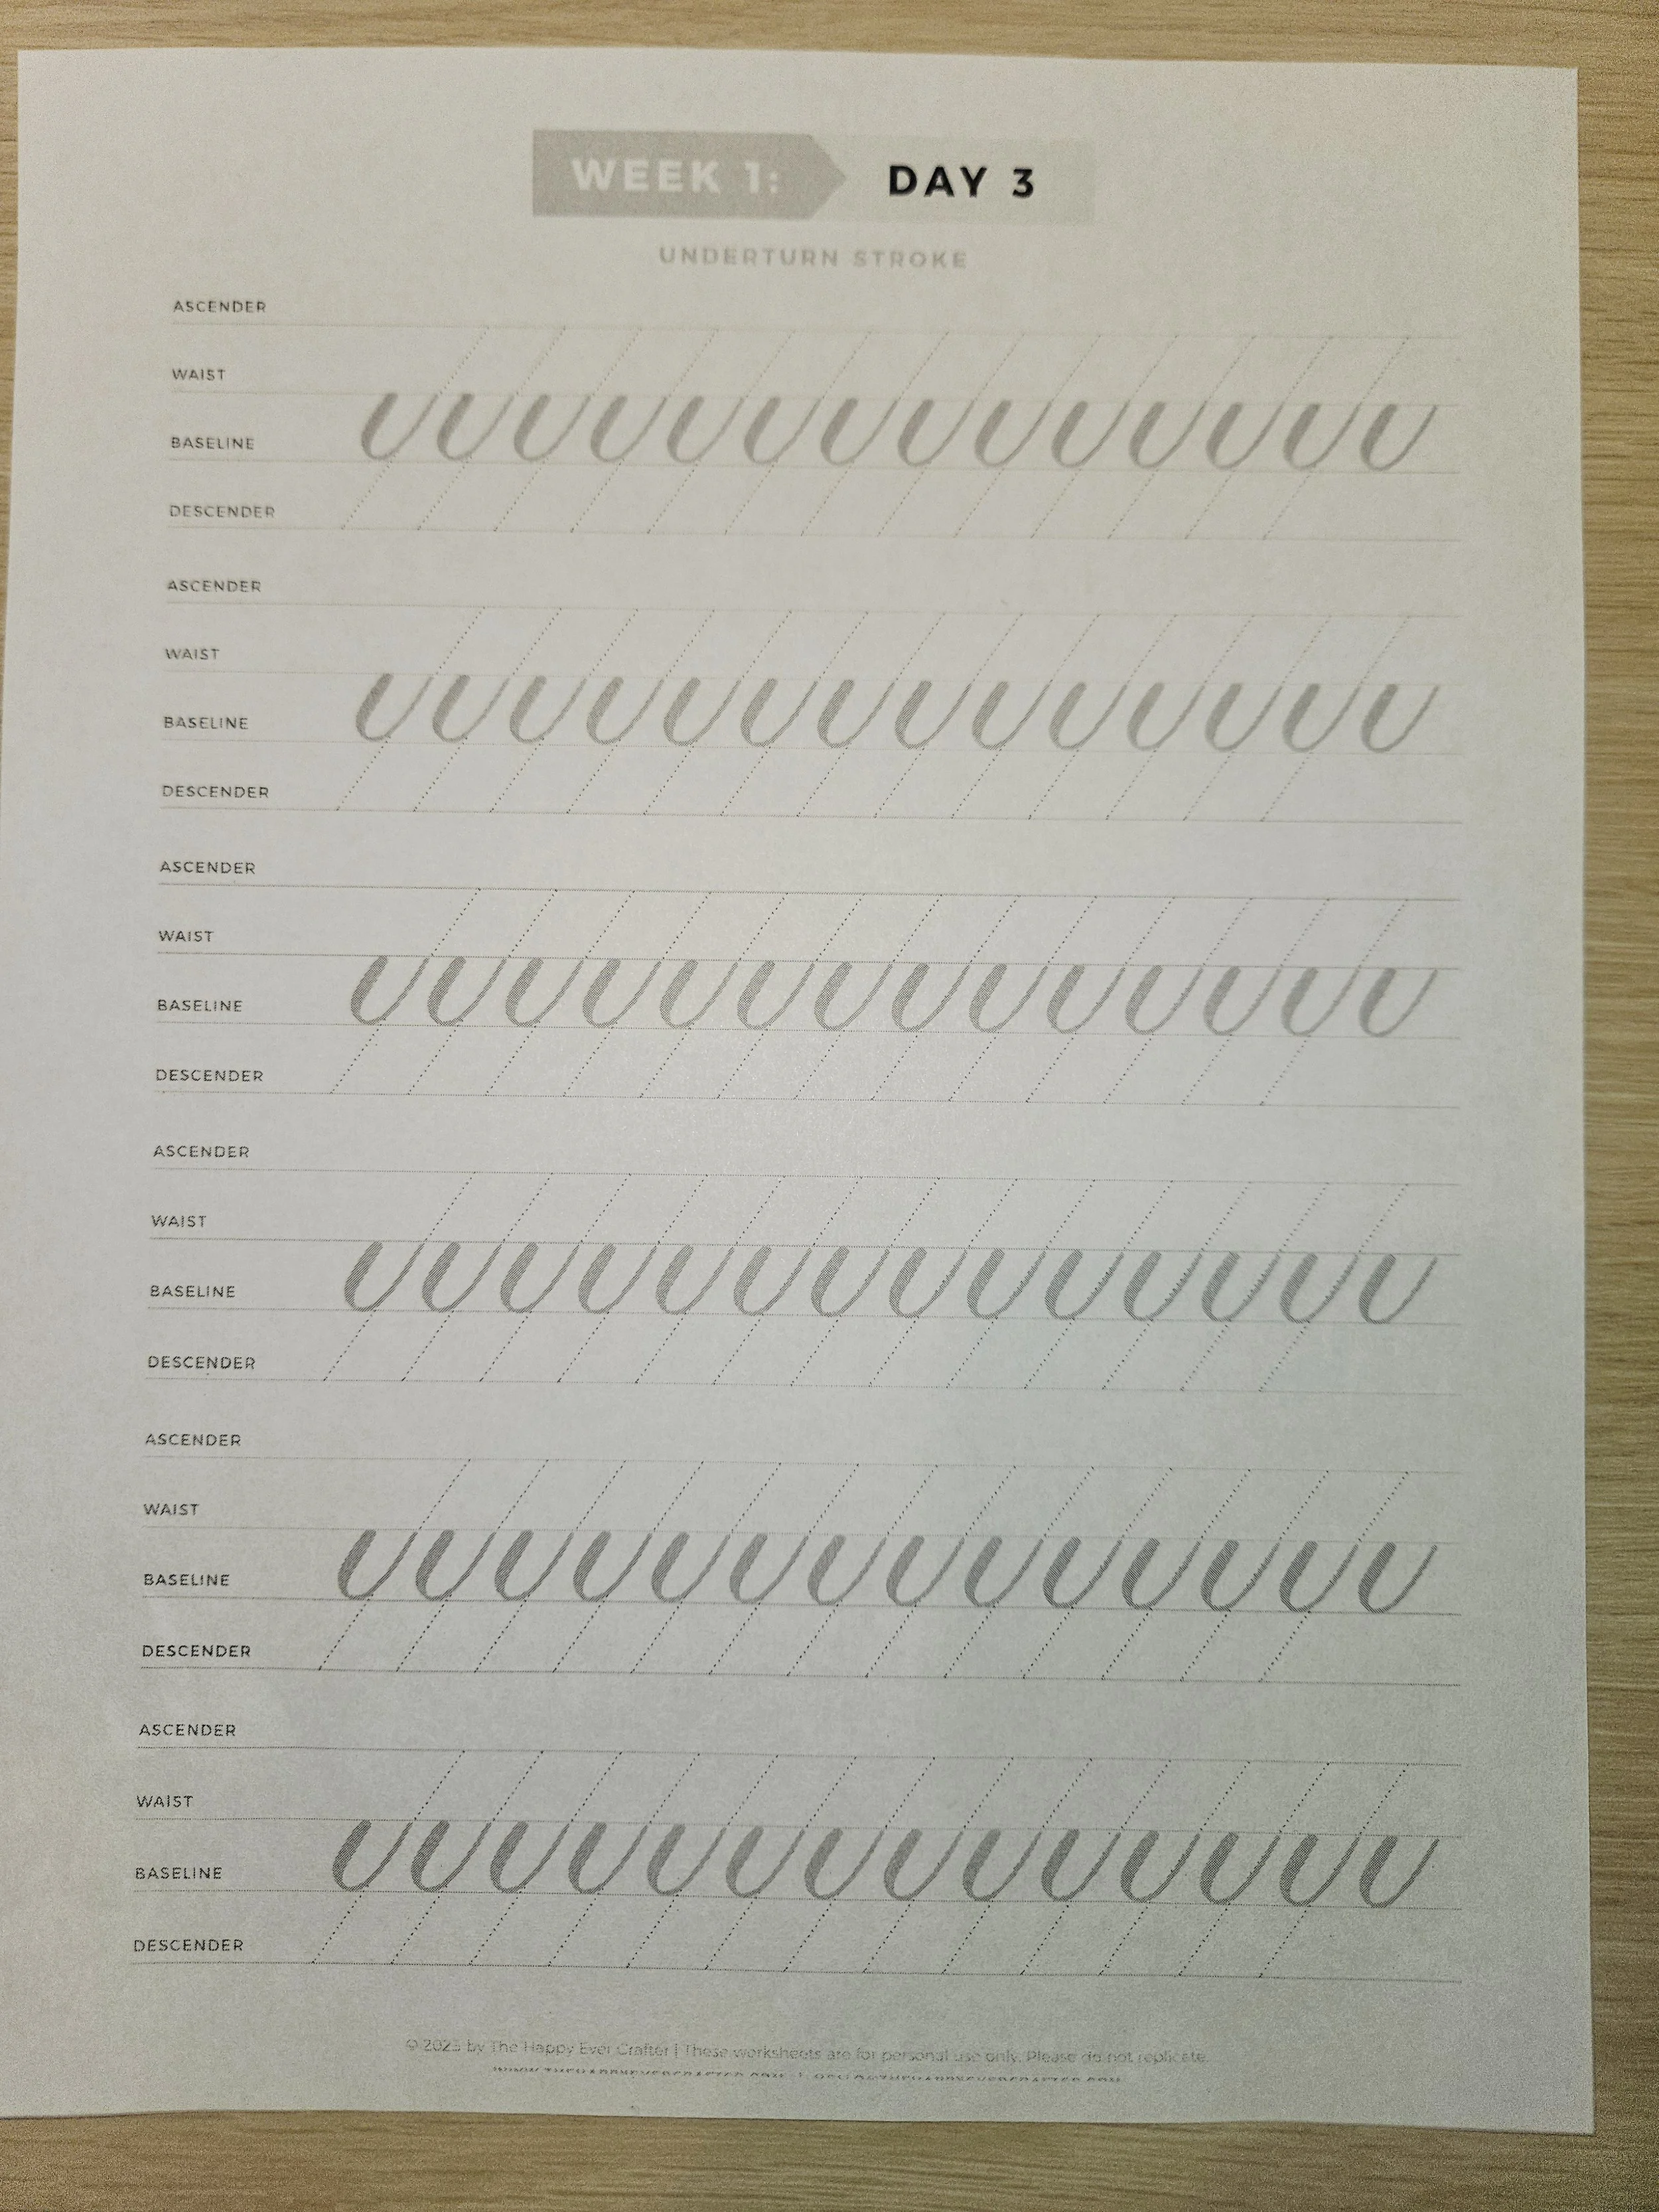
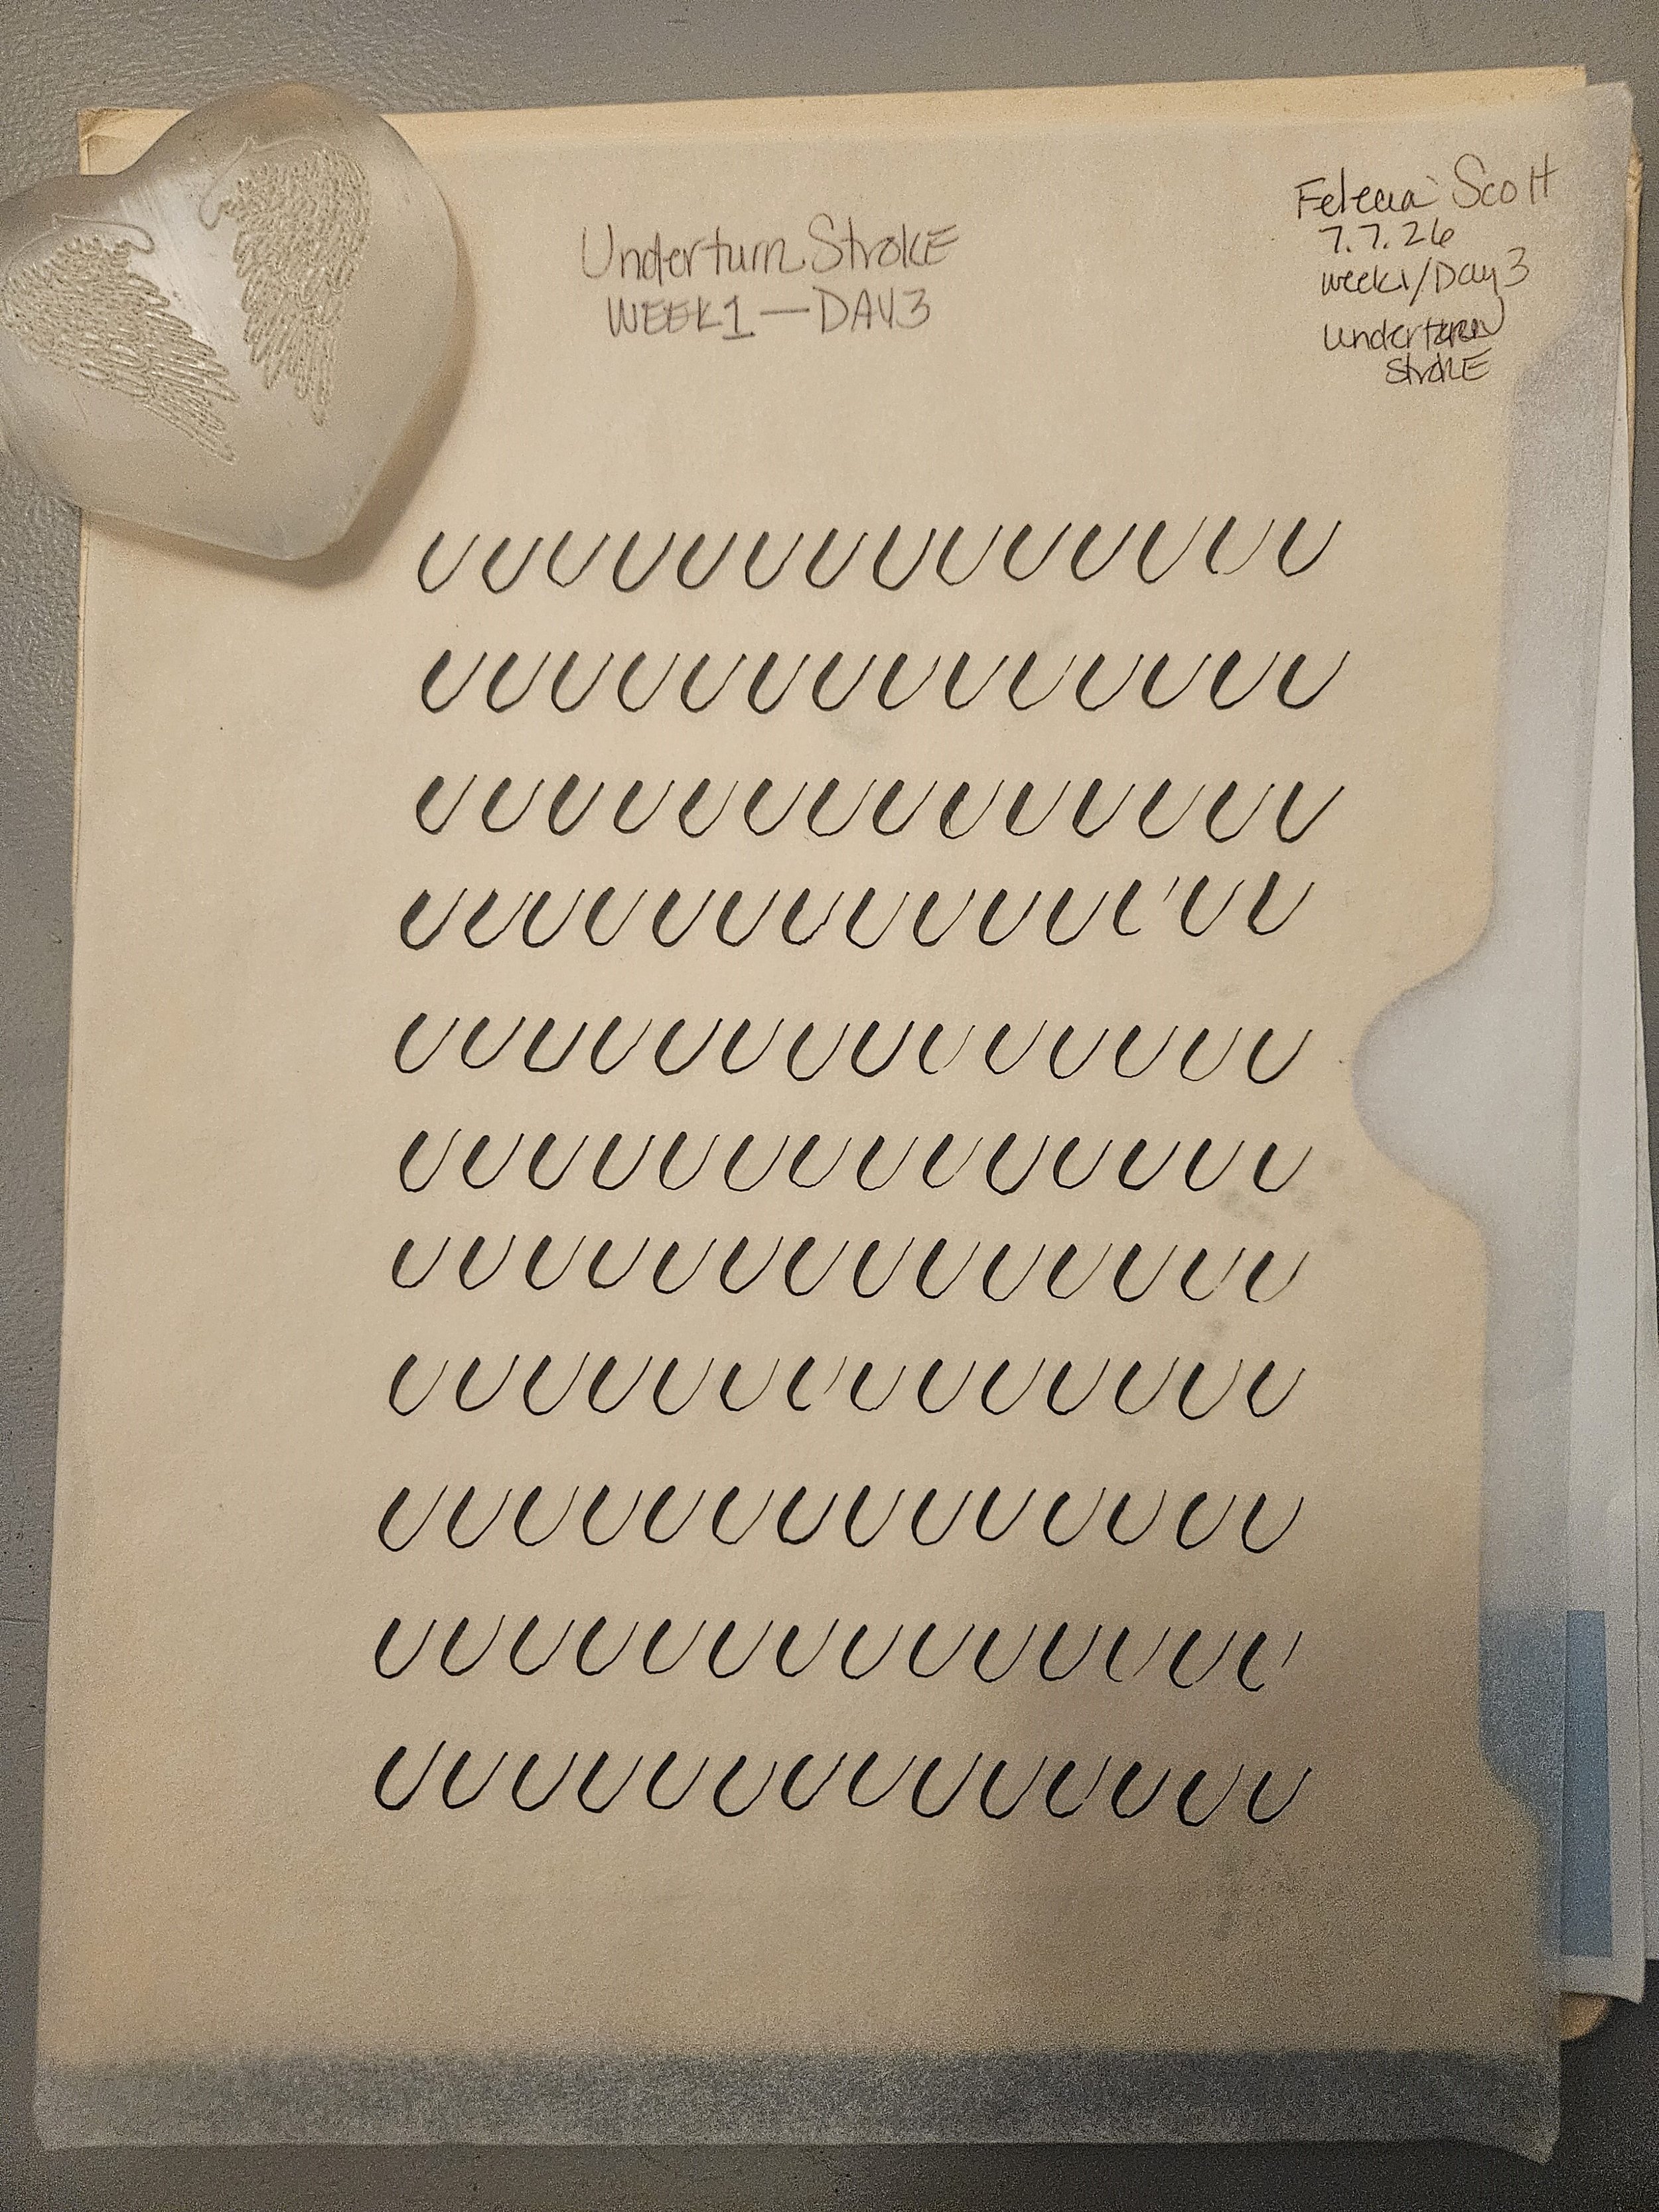
(Left) Underturn Practice Sheet (Credit Becca C. Rafter) @ The Happily Every Crafter (Right) My finished practice sheet for the Underturn Stroke.
This stroke was a bit easier for me than the Overturn Stroke. I really liked it. I still couldn’t get that smooth transition from the thick downstroke into the curve and connecting to the upstroke. My frustration level wasn’t as high as yesterday. So far, I will admit that the Undertone Stroke is my favorite.
I was able to do two practices. One in the morning and the other in the evening. The morning practice session were 30-minutes each. The evening session turned into an hour. I was so consumed and in complete concentration of practicing this stroke, I didn’t hear the alarm. It caught be my surprise because, I was looking around like, “What is that noise?” Whose alarm is that?” I laughed because I realized it was mine.
It’s okay to laugh and not be so serious all the time. Learning calligraphy or any hobby is supposed to be fun and not a chore. The strokes may not be perfect today, but they're better than yesterday—and that's enough for me.
Day 2: Overturn Stroke
The Overturn Stroke humbled and really got my attention because I struggled with this one.
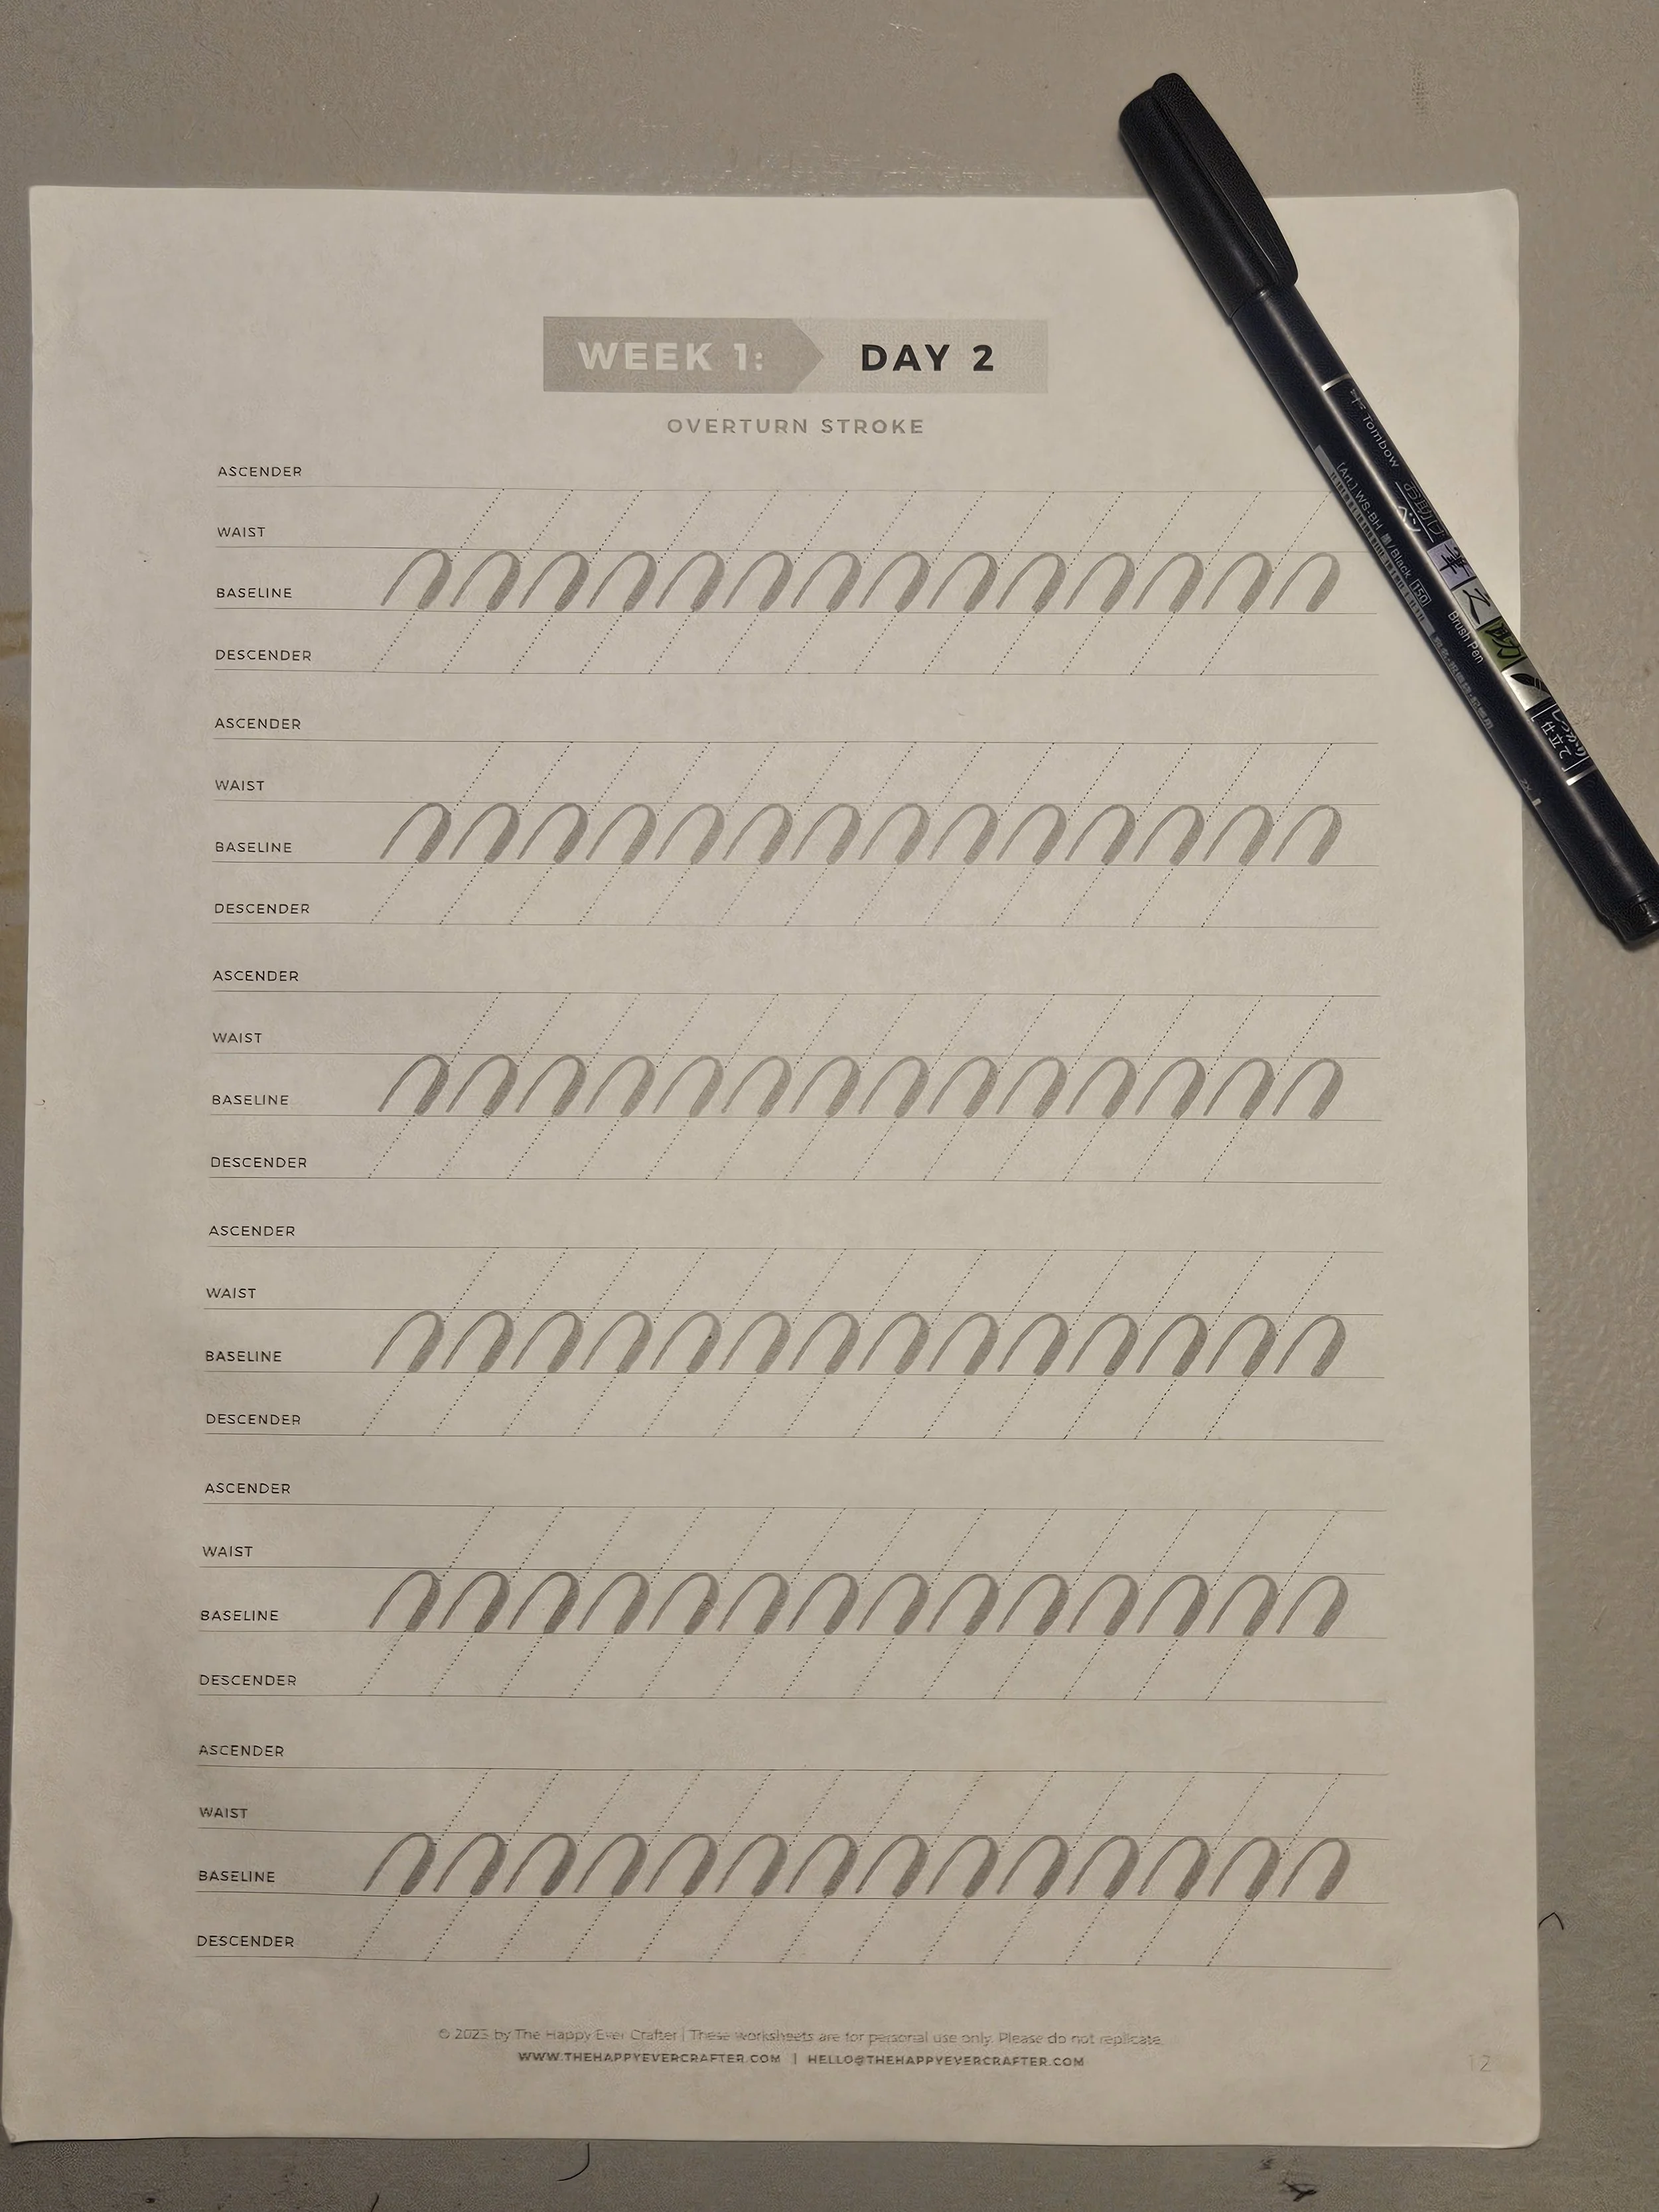
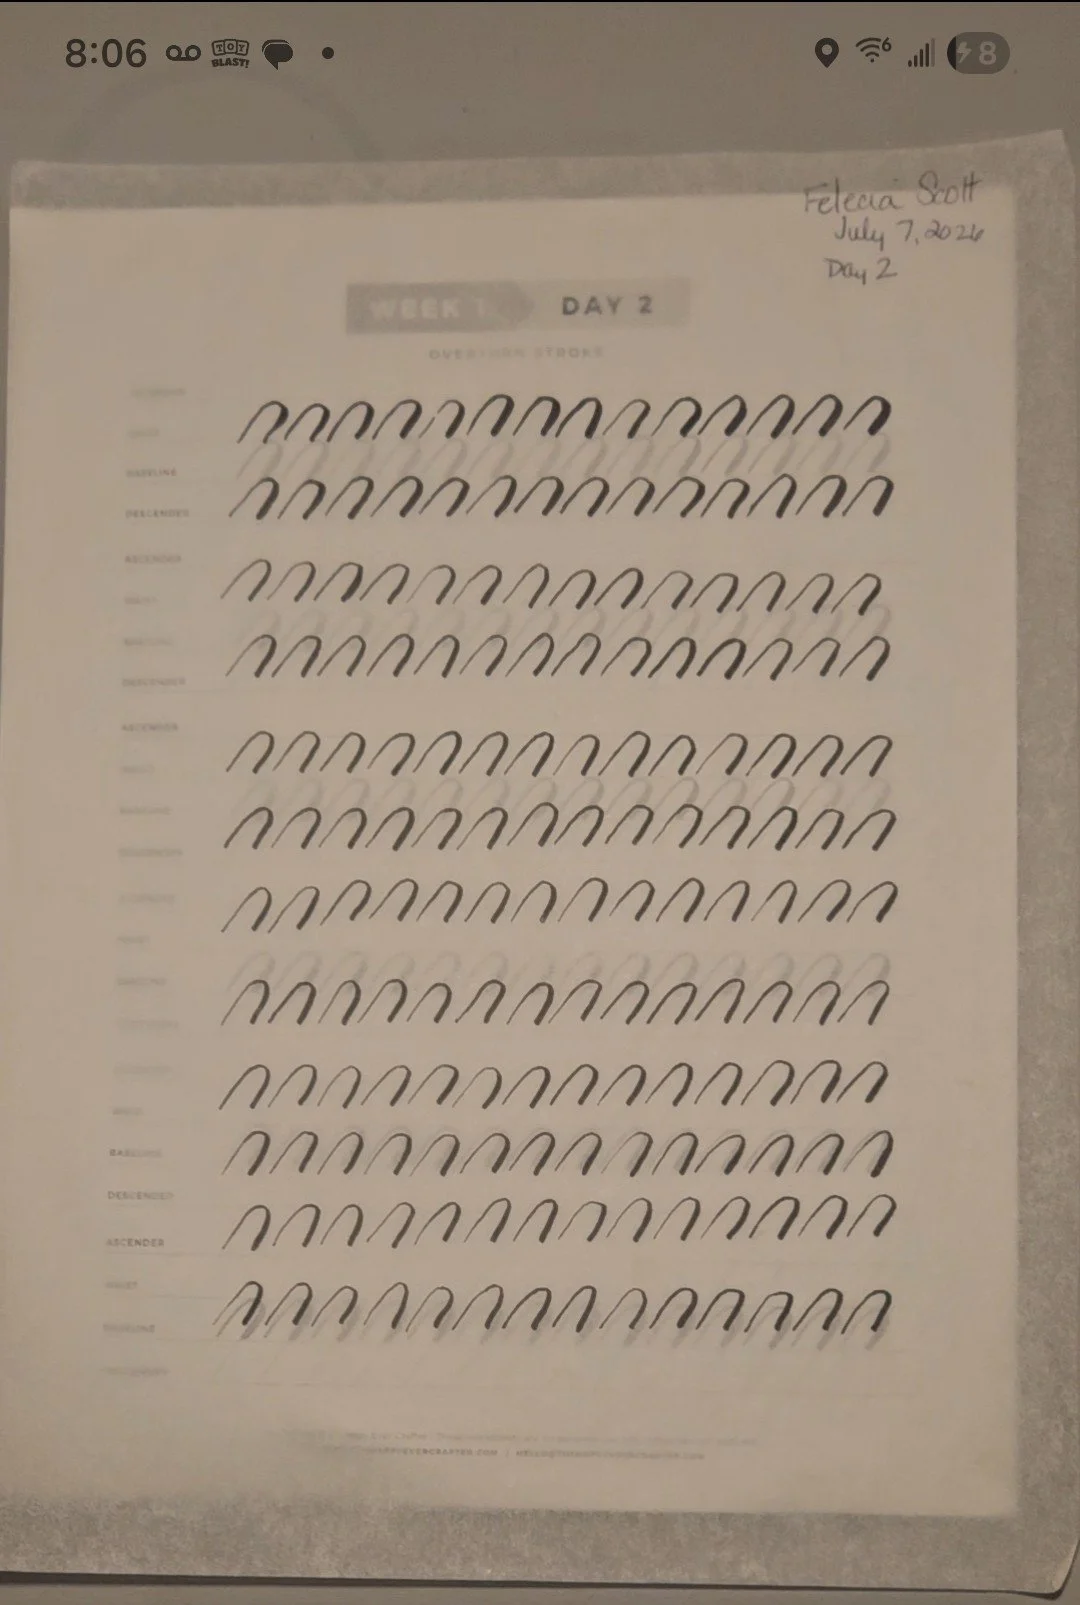
(Left) Overturn Practice Sheet (Credit Becca C. Rafter) @ The Happily Every Crafter (Right) My finished practice sheet for the Overturn Stroke.